|
Totoally updated FAQ with pictures
|
Talk about DREs, or anything else
|
See how much money I've wasted!
|
|
The Disc Read Error PS2 FAQ
By Col_Sandoz & XShady Version 0.97 (January 24, 2003) This document is a work in progress. |
| INDEX: 1. Intro 2. Warnings 3. Diagnoistic Mode 4. Cleaning the Laser 5. Do I need to adjust the voltage? 6. Clicking and Squeaking explained 7. Adjusting the Voltage 8. Disclaimer 9. Contact 10. Credits --Just Added: Adjusting Voltage on a Ver 4 or higher PS2 by Ylbissop (multiple sections are contained on each page, scroll down if you dont see the data you want) |
| DIAGNOSTIC MODE: This is the easiest thing you can do to attempt to fix your PS2, while it hardly ever works it only take a minute or two, and should be done first before you take apart your machine. 1) You must be in the "main menu" screen of the PS2 console, the first screen that comes up when you start with no disc in. 2) press the "triangle button" 3) Select "Console" from the top using the up directional buttons and press the "Triangle" button 4) Select "On" using the up and down directional buttons and press the "X" button 5) Insert a disc. The console automatically starts the diagnosis. |
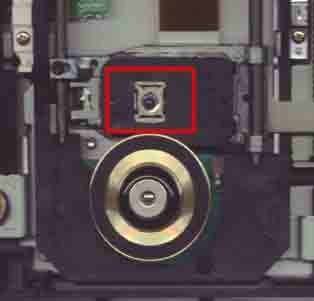
| CLEANING THE LASER: Required Materials: -Normal phillips head screwdriver -Jewelry (Small) phillips head screwdrivver -Q-Tip -Rubbing Alcohol (Isopropyl) Optional Materials: -Can of Air -Butter knife Taking the PS2 apart is fairly simple, nothing too complicating. All that you’re basically going to do is remove the upper shell, remove the lens cover, clean the lens, and put everything back together again. Just be sure to follow the steps, and read through each step and understand it before going through with it. Sometimes the instructions may seem a little too in depth or complicating, but just use your common sense and you should understand what I’m trying to say. It’s a lot easier if you print it out, as well. 1. Make sure that you have a neat, clean area set aside for taking the PS2 apart. A small box or cup to put screws in wouldn’t hurt, either. Flip your PS2 over so that the bottom (horizontally speaking) is facing up. There should be 6 screw covers, 4 plastic and 2 rubber, that need to be removed. You can use the butter knife for this, or your nails, whichever is easier. Screws should be uncovered under them. There should be 2-4 more screw covers on the outer side of the base, underneath the controller ports (where the system goes out a few inches from the base). The older model PS2’s have 4 screw covers, while the newer ones have only 2. Remove them all, and you should now have a total of 8-10 screws unveiled. Set the screw covers aside. 2. Using the normal sized phillips head screwdriver, remove all of the screws. REMEMBER where the longer screws go, or mark the holes with a piece of tape or anything that will remind you of which holes the long screws go into. If you do not remember where the long screws go, you could put a hole through a circuit board by trying to force the long screw in where it is not supposed to be. Make sure all of the screws are removed, and put them aside. 3. The PS2 shell should now be ready to remove. ONLY the UPPER side (with the PS2 logo) needs to be removed to clean the lens - Leave the BOTTOM side on. But, be very careful when taking the upper shell off, or you could damage the PS2. To take the shell off, you first should place the PS2 horizontally, with the PS2 logo facing up. Next, you need to move the side of the shell out a little, sideways, so that the Eject/Reset buttons are not blocking the shell, and it can be lifted off. Just play around with it a little and you should get it. Then, lift it at an angle, like opening the cover of a book. Take the bottom (Vertically speaking) of the shell, with the PS2 logo on it, and lift it an angle. You should notice a small wire around the area where the Reset/Eject buttons are. The wire should be taped to the top of the Lens cover. Remove the tape, and then carefully lift the cover so that it is laying flat, and the PS2 is open like a book, connected at the middle by the wire. The Lens is now almost accessible. 4. To gain access to the lens, you need to remove the lens cover. The lens cover is located right in the area where the PS2 ejects the tray out, just above the tray. It’s square shaped, and has a small white circle piece on it. To remove the lens cover, simply take out the 2-4 screws located on the side with the Jewelry screw driver. Place the screws aside, and lift the lens cover. You should now see the lens, a small circular glass piece located in the back of the disc tray. ***Optional*** 5. Now, the lens can finally be cleaned. Take the Q-Tip and swab it generously in the rubbing alcohol, but make sure that there’s not too much on it so that it’s dripping. Take the Q-Tip and carefully yet firmly rub the lens in a circular motion for a good 30 seconds. Then, flip the Q-Tip over to the dry side and dry it off in the same circular motions. The lens should now be clean. 6. All that’s left now is putting the PS2 back together, which should be fairly easy. Place the lens cover back on, making sure that it’s tight and snug in position. Screw it in place. Then, tape the wire back onto the lens cover and flip the shell back into place on the PS2. Screw the screws back in, making sure the longer screws are going into the correct holes. The screws don’t all have to be tight, so don’t sweat it if 1 or 2 of them aren’t seeming to fit into the holes all of the way, as long as they’re in the right holes. Put the screw covers back into place, and you’re done. Congratulations, your PS2 is now cleaned, and working like new, without having to spend a dime! Feel free to repeat this process in the future, as well, if Disc Read Errors ever occur again. |