Light Metering in Cameras
This article is not about how to prevent that from happening. But it will describe what is happening inside the camera. A better understanding of metering will help you to make better decisions on selecting the right exposure for the job.
An unfair match
 Lets start with the concept of
dynamic range.
Computers like to see things in absolute black and white values, but reality -especially the way
carbon-based life forms perceive it- is different. Our senses and brain do a wonderful job in
filtering and magnifying any signal that we process, so that we don't have to worry about any
'noise' in the background. There is no need to hear the wind blowing through the leaves when you're
standing right next to a working leafblower!
Lets start with the concept of
dynamic range.
Computers like to see things in absolute black and white values, but reality -especially the way
carbon-based life forms perceive it- is different. Our senses and brain do a wonderful job in
filtering and magnifying any signal that we process, so that we don't have to worry about any
'noise' in the background. There is no need to hear the wind blowing through the leaves when you're
standing right next to a working leafblower!Dynamic Range emphasizes the difference between the maximum and minimum value that we can distinguish. In case of vision: everything above 'maximum' will be rendered 'white', and everything below the 'minimum' threshold will be rendered black. On a bright summer day, you're sitting in the backyard. Now you're going into the kitchen to get something cool from the refrigerator. The first moment you step into the kitchen, you won't see a thing and everything looks black. That's dynamic range at work: everything you see is below the 'minimum' intensity level of light. Give your eyes a minute to adjust and you'll see fine; the dynamic range is adjusted to a lower intensity level. But as soon as you step outside, the light will be blindingly bright!
Carbon beats Silicon
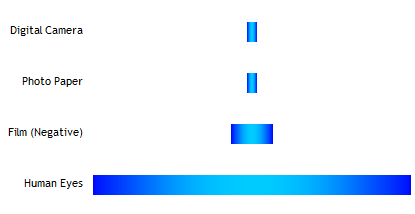 The real problem starts when we try to capture what we
see in an image - film or digital. And that is because the dynamic range of a camera is so much
smaller than that of an eye. The camera 'solves' the problem the same way we do - whatever is outside
the dynamic range is rendered either black or white, depending on where we put that dynamic range.
The real problem starts when we try to capture what we
see in an image - film or digital. And that is because the dynamic range of a camera is so much
smaller than that of an eye. The camera 'solves' the problem the same way we do - whatever is outside
the dynamic range is rendered either black or white, depending on where we put that dynamic range.That's why our picture of aunt Sue in the backyard has a white sky, while we are really sure that there was a beautiful blue sky that day. Reality is that you can have the sky blue, and your aunt displayed as a dark silhouette, or your aunt visible, and the sky badly overexposed. Getting both at the same time will be very, very hard.
Challenge
 So, what is it that our poor camera has to do? The good
thing is, that there aren't that many cases where we need the full dynamic range of the
human eye. Actually, that is a really good thing since the camera can't handle it.
The bad news is that the range that we do want to capture more than the camera is capable
of. Should the camera overexpose, or underexpose? Actually, the camera goes for the solution that
will make you unhappy on both ends of the spectrum: it compromises.
So, what is it that our poor camera has to do? The good
thing is, that there aren't that many cases where we need the full dynamic range of the
human eye. Actually, that is a really good thing since the camera can't handle it.
The bad news is that the range that we do want to capture more than the camera is capable
of. Should the camera overexpose, or underexpose? Actually, the camera goes for the solution that
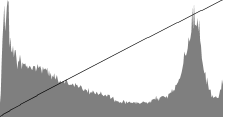
will make you unhappy on both ends of the spectrum: it compromises.The image shows a histogram, a chart that shows the number of pixels that have a certain intensity; from low (right) to high(left). The histogram is made of the picture at the top of the page. As we can see, there is a large amount of darker pixels (the foliage and trees), but still a good amount of lighter pixels (the road).
We can also see, looking at the picture, that the sky is overexposed, and the shadows in the trees are underexposed. A true compromise! But how did the camera get there?