Eye Candy 4000: Click on Eye Candy 4000 and then click on Demo.

My PSP8 Selections just click the folder:

My PSP7 Selections just click the folder:
Make a folder for these selections so you don't get them mixed up with your other selections. *S*
My Purple Critter hair:NOTE: The hair is saved and zipped with a psp extension. Just click the folder and open the hair in your PSP:
****NOTE: You are welcome to use your own colors just change the drop shadow colors to a darker shade of the color you have chosen. ****
1. Open a new 350x350 transparent image. Add a new layer and rename Feet. Load the purplecritterfeet.sel
2. Flood fill with black. Modify contract by 1 and flood fill with #7C35CB (or your choice of color). Invert and apply the following drop shadow:
V&H: 0 Opacity:100 Blur:25 Color: #340969
3. Deselect and add a 7% uniform noise. Then add the following Eye Candy Jiggle:
Bubble size: 5
Warp Amount: 5
Twist: 40
Movement Type: Brownian Motion
4. Add a new layer and rename Arms. Load the purplecritterarms.sel. On the same layer load the purplecritterhandlines.sel and flood fill with Black.**You may need to zoom in to fill the lines. Deselect and repeat steps 2 and 3. and SAVE.
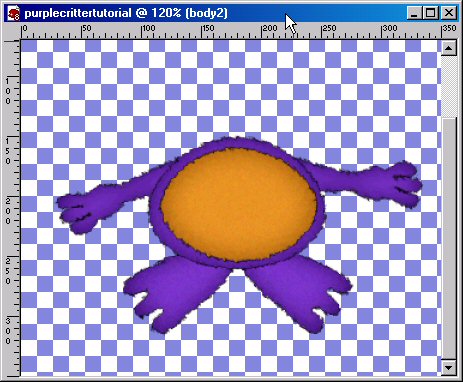
5. Add a new layer and rename Body1. Load the purplecritterbody1.sel. Again, repeat steps 2 and 3. ***EXCEPT change the blur to 35.*** SAVE
6. Add a new layer and rename Body2. Load the purplecritterbody2.sel. Repeat the same steps as you did in steps 2 and 3 but change the color of the body to #E79327. Again if you are using a different color change your drop color to a darker shade of the color you have chosen. The drop shadow color I used is #8E4F04. Rest of the settings are the same as you used for Body1. SAVE
7. Add a new layer and rename Face. Load the purplecritterface.sel. Change the color back to #7C35CB or the color you used to fill the feet, arms and body1. Repeat the same steps as you did in steps 2 and 3, changing the blur back to 25 and drop shadow back to #340969 SAVE
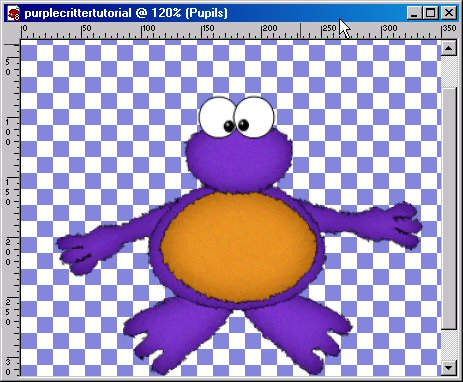
8. Add a new layer and rename Left Eye. Load the purplecritterleye.sel. Flood fill with Black. Modify contract by 1 and fill with White. Deselect and SAVE.
9. Add a new layer and rename Right Eye. Load the purplecritterreye.sel. Flood fill with Black. Modify contract by 1 and fill with White. Deselect and SAVE.
10. Add a new layer and rename Pupils. Load the purplecritterpupils.sel. Flood fill with Black and add the Round Inner Bevel. Deselect and SAVE.
11. Add a new layer and rename Beak. Load the purplecritterbeak.sel. Flood fill with Black. Modify contract by 1 and fill with 72AE72 or your choice of color.
Invert and add the same drop shadow settings as in step 2 but change the shadow color to #345E34 (or a darker color of the color you chose) Add the same noise and jiggle settings in step 3. SAVE
12. Add a new layer and rename Nostrils. Load the purplecritternostrils.sel. Flood fill with Black and add the Round Inner Bevel. Deselect and SAVE.
13.Add a new layer. Rename Belly Button. Load the purplecritterbellybutton.sel. Flood fill with Black and deselect. Add the Round Inner Bevel and SAVE.
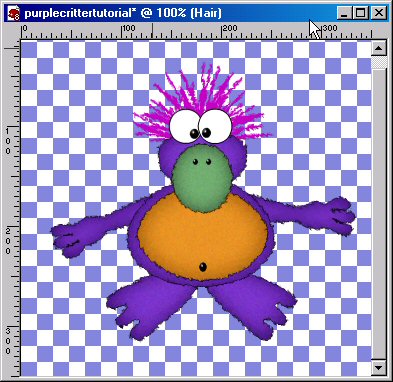
14. Add a new layer and rename Hair. Send this layer to the bottom below the feet layer but above layer 1. This way you can use layer 1 for a background if you like. *S*
You can either use the hair that I have offered for download or use your draw/pen tool to make your own hair. If you are making your own make sure your Stroke and Fill are set to the same color you have chosen for your hair.
When done either copying and pasting the hair or drawing your own add the same eye cand jiggle. SAVE.
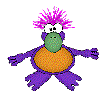
That's it you're done. Thank you so much for taking the time to do my tutorial. I hope that you have enjoyed doing this tutorial as much as I have making it. :o)
 Copyright
� August 16, 2003
Designs by Cheri All Rights
Reserved.
Copyright
� August 16, 2003
Designs by Cheri All Rights
Reserved.