|
Country Hutch

This tutorial is written in and for PSP Version 7 and assumes you have a working knowledge of PSP at a beginners level. I am sure this can easily be done in other versions of PSP but I have never worked with any of them but PSP 7.
This tutorial was written and created by me, Cheri Anderson. It is copyrighted by law and you may LINK to them only. Do not change the words, graphics, or any part of this tutorial around and reproduce it as your own without my written permission. Do not send this tutorial through the email, any type of mailing lists, Yahoo Groups or other sites. You may print and save this tutorial for your personal use only. Creations you make from this tutorial are YOUR creations and you may do what you like with them.
If you would like to use this tutorial for group lessons OR you are having trouble doing this tutorial, please contact me at Cheri
FOR THIS TUTORIAL YOU WILL NEED:
JASC's PSP (30 day free trial)- Just click the Paint Shop Pro 7 button 
Wood texture can be gotten HERE You need Wood020 or you can choose your own.
Dizzinz Dividers try the FIRST LINK
If that doesn't work try SECOND LINK
For the Fleuron font go HERE Choose the first one on the list.
****Just a Note: This tutorial will have some repositioning.****
1. Open 400 x 600 transparent background. Add a new layer
2. We are going to make a cupboard door. The doors will be repositioned but I�m giving you coordinates so that the positioning will be easier to do. Foreground color set to Black and Background color set to Pattern. Settings for pattern are Scale-100% Angle-90*
3. Pre Set Shape-Rounded Rectangle-Antialias Checked, rest unchecked and line width set to 1. Make a rectangle with the following coordinates. 50,400 to 80,500. Add the following inner bevel settings and save settings as Country Hutch as we will be using it through out the tutorial. 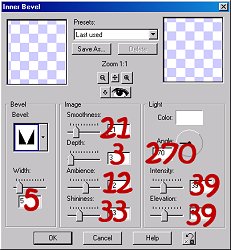
4. Duplicate 2 times and position the Rectangles side by side with the black showing some one each. (See Step 1 screen shot for placement) 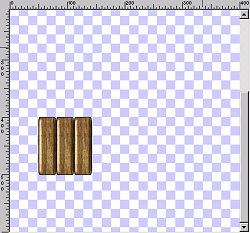
5. Add a new layer. Make another Rounded Rectangle with these coordinates. 50,380 to 142,400. Apply the Country Hutch Inner Bevel. Duplicate and with your Mover tool move it to the bottom�opposite of the one use just did. (See Step 2 screen shot for placement). 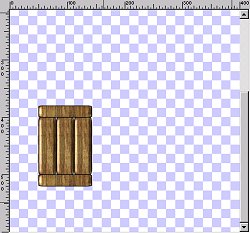
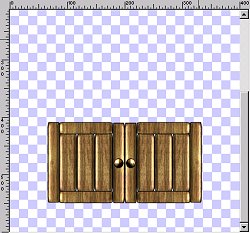
6. Add a new layer. Still using the Rounded Rectangle make another Rectangle with the following coordinates.30,380 to 50,520. Add the Country Hutch Inner Bevel and duplicate, mirror and with your Mover Tool Position it opposite the one you just did. (See Step 3 screen shot for placement). 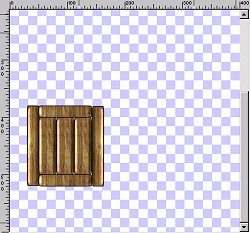
7. We are going to make the �knob� for the door now. Add a new layer. Change your Pre Set shape to Ellipse. Keep the settings the same. Make a small circle on the duplicated slat you just made. To get a even circle hold down your Shift key as you make your circle. Center your circle and add the Rounded Inner Bevel to it . Turn off visibility of layer 1 and merge the rest of the layers and rename Left Cupboard Door. Turn visibility of layer 1 back on. Add the following Drop Shadow: Vertical: -2, Horizontal:-2, Opacity:50, Blur:1.2 Color: Black
8. Duplicate Left Cupboard Door. Image-Mirror and rename Right Cupboard Door. We need to reposition the doors. With your Mover tool move both cupboards towards each other. The bottoms should be lined up with coordinate 550. The center of the two cupboards should be 200. For the bottom look at the arrows on the Mover tool. They should point to 550. The arrow pointing up towards the top of the canvas should read 200 in the center of the two cupboards. ***You�ll have a chance to fix it in a minute if you aren�t sure it�s lined up right. (See screen shot for placement)
9. Activate layer 1 and add a new layer. Change Pre Set shape to Rectangle with the same settings. Make a Rectangle with the following settings. 50,350 to 350,550. ****Make your adjustments with the cupboards if you need to.****Rename this layer Hutch Bottom Front. 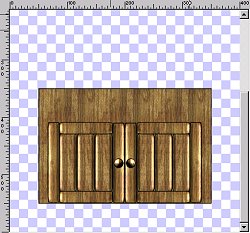
10. Activate Right Cupboard Door. Add a new layer. Change Pre Set shape to Rounded Rectangle and use the same settings. Make a Rectangle with the following coordinates. 30,350 to 50,570. Add the Country Hutch Inner Bevel. Rename Left Hutch Leg and add the following Drop Shadow. Vertical: 1, Horizontal: 2, Opacity: 50, Blur: 1.2 Color: Black. Duplicate, mirror and rename Right Hutch Leg. (See screen shot for leg placements). 
11. I felt I needed to make the bottom hutch top first before making the Drawers. I guess I just didn�t want the Drawers getting made too big and overlap the top. This way the top is defined and it keeps that from happening. Also I have coordinates for the drawers so it�s a double protection. *S*
Okay, change the Pre Set shape to Rectangle but this time check the �Create As Vector� box. You should still be on the Right Hutch Leg. Make a Rectangle with the following coordinates. 30,340 to 370,350. Click on your Object Selector and Node Edit. Move the top two Nodes out. (See Screen Shot for Node placement) Then click on Node Edit again and with the Deformation box around the Rectangle push down the top center node some to thin out the bottom hutch top some. Or if you want it that thick leave it as it is. *S* 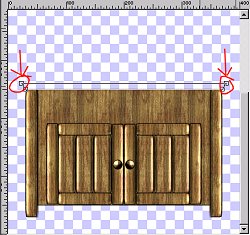
When you are done, Convert To Raster, add the Round Inner Bevel and rename Hutch Bottom Top.
12. Now for the drawers. *S* Add a new layer and change the Pre Set shape to Rounded Rectangle. Same settings but Uncheck �Create As Vector�. Make a Rectangle with the following coordinates. 55,360 to 195,400 Add the Country Hutch Inner Bevel.
13. Add a new layer and change the Pre Set shape to Ellipse and make a small circle for the drawer knob. Add the Round Inner Bevel. Turn off the visibility of all layers but the drawer and the knob. Merge these two layers and rename Left Drawer. Add the following Drop Shadow. Vertical: 2, Horizontal:-2, Opacity:50, Blur:1.2 Color: Black. 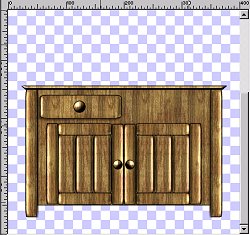
14. Duplicate the Left Drawer layer, mirror and rename Right Drawer.
15. Activate layer 1 and add a new layer. Change to Pre Set shape Rectangle with the same settings as we have been using. Make a Rectangle with the following coordinates: 60,100 to 340,360. (See screen shot for placement) Rename layer Hutch Back. 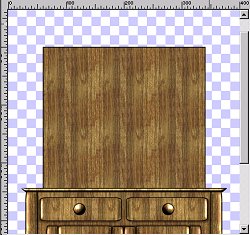
16. Add a new layer and change Pre Set shape to Rounded Rectangle. Make a Rectangle using the following coordinates: 40,100 to 60,350. Add the Country Hutch Bevel and apply the following Drop Shadow: Vertical: 1, Horizontal: 2, Opacity: 50, Blur: 1.2 Color: Black. Rename layer Left Side then duplicate, mirror and rename copy Right Side. (Screen shot of Left Side placement) 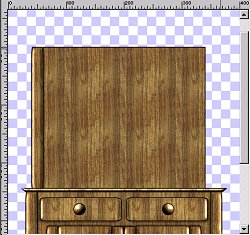
17. Activate Hutch Back layer and add a new layer. With the same Rounded Rectangle, make a Rectangle with the following coordinates: 50,270 to 350,280. Add the Rounded Inner Bevel. Rename Shelf 1, duplicate, mirror, rename Shelf 2 and position it where you would like it. (Screen shot of Shelf 1 placement) 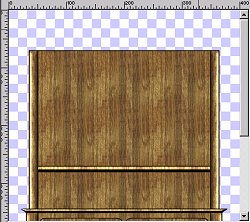
18. Activate Hutch Back layer again and go up to Selections-Select All-Float and add a new layer. Take your Airbrush tool with the following settings and spray in corners and here and there on the Hutch back. Shape: Round, Size 25, Hardness: 41, Opacity: 69, Step: 50, Density: 13. (See screen shot of airbrush placement) Add a Gaussian Blur of 3.00. Deselect, rename Shadow. 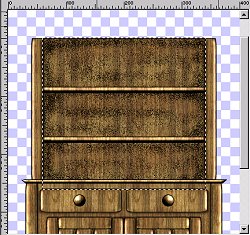
*We are going to merge the top part that we are working on. I want it smaller then what it is. If you like it the way it is, then move on to step�20�.
19. Turn off the visibility of all layers EXCEPT: Right Side, Left Side, Shelf 1, Shelf 2, Shadow, and Hutch Back. Merge these 6 layers and rename Hutch Top. Turn back on the visibility of all layers. Click on the Deformation Tool and bring in the sides as seen in the screen shot below. When done click on Apply and then sharpen your image. 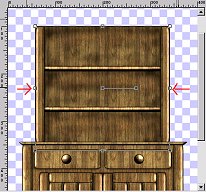
20. Activate the Right Drawer layer. Change the Pre Set shape to Rectangle and click on �Create As Vector� box. Rest of settings are the same as we have been using. I�m giving coordinates for the adjusted hutch top. What we are basically doing is adding a hutch top cover like we did for the bottom part of the hutch. You just need to make sure it looks like the screen shot as far as the shape and vector nodes. The only difference is the coordinates. Hope that made sense. *S*
Okay, make a rectangle with these coordinates: 60,90 to 338,100. **If you did not resize what you need to do is get the Rectangle to be 10 pixels thick/wide and the same length as the hutch top. Try to get it as close to the resized screen shot as you can.** Click on the Object Selector, Node Edit and move the top two nodes out. (See screen shot for Node placement) When done click on Node Edit again and with the Deformation box around image push down on top center node to make the Rectangle thinner. Or you can leave it like it is. Up to you. *S*. When satisfied, Convert to Raster, add the Round Inner Bevel and rename Hutch Top Cover. 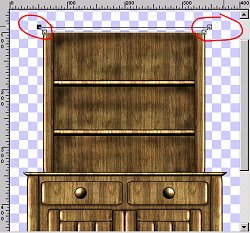
***Just a note, you may need to position this and if so just move it down until it butts up against the Hutch Top.***
21. Almost done *S* Now, click on your Text too. You can either use the fonts I am using or you can use your own.
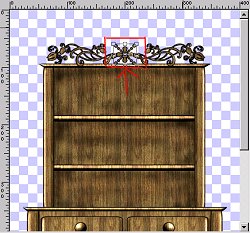
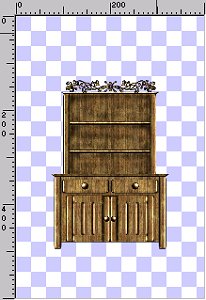
Leave your Stroke and Fill colors the same as we have been using. F- Black and B-Our wood pattern. Click on the Dizzinz Dividers Font. Size 35 Vector and Antialias checked. Type in a lower case G. Position as seen in screen shot below. Convert to Raster and apply the Country Hutch Inner Bevel. Rename Design 1 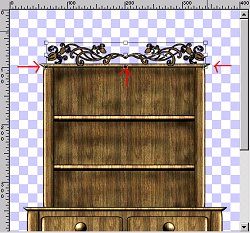
22. Click again on the Text tool. Change font to Fleurons. Size 40 Vector and Antialias checked. Type in a lower case E. Position as seen in screen shot below. Convert to Raster and apply the Country Hutch Inner Bevel. Rename Design 2 |
|