2. Attach a reflective surface to the cardboard.. The best method is to use aluminum foil and Elmers-type glue. Dribble the glue on the foil--not the cardboard--and spread it evenly over the entire strip of foil. Place the cardboard on top of the foil strip (easier than trying to move the glued foil) and apply pressure evenly over entire area. Flip the panel and smooth the foil onto the cardboard using a DRY cloth.
3. Repeat with additional strips until the entire side of cardboard is covered. Pay special attention to the seams. If possible, the seams should coincide with the folds in the cardboard.
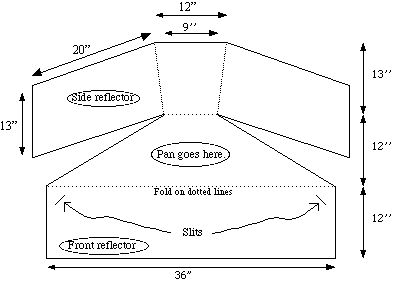
4. Cut the slits in the place shown above. Fold the panel, inserting the corners of the side reflectors into the slits.
5. To cook, place your food into a dark-colored pan. Put the lid on the pan and place it inside an oven bag (turkey bag). Seal off the bag with a "twisty-tie." Place the bag/pan assembly into the panel in the sun. For best results, the pan should be raised off the panel by placing it on something like a gas stove-top ring.