|
Home
Ishara-Sol
Tactics
Image
Gallery
Painting
Guide
Weapon
Swap Guide
Warp
Gate Terrain
|
|

|
Eldar Warp Gate Terrain |
|
|
There is nothing more satisfying than
vanquishing your enemies upon the alter of war, unfortunately
after a while even the greatest generals amongst us begin to
tire of the standard 'line up' and 'duke it out' style of
scenario and fortunately GW doth provide with missions like
'Take and Hold' and 'Sabotage' (yes there are others besides
Cleanse and Pitched Battle), but to show your genius these
require a rather large terrain feature so given my extreme
Eldar bias, what better to make than an Eldar Warp Gate.
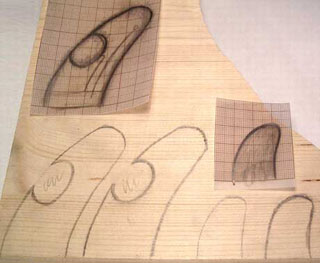
Using the images in the Eldar codex and the
Craftworld Codex for inspiration I made some sketches (I think
Jes' jobs safe) of what I wanted the project to finally look
like. (I do this for every project, and strangely enough the
end result never looks like the initial concept sketch). I
used these concept sketches to make templates for the major
structures before applying them to my chosen material (ok I'm
using wood, but I'd recommend using foam board about 2cm
thick, as it's easier to work with). |
|
|
|
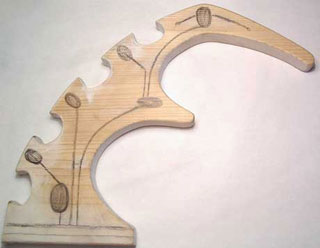
The blocks were then cut out and the edges
and surfaces smoothed over with fine polyfiller, at this point
I sketched the 'vein' lines on the blocks and marked out the
positions of the gems. |
|
|
|
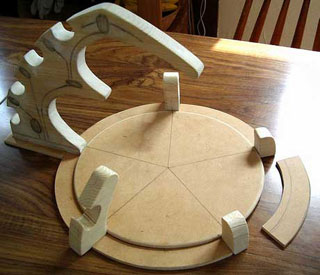
I then created the rounded base for the
model (and the area to fight over) using 1/2cm thick MDF,
beloved material of the DIY makeover shows which seam to be
perpetually on TV these days when there isn't a 'reality'
program. |
|
|
|
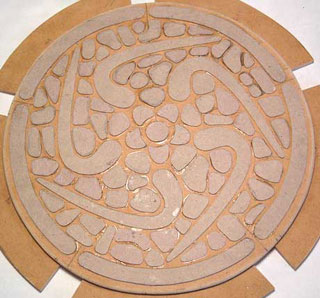
Being as it was a rather plain surface I
Eldar'd (tarted) the base up a bit with a cardboard over lay,
in a loosely inspired yin-yang symbol come turtle shell
effect, which was a nightmare to cut out, but the end effect
is well worth it. |
|
|
|
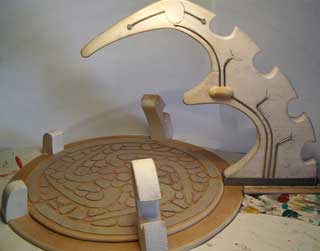
The next step was to acquire some metal wire
and suitable gem stones (from shops populated by hippies or
accessory shops populated by young girls [a hazardous
undertaking if you don't have the girlfriend in tow!]. After
experimenting with different types of wire (to make the veins)
I concluded that the easiest to use was solder wire (a soft
lead composite) as it is easily bent into shape with bare
hands and relatively cheap (electronics shops eg Maplins),
once cut to length the wire was placed in the appropriate
positions and glued in place. The gems are left unattached at
present as the model will be easier to paint without them.
Leaving the model looking like this: |
|
|
|
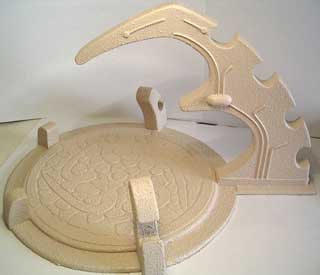
NB: I sanded a small piece of circular dowel
and attached it to the structure to add some more dimension
and clipped the small circular vein endings from a GW plastic
sprue.
With all the modeling done I primed the whole thing with a
coat of chaos black aerosol spray before applying a basecoat
of masonry paint, I say masonry paint, what I mean is normal
paint with sand mixed in, (I'd experiment with the mixture
first so you get the right consistency before applying it for
real). |
|
|
|
Then came the mildly boring task of washing
between the gaps and in the joints with a dark brown/red
colouring to match both the 'traditional' wraithbone aging and
the colour of my board. For those interested I used Bestial
brown and Dark flesh watered down by a stupid amount and
applied twice (a thicker amount was used around the veins). At
this point it was not looking very pretty (hence no photo) so
I dry brushed over it with the original paint colour (coffee
cream I believe) and painting the raised tiles on the base so
they contrasted. Finally I painted the veins in Boltgun metal
more for aesthetics than fluff consistence.
As I say you don't have to paint it like mine as quite frankly
you might hate it, but it's worth doing some paint tests to
see if the colours work first. In addition you may want to add
some transfers of decals to yours, I did stick some GW ones
on, but IMO they were too thick and didn't look that great
hence I unstuck them. |
|

|
The final task was the affix the gems and stop them cluttering
up my desk as they have been for the past 6 weeks (I work
slowly OK I do have a full time job). To do this I used
generous amounts of PVA glue mixed with some paint that was
the same colour as the gems.
|
|
|
|
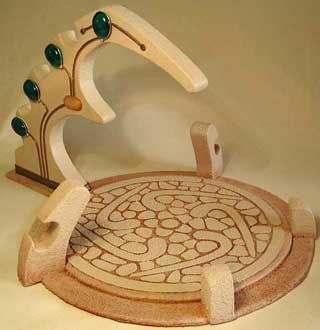
And there we have it. |
|
|