
|


|
|
When I made these little nav-button leaves, I found that I could reduce the size of the leaf by 20%; I did have to make its major axis horizontal for the text—text small enough to fit on the leaf was too small to be rotated, be made cutout, and remain legible. And I didn't follow the process I'd adapted from the Photoshop tutorial about icons to make the almost-gumdrop leaves on the previous page.
|
Instead, I took a shortcut that's proved more useful for objects with irregular shapes. Rather than creating inner highlights like those in the "aquified" translucent spheres—the icons and buttons one sees on the web—I made a selection of the leaf, created a new layer with the selection active, poured in a fairly complex gradient with a central major-axis highlight, warped the highlight upward into a convex shape (this adjusted the opacities of the gradient nicely), and there it was! Then I repeated this process and added some difficulty (a more irregularly shaped leaf) and, yes, it's repeatable and it works. So this page begins an irregular sort of tutorial on how to "aquify," or make a gel object (or gumdrop) of, all sorts of things with complex shapes.
|
|
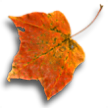
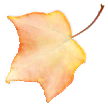
HERE ARE THE 'BEFORE' AND 'AFTER' LEAVES
|
|
I use and refer to PSP10; you can do this with PSP7 and later versions, and possibly PSP6; with PSP5 you'll have to make a mask to get a transparent-to-opaque gradient. The original leaf is from the PSP10 'Autumn Leaves' tube. You can also get it
from this file, or you can use your own picture of a three-lobed leaf. Besides a willingness to experiment and a good deal of patience, you won't need anything else.
If you're unsure that your proficiency with PSP is up to the challenge of adding opalescence to complex shapes, here are some relevant PSP tutorials:
Freehand Selection,
Layers,
Materials Palette v9 (includes gradients),
Gradient Editor v7+, and
Mesh Warp.
I have to assume that you're reasonably familiar with most of what these tutorials are about.
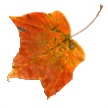
 The first step is to clean up: remove the drop shadow, repair the big tear on the left edge, maybe recolor the worst of those dark spots. The background eraser does a good job, but you'll need the normal eraser for some places along the outer edge of the leaf. When you're happy with the edge, select all again, reduce the selection area by clicking on the leaf, and de-select the stem; then save the selection—the outline of the leaf—to the alpha channel [Selections � Load/Save Selection � Save Selection to Alpha Channel]. We'll be using this selection repeatedly. The first step is to clean up: remove the drop shadow, repair the big tear on the left edge, maybe recolor the worst of those dark spots. The background eraser does a good job, but you'll need the normal eraser for some places along the outer edge of the leaf. When you're happy with the edge, select all again, reduce the selection area by clicking on the leaf, and de-select the stem; then save the selection—the outline of the leaf—to the alpha channel [Selections � Load/Save Selection � Save Selection to Alpha Channel]. We'll be using this selection repeatedly.
|
| Next comes an interesting part, making selections of the leaf's three lobes.
|
|
|
There's the leaf, and next to it the leaf with a few embellishments. First thing to do is activate the layer with the leaf on it (it should be the only layer so far). Next, create a new raster layer and activate it; then load the leaf-outline selection from the alpha channel where you saved it
|
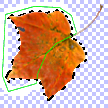
| [Selections � Load/Save Selection � Load Selection from Alpha Channel]. You'll see something like the second picture of the leaf (the selection marquee is black dotted lines) but without the green line. Now, with the new layer active, use the lasso (point-to-point or freehand if you're good at it) selection tool to de-select (ctrl + lasso) two of the leaf's three lobes. The green line shows where I decided on the lobe's border and added the rest of the leaf's outline. When you close the de-selection shape, you'll have just that right-hand lobe selected. Time to name this layer: "lowest lobe" or something. Save this selection to the alpha channel, too, and name it where the dialog box shows "Selection #2. Then repeat the process for the next lobe— new layer � (might as well name it: "top lobe") � load the leaf-outline selection from the alpha channel � de-select what you decide isn't the top lobe (just about the opposite of what you did for the bottom lobe) � close selection shape � save the selection to the alpha channel, and name it. Then do the middle lobe the same way. If you haven't done so already, save your image as a ".pspimage" now. (Don't worry that there's nothing visible on these new layers; there will be, soon.)
|
Now we come to another interesting part, making the gradients that will give the leaf its opalescent thickness. If you're really tired or jumpy, take a break or come back to this tomorrow. It's kind of exacting, but very rewarding after you've done it.
Ready? —on the layers palette, activate your bottom-lobe layer and load its selection, then go to the materials palette and access the gradients properties box. Make sure the thumbnail gradient is a simple linear one. Click "Edit." Now you'll see the interface of the gradient editor. Click "New" (you could edit an existing gradient and "Save As," but there's no sense risking the loss of a gradient if you forget to "Save As"). Name the gradient, and the gradient editor opens.
|
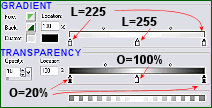
| Here's the lower half of the editor. The gradient color should be white in the middle and a little less white at the ends, its opacity 100% in the middle, 20% at the ends. Use the settings shown in the screenshot.
|
|
["L" = Lightness, as in
Hue-Saturation-Lightness;
"O" = Opacity (which is
100% minus transparency)]
|
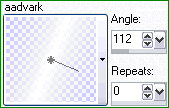
| Once you've entered the color- and opacity-values, click "Export," give the name again if necessary, and click "Save." Back at the Materials Palette, click the foreground square—on your new gradient—set its angle, click OK. Select the flood-fill tool and fill the selection. Save the file, activate the top-lobe layer, and repeat the process
|
|
| (after you change the angle of the gradient! I gave you the first angle). Now, look at the top lobe, twirl the gradient, fill; not right? undo and adjust the angle till the central part is over the vein in the leaf's upper lobe. (It doesn't have to be perfect, just close.) And do the same with the middle lobe's layer and selection, making the top and bottom lobes' layers invisible if that helps you see. Now you've got opalesent leaf on three layers. Save the file and congratulate yourself; bask in self-esteem awhile, for the next part is a little bit harder.
|
|


