|
STEP 1
Before you Begin:
Clear a good-size workspace with plenty of light.
It's best to avoid carpeted areas, which can quickly
accumulate component-destroying static electricity.
You'll need a Phillips-head screwdriver, a pair of
needle-nosed pliers, and plenty of time.
Gather all your components and unpack them to
confirm that everything is included. Remove the
computer case cover and lay it flat on your work
surface. Inside, you should find the AC power cable,
mounting brackets, and a bag of screws.
STEP 2
Prepare the
Motherboard
Most
of today's motherboards have only a few jumpers, and
you seldom need to deal with the ones that are
there. Usually, the default settings will work fine.
But read the manual for your motherboard carefully
to see if any need to be changed.
If
you purchased your motherboard along with a CPU and
RAM, these components may already be installed.
Otherwise, you'll need to do it. Lay the motherboard
on a flat surface and install the RAM into the RAM
sockets, beginning with the socket marked "Bank
0." Slide the module firmly into the socket. A
bracket on each side will snap into place when the
module is correctly seated. If you purchased
multiple modules, install the rest of them now.
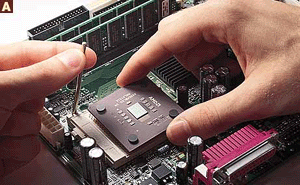
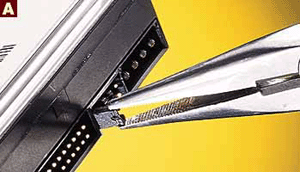
Work
very carefully when installing the CPU. Lift the
lever located on the side of the socket and
carefully insert the processor. As you do so, make
sure that pin 1 on the processor matches pin 1 on
the socket. The CPU will fit correctly only one way.
Hold the processor firmly in place and lock the
lever down (A).
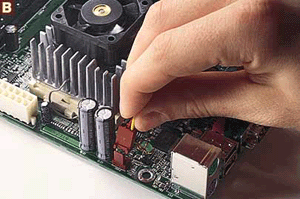
Install
the cooling fan/heat sink on the CPU (procedures
vary, so read the instructions carefully), and
attach the fan power connector to the connector on
the motherboard (B). (See the motherboard manual for
the correct location.)
STEP 3
Install the
Motherboard in the Case
Screw
in the metal standoffs (packed with the case
hardware) that will hold the motherboard in the case
(A).
Carefully
slide the board into place (B).
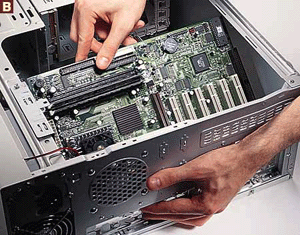
You'll
know it's correctly seated when the mounting holes
line up. Using the screws that came with the case,
mount the motherboard. Be careful not to overtighten
the screws, or you may damage the board.
Next,
hook up the small connectors for the case's on/off
switch, the reset button, speakers, and the
indicator lights (power and hard disk activity) to
the motherboard. See your motherboard manual for
details, and work carefully.
Finally,
connect the large power connector from the PC's
power supply to the motherboard. The connector will
fit only one way.
STEP 4
Install Drives
Using
the screws that came with the case, install the
floppy disk drive. (If you aren't sure where it
goes, look for the cutout in the front panel of the
case.)
Next,
make sure the jumpers on your EIDE hard drive (A),
CD-RW drive, and other drives are set
correctly.
Make
sure the data and power connectors on all drives are
facing inside the case.
Mount
your hard drive (or drives) in the appropriate
location, usually in bays in the middle of the case
near the motherboard. If you have two hard drives,
install the second one next to the primary drive to
make hooking up the cables easy.
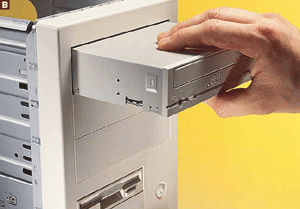
For
components, such as CD-RW drives, that you'll need
to access from the front of the case, you may have
to attach mounting brackets that came with the case.
Some cases don't require them. When you install the
drives, make sure that their fronts line up with the
front of the case (B).
STEP
5
Install Add-In Cards
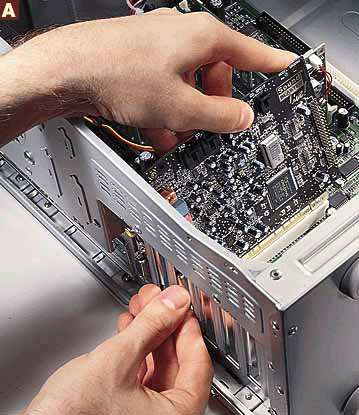
Press
firmly and evenly on each add-in card until the card
is seated properly in its slot; then screw the card
down using the set of screws that came with your
case (A).
STEP
6
Connect the Cables
It's
time to wire everything up. When making connections,
make sure that pin 1 of the wide data cables
(usually the red wire) connects to pin 1 of the
drive and motherboard connectors. (If you're lucky,
you'll have keyed connectors on the cables that fit
in only one way.) Note the beveled edge on the power
connectors and their sockets, but be careful: You
can force them in the wrong way.
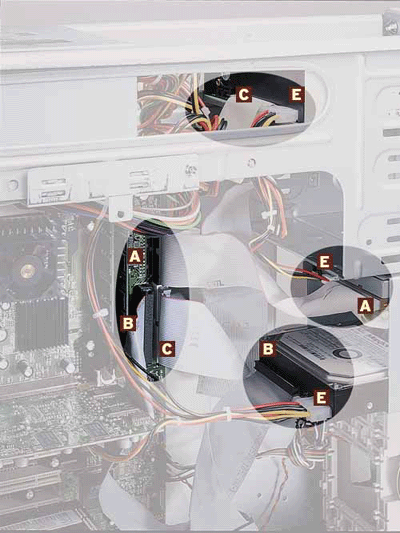
A.
Attach the floppy disk data cable from the drive
to the floppy connector on the motherboard.
B.
Plug the wide data cable into the primary EIDE
channel connector on the motherboard and into the
first hard drive on the other end. If you have a
second drive on that channel, attach the second
connector on the cable to it. (It doesn't matter
which connector you use on which drive.)
C.
Connect a wide data cable from the secondary
EIDE connector on the motherboard to your CD-RW
drive. Attach the second connector to the second
EIDE drive on that channel (if any).
D.
Run the thin audio cable (not pictured) from the
rear of your CD-ROM or DVD-ROM drive to the
appropriate connector on the sound card--or to the
motherboard, if you're using its built-in sound
support.
E.
Plug power connectors into your floppy drive;
your hard drive(s); your CD-ROM, CD-RW, or DVD-ROM
drives; and any other removable-media drives.
Other
drives (such as a DVD-ROM) may have additional
cables. Follow the directions that came with the
drive to connect these cables correctly. If you run
out of power leads, purchase a "Y"
connector to add a lead.
STEP 7
Connect External
Peripherals
Plug
the keyboard and mouse into the appropriate
connectors on the back of the case. Also hook up
your monitor, speakers, printer, and other devices
(such as network or modem cables). Finally, plug the
AC cord from the power supply into the wall.
*Now
you need to move on to installing the software.
*Information
and images are from BUILDACOMPUTER.net
|