 |
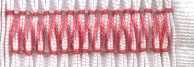
 1. Bring the needle up between the first two pleats to be stitched on the right hand side of the fabric. Take the thread through to the left hand side of the second pleat. 1. Bring the needle up between the first two pleats to be stitched on the right hand side of the fabric. Take the thread through to the left hand side of the second pleat. |
 |
2. Keeping thread over needle take a backstitch through pleats one and two. (I have found that angling the needle ever so slightly as you do this second stitch will make it easier to keep the stitch straight and even in depth. Also, take care not to pierce the threads of the first stitch (otherwise... and not that you will need to, *smile* , unpicking in the event of a mistake, will be a nightmare!) |
 |
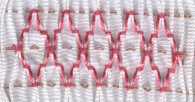
3. Thread still over needle, follow pleat two down to the bottom gathering row and take a stitch through pleats two and three (an old pleat and a new one) |
 |
4. Thread under needle, make a backstitch through these two pleats again. |
 |
5. Thread still under needle, travel up on pleat three and make a stitch through pleats three and four (old pleat and a new pleat) . |
 |
6. Changing thread to over needle, backstitch through pleats three and four a second time. |
 |
7. Continue across row in this manner. |
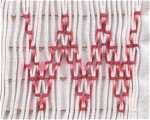
| 1. Begin as before, and bring the needle up between the first two pleats to be stitched on the right hand side of the fabric.Take the thread through to the left side of the second pleat (as if taking a stitch) and keeping thread over needle take a backstitch through pleats one and two. |
| 2. Follow second pleat down to the half space mark between gathering rows and take a stitch through pleats two and three. Changing thread to over needle position, secure these pleats with a backstitch. |
 |
| 3. Still with thread over needle, travel down the third pleat to the bottom gathering row and stitch through pleats three and four. Restitch with a backstitch. |
 |
| 4. Continue working down in this manner until the bottom of the wave is reached and then changing thread to the under needle position, work back up, a half space at a time in the same manner. |
 |