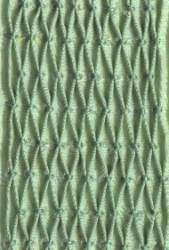
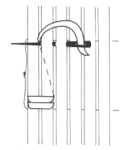
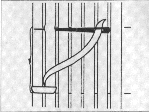
1. Working from left to right and beginning on the bottom gathering thread, (row 2) start by inserting the needle right to left in the first pleat to secure the knot. Pick up the first two pleats together with an under cable. 1. Working from left to right and beginning on the bottom gathering thread, (row 2) start by inserting the needle right to left in the first pleat to secure the knot. Pick up the first two pleats together with an under cable. |
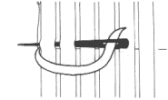 |
| 2. Take another stitch on the same two pleats (inserting your needle through the the same exit point as your first stitch), but leave the needle in the back of your work this time, pointing up to the top gathering row. Don't rush it. It is slow going but the extra care now will show in the finished work. |
 |
| 3. Bring needle back to the surface through the valley between the first and second pleats level with the top gathering thread (row 1) and pull thread through. With thread over needle pick up the second and third pleats together. Keep needle the horizontal. (The dotted line in these diagrams represent the thread under the fabric) |
 |
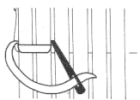
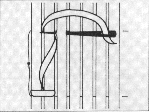
| 4. Make an over cable over these same two pleats with the thread over the needle and leave the needle in the back pointing down to the bottom gathering row (inserting your needle through the the same exit point as your first stitch). |
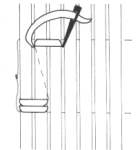 |
| 5. Bring the needle to the front through the valley of the previous pleats you stitched together on the bottom gathering row, level with the bottom gathering row. Notice that the rule here is to always pick up the last pleat you have just stitched and the next new pleat as you move across the row stitching the pleats together in twos. |
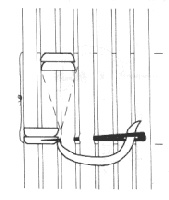 |
6. Back stitch these pleats with an under cable and continue across the row in this manner. Keep checking all pleats have been stitched and only two at a time. I assure you that it frustrating to find that you've missed the count later on. So go slowly and keep checking now.
7. Start the next row of stitching, as before, with an undercable level with gathering row 4. The back of your finished work should have bands of stitching with an unstitched row in between. |
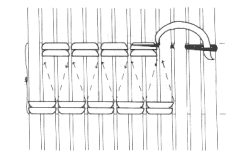 |
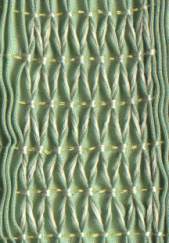
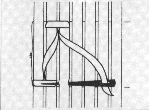
1. Begin the row by inserting the needle right to left into the first pleat (to secure the knot). Pick up the second pleat with an under cable stitch level with the bottom gathering row.
2. Keeping the thread under the needle, pick up this second pleat again, while keeping level with the top gathering thread. |
 |
| 3. Change the thread position to over the needle and pick up the next pleat to complete a top level cable stitch |
 |
4.Thread still over the needle, move back down to the bottom gathering row and pick up this third pleat again.
5. Thread under needle, stitch a bottom level cable. |
 |
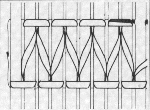
| 6. Continue across the row in this manner. The second row is worked directly under the first one, from left to right, beginning with an over cable and going down to the bottom gathering row, etc and so forming the bottoms of the diamonds. |
 |