Cable Stitch and Variations

Cable Stitch

A firm stitch that does not stretch too easily. Used as a border row in many smocking designs. (Acts an anchor row to keep the pleats aligned.) Also acts as a guide for sewing on piping prior to attaching the yoke. This stitch is also used for backsmocking and in picture smocking.


  1. Start by bringing the needle up to the left of the first pleat. With thread under needle, pick up the second pleat, inserting the needle from right to left. This is called an under cable. Give a gentle tug upward as you finish the stitch. cable stitch 1
  2. The third pleat is picked up in the same manner but with the thread above the needle. (An over cable.) Gently pull the thread down as you finish the stitch.

cable stitch 2
  3. Continue across the row in this manner with the thread alternating above below and above the needle. Use your needle to push stray stitches into alignment. Remember to always keep your needle parallel to the gathering row as you sew and you cable stitch will sit straight. cable stitch 3


Double Cable Stitch

Resembling the links of a chain, two parallel rows of cable stitch worked so that they touch.


  1. Stitch one row of cable stitch beginning with an under cable.

  2.Stitch a second row of cable stitch beginning with an over cable.This row is stitched so that the two rows kiss but don't overlap
double cable stitch


Alternating Cable Stitch

Makes a very effective border when worked in contrasting colours.


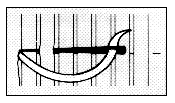
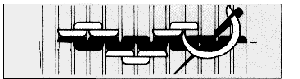
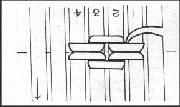
  1. Stitch a base row of cable beginning with an over cable.(Represented by dark thread in diagram).

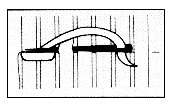
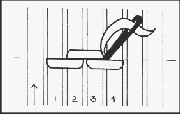
  2. With a new thread, stitch the first three cables of the alternating row directly above (as with Double Cable Stitch). As you do the third cable, instead of stitching through the pleat on the straight, angle the needle down through this pleat to below the base cable row, and bring your needle out here.

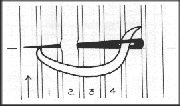
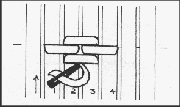
  3. Stitch the next three pleats in the same manner, beginning with an over cable, angling the needle back up through the pleat with the third cable.
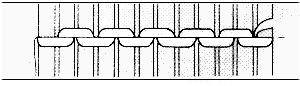
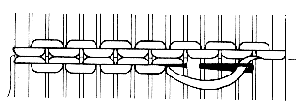
Continue along the row alternating three cables above base row and then three cables below. When worked correctly there should be one unworked cable between each group of three on alternating rows.
alternating Cable


Small Flowerette

Small detached groups of cable, flowerettes can be used to add small areas of colour to give impact to a design.


  1. Start by working three cable stitches, beginning with an under cable.
  2. Take the needle to back of work exactly where it came out. Turn work upside down.
  3. Make an under cable to match with the middle cable in the first row. Take needle to back of work, take a backstitch and tie off.


Large Flowerette

  1. Start by working three cable stitches, beginning with an under cable.Take the needle to back of work exactly where it came out. Turn work upside down.

  2. Directly above your last stitch, mirror with three cables. Take needle to back of work, take a backstitch and tie off.
large flowerette4


  Click on images below for examples of cable stitch used on child's dress.
bishop2


Next Page          Back to the smocking index


1