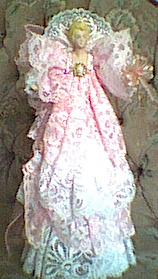
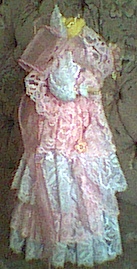
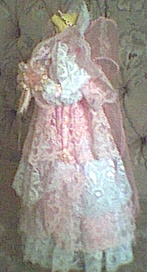
Step 1)
ONLY do this step: IF YOU DON'T have a Plastic cone with the head and arms attached. Put glue into the head portion and set it over the tip of the cone, hold it in place till it sets. then put glue into an arm before sliding an end of the pipecleaner into it. Repeat with the other arm. Then be careful when you glue the pipecleaner to the cone just below the chest and back of the porcelain head piece you will crisscross it at the back so make sure your hands end up facing the right direction. (don't worry if the arms appear long, you can bend the pipecleaner to the length of arm you wish.)
Step 2)
Cut 2/3 the white lace (4 in. height) laying it flat in front of you, then use a basting stitch to gather the lace. Once all the lace is on the thread then lift and place this first row of lace along the lower part of the plastic cone till the bottom of the lace just touches the table you are working on.. Tie at the back and then use small amount of glue to keep the lace in place.(about four places round the cone)
Step 3)
Now repeat with the Pink lace (4 in. height) tie the gathered lace the same way at the back of the cone, leaving about an inch of the white lace showing beneath. Glue it in place. Now add another row of white, and then pink lace (make sure when you are adding the final row of pink lace it gets tucked and glued under the porcelain chest and back.) You should have 4 rows of lace. (2 white and 2 pink)
Step 4)
For the Sleeve: Use the white 2 in. lace (about 6 inches length) gather the same as you did for the lace on the body. slide lace over an arm to just below the shoulder tie it there, glue to the underside of the porcelain shoulder. Repeat with other arm.
Step 5)
Cut a piece of 2 in. pink lace just big enough to lightly gather and wrap round the arm (over the white lace) Use small amout of glue to hold it in place. To finish off the arm cut a piece of small ribbon to wrap round the cuff of the sleeve making sure to gather the white lace tightly as you do this.
Step 6)
With the same small ribbon use it to make a "V" shaped neckline or a "Square" neckline this is to help hide the edges of the lace that have been glued to the underside of the porcelain. and gives a nice touch to the body of the dress. You could also add a decorative button for a brooch. I also used two buttons to lift a bit of the lace on the sides of the dress.
Step 7)
For the halo use the braided cord, cut a piece and glue the ends together before glueing to the back of the angel's head. Then add a lace halo to the back of her head as well. (this hides the joint in the braided cord.)
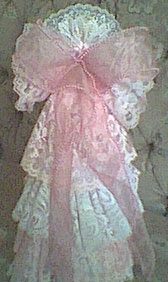
Step 8)
Lastly You will need to Cut a good length of the sheer ribbon for the bow in the back. Do not tie the ribbon, stitch it together, it has a much nicer finished look this way.
|