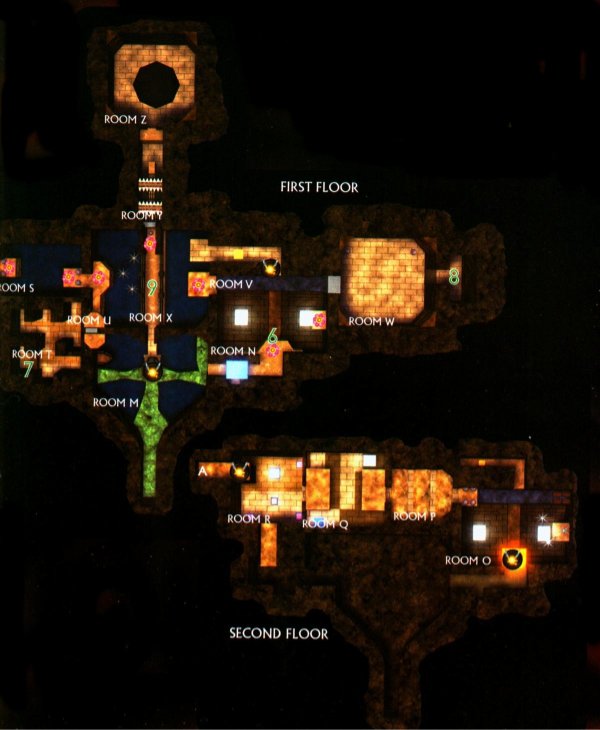
Now that the temple is flipped upside-down, everything is the opposite of what it used to be.if it has water in it, it is bone dry. And many rooms now have long catwalks running across for long distances. Your task in this room is to grab the fairy in the chest, which is fairy #8, and to exit through the hallway to the right, leading into the next room.
Step 14: Rooms N and O
Use the light arrows to demolish the sunblock, then turn into deku Link. You will notice air vents to the left and right, like the ones you used in room J. What you need to do first, is to rescue another fairy here. Fairy #9 is in a little niche. The deku flower doesn;t have enough power to launch deku Link over there, so you need to use the vent to the right to get to the opposite wall, then glide down to the niche. Next, fly over to the pressure switch on the east side of the room about halfway up the wall on a ledge. Leave a shell of regular Link to weigh it down and then fly over to the ledge with the chest (no longer surrounded by flames) on the south wall, to get fairy #10. Hop down to the bridge below, head down the corridor to the north, and step on the switch. This reveals a chest on the opposite side of the bridge that contains an important small key. Grab it, then launch yourself ot the ledge at the top of the room in the northwest corner. Before you exit, be sre to shoot an arrow at the sun mark to reveal a treasure chest for your return trip!
Step 15: Room P
This room now has lava dripping from the ceiling. But you can still cross it without getting hurt. By standing on the ledge where lava isn't dripping, shoot the spider mark to flip the room upside down. Now turn into goron Link and cross the lava. Then once at the other platform flip the room over again, and exit through the door.
Step 16: Room Q
The object here is to move the stone block into the little groove where it fits perfectly. But you can't get it there without flipping the room. So really, just move the block as far as you can to the groove, then flip the room (the spider mark). Then push as far as you can, then flip again. Simple as that. And be sure to refill on magic and arrows if you need to (can't find them? That's what the yellow and green chuchu's are for ;) ). Putting the block in the groove lets you go to the next room.
Step 17: Room R
Step in this room, you are locked in. Look familiar? Yeah, it's the wizrobe again. This time he is using lava, like in the Ancient Castle of Ikana. Dodge the lava, and use the exact same tactics as before. Three hits and he starts to use his teleport move. Three hits on this form and you are done. Defeating the wizrobe leaves you fairy #11. Grab it from the chest and exit the room.
Step 18: Rooms S and T
There are four poes in this room. Poes are shy, and if you use z-targeting on them, they will disappear. Defeat them if you want. Then hop into the deku flower as deku Link and launch yourself across the room. On the other side, to the south, is the entrance to room T. Launch yourself over there. If you want a difficult battle, wear no masks. But the easiest way to get by is to wear the Stone Mask. In this room four death armos guard a chest with a small key. If you are wearing the stone mask you can just run straight to it and grab it and be done with it. But if you aren't wearing it, then shoot the death armos with a light arrow on the sheild. It will flip over and try to land on you, where it will explode. Escape this and repeat on the other Death Armos. They leave behind green potions, so that will help a lot because using the Light Arrows will take up a lot of magic. To get the small key, place a shell (using the Elegy of Emptiness) on the switch and grab the key from the chest that appears.
Step 19: Room U
Go back to room S, exit through the door there and take an immidiate right. Wearing the stone mask will help here because you need to exit through the door to the right, which leads into a little cove guarded by another death armos. Step on the switch. This causes a treasure chest to appear on the ceiling. Now head back to Room U. Use your bow to take care of the hanging mines in the alcove halfway through the room. Deku glide your way to this alcove, get in the deku flower there, make it to the other side, and exit through the door there.
Step 20: Rooms V and W
As you are in Room V, which is just a bridge with blue bubbles in it, run through it and watch out for the blue bubbles so you don't get cursed. If you do get cursed, then just play the Song of Storms. Make sure you have lots of magic and that you aren't cursed before you enter Room W. Room W contains the final sub-boss, Gomess. Have your light arrows out, and be sure that he is z-targeted. Also make sure to be wearing the Bunny Hood. Gomess is just a giant swordsman shrouded in bats. You cannot attack him unless you get rid of the bats. To do this, shoot a light arrow at him. Then rush in and get as many sword hits on him as you can. Watch out for his long scythe! This has a long reach, so watch out for it. After defeating Gomess, grab the Boss Key, and then use the Song of Soaring to warp back to the entrance of the temple.
Step 21: Rooms X and Y
As you come back to room M, look up on the ceiling to the treasure chest that you uncovered in the alcove with the death armos. Hookshot your way up to that chest. Use the small key to get into room X. Defeat the eyegore with four shots to the eye when it turns yellow. This time the eyegore uses lasers! When you defeat the eyegore, and big chest appears. This contains a very important item. Open the chest, and you get the Giant's Mask. This mask turns you into a giant. It can only be used in this temple's boss room, and it uses up a lot of magic. Enter room Y, and shoot the crystal switch to cause a chest to appear. Now, you can either continue your way to the boss chamber, or you can collect the rest of the fairies in the temple.
Step 22: Grabbing the Remaining Fairies
Now you need to go and flip the temple again to collect the rest of the fairies. So go outside, shoot the spider mark, and come back into room A. The first of these last four fairies to collect is in the little pit in the center of the room. Open the chest and claim fairy #12.
Step 23: Room E
Next, head to Room E. Use your light arrows to melt the two sun blocks on both sides of the bridge. Porpoise jump your way into the fenced area on the right side. Defeat the beamos by planting a bomb by it, then watchout! Then strike the crystal switch. Another fairy forms in a chest on the opposite side. Porpoise jump there to get fairy #13.
Step 24: Room F
Swim through the underwater passage to room F. Locate the sun mark under a platform. Jump on top of the platform and grab fairy #14 inside the chest.
Step 25: Room K
This is the last fairy to collect, and you just uncovered it a few minutes ago. Step into the room, jump on the floor, and grab the fairy inside the chest. Fairy #15 is now in your hands! Use the Song of Soaring to warp back to the beginning of the temple.
Step 26: To the Boss's Lair
Before heading to the Boss's Chamber, you will probably want to head to the Great Fairy's Fountain to regain health, and collect the Great Fairy's Sword. Also bringing in some green potions would help. Now, to get to the boss chamber, you need to flip the temple upside down. Then head through room X. In room Y you need to watch out for the spiked logs. You can make him hookshot to the opened chest at the ceiling of the room to get past them, then into the Boss's Chamber.

As for the ones who want to attack it from the ground, you will have a very hard time. Your best chance is to use the Great Fairy's Sword to attack the head and tail. Another way to attack it is to use arrows. These are much harder and most likely you won't get much damage done. So you will probably wanna switch to be big.
After you defeat Twinmold, grab the heart container and the Remain's Mask. You have now beaten Twinmold and are ready for the final battle with the final boss!