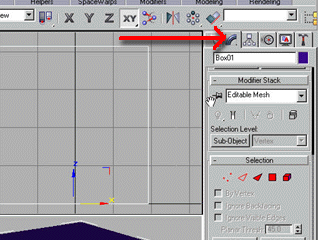
xxxxxxxxxxxxxxxxxxxxxxxxxxx xxx |
|
|
OK novices, I have had a good deal of feedback on the tutorial and the one thing that keeps coming up is questions about the tools that you have to use on the model. Here i am going to try to give you a basic rundown on the tools associated with the "Editable Mesh" that we create for the tutorial. To begin with we have a real first-timers look at the tab panel on the right of the interface. |
|
![]() |
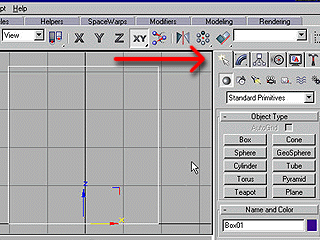
Here is the technical arrow pointing at the "Create " tab. For the purposes of the tutorial our main interest here is to draw our box. If you click on the "Box" button the cursor will become a cross-hair in the viewport areas and allow you to click and drag a box. Dont forget that drawing a 3D object is a 3 stage process. First you drag the length and width then you do the height. I have already drawn the box here. |
![]() |
Next we flip into the "Modify" panel and we can now get stuck into our box properly. Here I have already converted the box to an editable mesh. Prior to this operation there were input fields for all of the values that go to create our venerable box object. Length, width, and height plus the sections horizontally and vertically which I tell you how to set back in the tutorial proper. |
![]() |
Here I am demonstrating the step that collapses your box to an editable mesh. The panel for this operation pops out from the down arrow of the field next to the symbol of a pushpin. |
|
|
Now that we have a nice little editable mesh, we can give it a few tweaks! Beginning with the Vertex selection. Notice we have operated the "Sub Object" level and we are looking at "Vertex" . this means that we can now move the individual points that make up our object. Doing this we can alter its shape considerably. We use vertex selection in the tutorial alot! The red technical arrow points at the button illuminated to indicate "Vertex" mode. |
![]() |
Now here's the go for all of you budding modellers. There is so much power in these selection buttons!!!! I will just scratch the surface here but the next level that we need to look at is "Face" selection. See the button illuminated. And the field reads "polygon". This selection will select quads or tri's with all edges visible. The red triangle selects tri's only and the red edged triangle selects edges. The famous "Bevel" tool is only available under the red triangle and red square buttons |
![]() |
||