| Home | News | Files | Links | Forum |
FAQ topics:
How do I enlarge
the capacity of my Sky+ harddrive?
Many people have complained that 30~40 GB (20 hours) is not enough storage space and are
thus forced to watch or delete programs to fit in more material. Here is a step-by-step
guide on how to upgrade your storage space.
The drive recommended in one of the TIVO forums was a Maxtor D540X -4K 80Gb 5400rpm drive.
Details: Maxtor D540DX Hard Disk Drive 80GB UIDE100 12ms 5400rpm - OEM. A used one can be
purchased for a bit over 120 UK Pounds.
You will need to open the Digibox with either a standard Torx bit, or a special bit designed
to remove the spiked Torx screws on the digibox. After unplugging the box from the mains
and opening the case undo the three spiked torx screws on the back and slide it off.
At the front left is a metal cover over the drive held on by 4 screws. There is a short IDE cable
leading from the mainboard, through bent retaining lugs on top of the cover, leading to the
IDE socket on the drive.
Remove both ends of the cable and slide them out of the retaining lugs putting it to one side.
Undo the four screws and remove the cover. Disconnecting the power lead from the drive allows
the drive to be removed (it is sitting in rubber pads).
The existing drive should also a Maxtor D540X -4K but it is a 40Gb model. The existing drive
and the larger drive should be jumpered identically. Place the new drive in the space vacated
and connected the power and IDE leads. Screwed on the metal cover. Feed the IDE cable back
under the retaining lugs plug it in to the socket on the mainboard. Replaced the top cover
of the unit Replaced the three screws that hold it in place. After reconnecting the power,
the unit refuses to come out of standby for about a minute or so. This is presumably while
the drive is being prepared. After the usual searching for listings, everything should come
up as normal and you should be able to live pause TV and start a recording as before.
The only
oddity with the upgraded unit is that the percent full indicator reads 43% when
the new drive is empty. The bar graph and automatic disk managment work fine.
The whole procedure should not take more than 30 minutes. (Thanks to Dave
Mansell from uk.tech.tv.sky)
Additional information including screen
shots can be found
here or here
Set your Remote control Handset for TV
The Sky remote
control was designed to work with most TV sets. If it cannot carry out the basic
control functions (volume control, channel change, Teletext access etc.), you
may have to choose a different
setup code.
Note, however, that if you have a very old -
or a very new - type of TV set, the Sky remote may not be compatible with it. In
such a case, you will have to resort to the original remote to control the TV,
and use the Sky remote to control the digibox receiver only.
How force a software download
Switch
off the receiver at the mains wall socket. Press and hold the front panel
"backup" button and switch the mains power back on. Continue to hold the button
for 20 seconds or until the LEDs all light (depends on the make/model). As soon
as this happens, you'll see a message on the screen (only if you have connected
via the TV Scart). Leave the receiver for at least 2-15 minutes to download the
software via satellite. Note that this will not work unless the receiver is
getting a good signal!
Receive free-to-air channels on DigiBox
The digibox
is capable of receiving free-to-air (FTA) channels,
provided that the channel frequency is in the range 10.7-12.5 GHz and
that the symbol rate is either 27.5 or 22.0 Mbaud. You need a motorized dish or
a second dish with an LNB pointing to the satellite you're trying to receive.
On the Sky remote control, press the services button to
display the Services menu. Select option 4, 'System Setup', to display the
System Setup menu. Select option 4, Add Channels', to display the Add Channels
screen. Here, you can choose the settings for the channel you are interested in.
When you have adjusted the settings, highlight 'Find
Channels', then press the select button. The digibox will search for all
available channels whose parameters match the settings you have made. The
channels are then listed at the New Channels screen. To choose the channels you
want to store, first highlight the name, then press the yellow button on the Sky
remote control. This places a tick next to the channel name. When you have
ticked all the channels you are interested in, press the select button twice.
New channels are stored in the Other Channels listing,
which you can access from the Services menu. The digibox can store up to 50 such
channels.
How access to "Secret menu" - Service Menu on a DigiBox
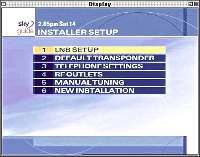 |
Press the services button, press no
4 - system setup, press 0 then 1, then press the select button this brings
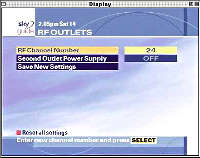
you to the installer setup. This has 6 options which are: 1) lnb setup, 2) default transponder, 3) telephone settings, 4) rf outlets, 5) manual tuning, 6) new installation. |
 |
How do I log the data between the set-top box and the
smart card?
A fully working logger has been made for logging the Sky NDS system.Normal loggers
will not give proper results due to the baud rate being different to other systems.
These loggers do not emulate the real cards but they do allow a user to see the data
going between the card and the STB. The unit comprises of a logger board in which the
original card is placed and ISO Contact card which is placed in the STB. Using a
suitable program and PC, the user can look at the data traffic between the smart card
and the STB. The logger board also has room for expansion and sockets for future upgrades.
for more indepth instructions, check out this information.
These Units can be purchased at
the wizards workbench.
How do I use WinExplorer to analyze my smart card?
First it's important to emphasize that experimenting with a smart-card may damage it. To much and
you may end up trashing the card.
First you will need some hardware in the form of a Phoenix-type interface. A basic smart-smouse/
phoenix interface or a programmer that supports this mode such as "The Elvis" or "VXMulti".
Download WinExplorer
which is a nice, user-friendly program used to talk to the smart-card.
Plug the smart-card interface into the COM1 port in your PC. After installing
and running winexplorer you will see the following screen:
| Comm port: wherever the Phoenix-interface is connected | Rec.Timeout: 200 |
| Data Baud: 38 400 | Byte Delay: 70 000 |
| Reset Baud: 9 600 | Reset Delay: 40 000 |
| Parity: odd | Stop Bits: 2 |
| Byte Convention: Inverse | |