Hence in the following grid:
In every generation a cell changes state according to its current state ( alive or dead), and the state of its 8 neighbours.
Standard Rules
The standard rules, as suggested by John Conway, are :
The rules applied
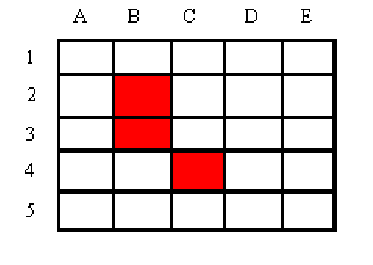
Hence in the following grid:
A1: has 1 live neighbour (B2)
A2: has 2 live neighbours (B2)(B3)
A3: has 2 live neighbours (B2)(B3)
A4: has 1 live neighbour (B3)
A5: has 0 live neighbours
B1: has 1 live neighbour (B2)
B2: has 1 live neighbour (B3)
B3: has 2 live neighbours (B2)(C4)
B4: has 2 live neighbours (B3)(C4)
B5: has 1 live neighbour (C4) etc.
In the next generation:
So in terms of the 'interesting' cells in the first generation grid ( the one on the left):
B2: dies because it has only 1 live neighbour, and hence does not meet any of the rules for survival
B3: remains alive because it has 2 live neighbours, and is alive itself ( Rule 3)
B4: remains dead because it was not alive ready, and has only 2 (not 3) live neighbours
C3: becomes alive because it has 3 live neighbours ( Rule 1)
In the following generation all cells are dead, as none of the rules are met.
These are the rules that are usually used, and they are used in the basic simulation this site contains. There are, however, other simulations that modify the rules slightly. Later on in this tutorial, you will be given the opportunity to modify the rules yourself.
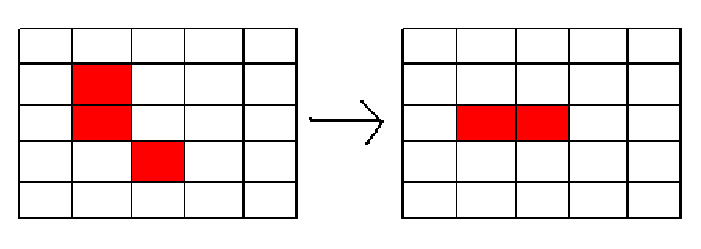
Example of the Complexity Arising from These Rules
Below is a standard configuration called 'Arch'. Observe how extremely complex patterns can be generated from just seven alive cells in the first generation.
To use the applet: