|
For this tutorial
you will need
Paint Shop Pro,
and this zip file  Unzip the selection to your selection folder and open the plaid
in your PSP window.
Unzip the selection to your selection folder and open the plaid
in your PSP window.
1. Open a new image 350x640 Go to
Selections>Load from disk>APmsel1.sel flood fill with black, go to Selections>Modify>Contract "1" and flood fill
with color #949292 (NOTE: This gray color is the same we are going to be using
for the rest of the tutorial so I'm just going to say gray) deselect and load the same selection again, go to
Selections>Invert and apply a drop shadow: Color "Black",
Horizontal & Vertical "4", Opacity "45" and Blur
"20", repeat the shadow but this time change Horizontal & Vertical
to "-4", deselect. Go to Effects>Noise Add 4% Uniform.
Name this layer Body. Save.
with black, go to Selections>Modify>Contract "1" and flood fill
with color #949292 (NOTE: This gray color is the same we are going to be using
for the rest of the tutorial so I'm just going to say gray) deselect and load the same selection again, go to
Selections>Invert and apply a drop shadow: Color "Black",
Horizontal & Vertical "4", Opacity "45" and Blur
"20", repeat the shadow but this time change Horizontal & Vertical
to "-4", deselect. Go to Effects>Noise Add 4% Uniform.
Name this layer Body. Save. 2.
Add a new layer and load from disk APmsel2.sel flood fill with black, contract
selection by 1 and flood fill with the gray color, deselect and
load the same selection again, invert selection and repeat the drop shadow from Step 1, deselect.
Using your Freehand Tool  Point to Point, Antialias checked, Feather "4" draw a rectangle
getting part of the top side (see screenshot) and hit the Delete key,
deselect. Add the same Noise. Save.
Point to Point, Antialias checked, Feather "4" draw a rectangle
getting part of the top side (see screenshot) and hit the Delete key,
deselect. Add the same Noise. Save. 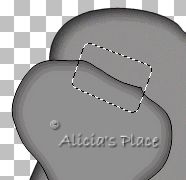
On
the same layer load APmsel3.sel click on the Magnifying Glass Zoom in and Flood Fill "inside" the selections with black (see
screenshot). Deselect. Name this layer
Ear.
Zoom in and Flood Fill "inside" the selections with black (see
screenshot). Deselect. Name this layer
Ear. 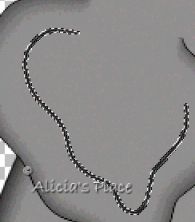
3.
Add a new layer and load from disk APmsel4.sel, flood fill with black, contract
selection by 1 and flood fill with gray, deselect, load the same
selection again, invert selection and apply the drop shadow same settings as
before, deselect and using the Freehand Tool
again, same settings as before draw a rectangle? (sorry but I don't know the
name of that, maybe a parallelogram? :o) well, you can see the screenshot) and
hit the delete key. Add the same Noise as before. Name this
layer Arm. Save. 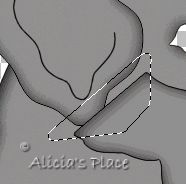
4.
Go back to the Body Layer and add a new layer, load APmsel5.sel flood fill with
black, contract selection by 1 and flood fill with the color or pattern of your
choice, I'm using the plaid supplied on the zip file, Scale 40%. Name
this layer Skirt. Save. 5. Add
a new layer and load APmsel6.sel flood fill with black, contract selection by 1
and flood fill with gray, deselect and load the selection again, invert
selection and apply the drop shadow as before, but this time change the Blur to
"10" and don't apply it twice. Add the same Noise as before, go to
Layers>Arrange>Send to Bottom. 6.
Go to the arm layer and add a new layer, load APmsel7.sel, flood fill with
black, contract selection by 1 and flood fill with #FFC0C0. 7.
Add a new layer and load APmsel8.sel, flood fill with black,
contract selection by 1 and flood fill with white. 8. Add
a new layer and load APmsel9.sel, zoom the image and flood fill with black
"inside" the selections, deselect, with your Magic Wand  RGB Value, Tolerance and Feather "0" click on the
"nails" holding the Shift key to select them all, go to
Selections>Modify Expand "1", add a new layer and flood fill with
white, go to Layers>Arrange>Move down.
RGB Value, Tolerance and Feather "0" click on the
"nails" holding the Shift key to select them all, go to
Selections>Modify Expand "1", add a new layer and flood fill with
white, go to Layers>Arrange>Move down. 9.
Go to the body layer and add a new layer and load APmsel10.sel, flood fill with
black, add a new layer and with the Airbrush  Color
Black draw a line similar to the screenshot, then go to
Effects>Blur>Gaussian Blur "5.5" and lower the opacity on this
layer to 80. Color
Black draw a line similar to the screenshot, then go to
Effects>Blur>Gaussian Blur "5.5" and lower the opacity on this
layer to 80. 
Now
you can merge your layers visible. Save. 10.
Add a new layer, with the Draw Tool  Foreground
"Black", Background "Null", Freehand Line, Width
"1", Antialias "Checked", Create as Vector
"Unchecked" draw some lines around her body special on knees and
trunk, see at the top graphic, merge visible again. Foreground
"Black", Background "Null", Freehand Line, Width
"1", Antialias "Checked", Create as Vector
"Unchecked" draw some lines around her body special on knees and
trunk, see at the top graphic, merge visible again. 11.
Add a new layer, load from disk APmsel11.sel zoom and flood fill with black
"inside" the selection, deselect, with your Magic Wand
same settings as before, click inside the eye and expand the selection by
"1", add a new layer and flood fill with white, deselect and go to
Layers>Arrange>Move Down, add a new layer and with the Paint Brush  Color Black, click once, change color to White and Size to "3" and
click inside, see screenshot.
Color Black, click once, change color to White and Size to "3" and
click inside, see screenshot. 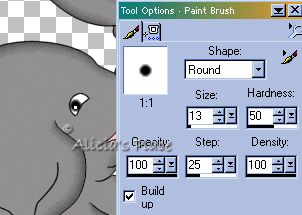
12.
With the Draw Tool, same settings as before draw the eyebrow. You can
merge again and don't forget to save. 13.
Add a new layer and load from disk APmsel12.sel, zoom and flood fill with black
"inside" the selection, deselect, with the Magic Wand
same settings as before and holding the Shift key click inside the 3 parts of
the bow, expand the selections by 1, add a new layer and flood fill with the
color of your choice for the bow, deselect and go to Layers>Arrange> Move
down. Again click with the Magic Wand outside the bow and add a drop
shadow, the color of the shadow depends on the color of the bow (pick a darker
tone) and the settings are the same as before, just change the blur to
"12". 14.
Add a new layer and load from disk APmsel13.sel, flood fill with black, contract
selection by 1 and flood fill with the color of your choice, with the Draw Tool
same settings as before, color black draw some outlines on your bow. Merge
visible again, save. 15.
Add a new layer Foreground "Null" and Background black, and with your
Preset Shapes Tool  Ellipse, Antialias Checked, Create as Vector UNchecked, holding the Shift key
draw a circle size 111x111, doesn't matter if is not on the right place, since
you are on a separate layer you can move it and position it, go to
Selections>Select All, Selections>Float, Selections Modify>Contract
"1" and flood fill with the color of your choice or decorate the ball
however you want it, I have provided my selections also APmsel14.sel but you can
do it the way you want it, when the ball its ready, add a new layer and with the
Draw Tool same settings
as before, but change the Width to 14, draw a small arc, see screenshot, and go
to Blur>Gaussian Blur "5.50"
Ellipse, Antialias Checked, Create as Vector UNchecked, holding the Shift key
draw a circle size 111x111, doesn't matter if is not on the right place, since
you are on a separate layer you can move it and position it, go to
Selections>Select All, Selections>Float, Selections Modify>Contract
"1" and flood fill with the color of your choice or decorate the ball
however you want it, I have provided my selections also APmsel14.sel but you can
do it the way you want it, when the ball its ready, add a new layer and with the
Draw Tool same settings
as before, but change the Width to 14, draw a small arc, see screenshot, and go
to Blur>Gaussian Blur "5.50" 
Merge
all your layers visible and Miss Elephant is ready. If
you want to do her husband you can find him here.
I
hope you enjoyed this tutorial, if you have any questions or
comments please email me

TUTORIALS
- HOME
Copyright
Terms and Conditions
No Part of this Tutorial
shall be Copied - Distributed - Placed on a CD - Sold - or Copied onto another
Website.
Tutorial © Alicia's Place -
January 21, 2002
All Rights
Reserved
As a special
gift, please feel free to use the image shown below on
your own pages after completing this lesson.

Graphics ©Copyrighted Prestigious Dames & Prestigious PSP 2002
Tutorials are ©Copyrighted by each Author
|