The following are the main ten steps in the ASP.NET page life cycle.
1. Object Initialization
A page's controls (and the page itself) are first initialized in their raw form. By declaring your objects within the constructor of your C# code-behind file, the page knows what types of objects and how many to create. Once you have declared your objects within your constructor, you may then access them from any sub class, method, event, or property. However, if any of your objects are controls specified within your ASPX file, at this point the controls have no attributes or properties. It is dangerous to access them through code, as there is no guarantee of what order the control instances will be created (if they are created at all). The initialization event can be overridden using the OnInit method.
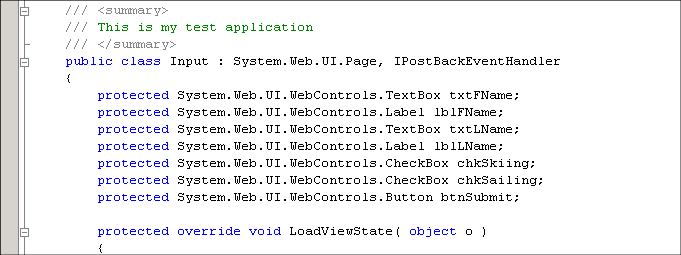
Figure 1 - Controls are initialized based on their declaration.
2. Load Viewstate Data
After the Init event, controls can be referenced using their IDs only (no DOM is established yet for relative references). At LoadViewState event, the initialized controls receive their first properties: viewstate information that was persisted back to the server on the last submission. The page viewstate is managed by ASP.NET and is used to persist information over a page roundtrip to the server. Viewstate information is saved as a string of name/value pairs and contains information such as control text or value. The viewstate is held in the value property of a hidden <input> control that is passed from page request to page request. As you can see, this is a giant leap forward from the old ASP 3.0 techniques of maintaining state. This event can be overridden using the LoadViewState method and is commonly used to customize the data received by the control at the time it is populated.
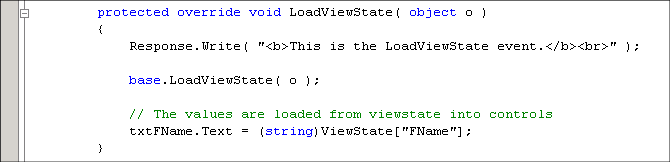
Figure 2 - When LoadViewState is fired, controls are populated with the appropriate viewstate data.
3. LoadPostData Processes Postback Data
During this phase of the page creation, form data that was posted to the server (termed postback data in ASP.NET) is processed against each control that requires it. When a page submits a form, the framework will implement the IPostBackDataHandler interface on each control that submitted data. The page then fires the LoadPostData event and parses through the page to find each control that implements this interface and updates the control state with the correct postback data. ASP.NET updates the correct control by matching the control's unique ID with the name/value pair in the NameValueCollection . This is one reason that ASP.NET requires unique IDs for each control on any given page. Extra steps are taken by the framework to ensure each ID is unique in situations, such as several custom user controls existing on a single page. After the LoadPostData event triggers, the RaisePostDataChanged event is free to execute (see below).
4. Object Load
Objects take true form during the Load event. All object are first arranged in the page DOM (called the Control Tree in ASP.NET) and can be referenced easily through code or relative position (crawling the DOM). Objects are then free to retrieve the client-side properties set in the HTML, such as width, value, or visibility. During Load, coded logic, such as arithmetic, setting control properties programmatically, and using the StringBuilder to assemble a string for output, is also executed. This stage is where the majority of work happens. The Load event can be overridden by calling OnLoad .
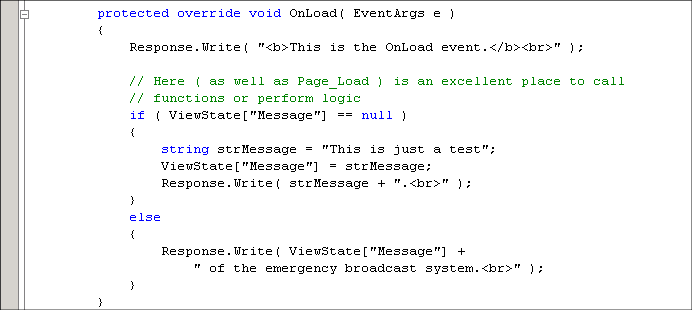
Figure 3 - The OnLoad event is an ideal location to place logic.
5. Raise PostBack Change Events
As stated earlier, this occurs after all controls that implement the IPostBackDataHandler interface have been updated with the correct postback data. During this operation, each control is flagged with a Boolean on whether its data was actually changed or remains the same since the previous submit. ASP.NET then sweeps through the page looking for flags indicating that any object's data has been updated and fires RaisePostDataChanged . The RaisePostDataChanged event does not fire until all controls are updated and after the Load event has occurred. This ensures data in another control is not manually altered during the RaisePostDataChanged event before it is updated with postback data.
6. Process Client-Side PostBack Event
After the server-side events fire on data that was changed due to postback updates, the object which caused the postback is handled at the RaisePostBackEvent event. The offending object is usually a control that posted the page back to the server due to a state change (with autopostback enabled) or a form submit button that was clicked. There is often code that will execute in this event, as this is an ideal location to handle event-driven logic. The RaisePostBackEvent event fires last in the series of postback events due to the accuracy of the data that is rendered to the browser. Controls that are changed during postback should not be updated after the executing function is called due to the consistency factor. That is, data that is changed by an anticipated event should always be reflected in the resulting page. The RaisePostBackEvent can be trapped by catching RaisePostBackEvent .
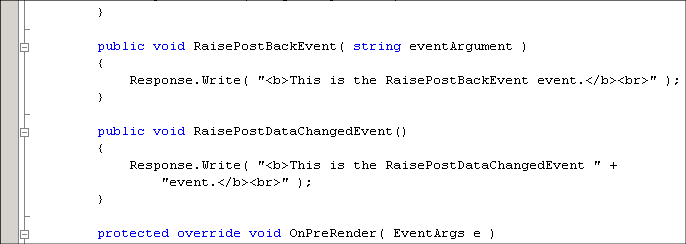
Figure 4 - The RaisePostDataChanged and RaisePostBackEvent events are defined by the IPostBackDataHandler interface.
7. Prerender the Objects
The point at which the objects are prerendered is the last time changes to the objects can be saved or persisted to viewstate. This makes the PreRender step a good place to make final modifications, such as changing properties of controls or changing Control Tree structure, without having to worry about ASP.NET making changes to objects based off of database calls or viewstate updates. After the PreRender phase those changes to objects are locked in and can no longer be saved to the page viewstate. The PreRender step can be overridden using OnPreRender .
8. ViewState Saved
The viewstate is saved after all changes to the page objects have occurred. Object state data is persisted in the hidden <input> object and this is also where object state data is prepared to be rendered to HTML. At the SaveViewState event, values can be saved to the ViewState object, but changes to page controls are not. You can override this step by using SaveViewState .

Figure 5 - Values are set for controls in OnPreRender. During the SaveViewState event, values are set for the ViewState object.
9. Render To HTML
The Render event commences the building of the page by assembling the HTML for output to the browser. During the Render event, the page calls on the objects to render them into HTML. The page then collects the HTML for delivery. When the Render event is overridden, the developer can write custom HTML to the browser that nullifies all the HTML the page has created thus far. The Render method takes an HtmlTextWriter object as a parameter and uses that to output HTML to be streamed to the browser. Changes can still be made at this point, but they are reflected to the client only.
10. Disposal
After the page's HTML is rendered, the objects are disposed of. During the Dispose event, you should destroy any objects or references you have created in building the page. At this point, all processing has occurred and it is safe to dispose of any remaining objects, including the Page object. You can override Dispose , as well as Render by setting the appropriate selection in the object parameter

Figure 6 - The Render event will output custom HTML to the browser through the HtmlTextWriter object.
The following are the some of the guidelines to create a good ASP.NET application.
- Disable session when not using it. This can be done at the application level in the "machine.config" file or at a page level.
- The in-proc model of session management is the fastest of the three options. SQL Server option has the highest performance hit.
- Minimize the amount and complexity of data stored in a session state. The larger and more complex the data is, the cost of serializing/deserializing of the data is higher (for SQL Server and State server options).
- Use Server.Transfer for redirecting between pages in the same application. This will avoid unnecessary client-side redirection.
- Choose the best suited session-state provider - In-process is the fastest option.
- Avoid unnecessary round-trips to the server - Code like validating user input can be handled at the client side itself.
- Use Page.IsPostback to avoid unnecessary processing on a round trip.
- Use server controls in appropriate circumstances. Even though are they are very easy to implement, they are expensive because they are server resources. Sometimes, it is easier to use simple rendering or data-binding.
- Save server control view state only when necessary.
- Buffering is on by default. Turning it off will slow down the performance. Don't code for string buffering - Response.Write will automatically buffer any responses without the need for the user to do it. Use multiple Response.Write s rather than create strings via concatenation, especially if concatenating long strings.
- Don't rely on exceptions in the code. Exceptions reduce performance. Do not catch the exception itself before handling the condition.
// Consider changing this...
try { result = 100 / num;}
catch (Exception e) { result = 0;}
// to this...
if (num != 0)
result = 100 / num;
else
result = 0;
- Use early binding in VB.NET and Jscript code. Enable Option Strict in the page directive to ensure that the type-safe programming is maintained.
- Port call-intensive COM components to managed code. While doing Interop try avoiding lot of calls. The cost of marshalling the data ranges from relatively cheap (i.e. int , bool ) to more expensive (i.e. strings). Strings, a common type of data exchanged for web applications, can be expensive because all strings in the CLR are in Unicode, but COM or native methods may require other types of encoding (i.e. ASCII).
- Release the COM objects or native resources as soon as the usage is over. This will allow other requests to utilize them, as well as reducing performance issues, such as having the GC release them at a later point.
- Use SQL server stored procedures for data access.
- Use the SQLDataReader class for a fast forward-only data cursor.
- Datagrid is a quick way of displaying data, but it slows down the application. The other alternative, which is faster, is rendering the data for simple cases. But this is difficult to maintain. A middle of the road solution could be a repeater control, which is light, efficient, customizable and programmable.
- Cache data and page output whenever possible.
- Disable debug mode before deploying the application.
- For applications that rely extensively one external resource, consider enabling web gardening on multiprocessor computers. The ASP.NET process model helps enable scalability by distributing work to several processes, one on each CPU. If the application is using a slow database server or calls COM objects that access external resources, web gardening could be a solution.
- Enumerating into collections sometimes is more expensive than index access in a loop. This is because the CLR can sometimes optimize array indexes and bounds checks away in loops, but can't detect them in for each type of code.
- JScript .NET allows methods within methods - to implement these in the CLR required a more expensive mechanism which can be much slower, so avoid them by moving inner methods to be just regular methods of the page.
- Do a "pre-batch" compilation. To achieve this, request a page from the site.
- Avoid making changes to pages or assemblies that are there in the bin directory of the application. A changed page will only recompile the page. Any change to the bin directory will result in recompile of the entire application.
- The config file is configured to enable the widest set of features. For a performance boost it is better to tune it to the requirements. Some key points here are:
- Encoding - Request/Response - The default is UTF-8 encoding. If the site is completely ASCII, change the option to ASCII encoder.
- Session State - By default is ON. If session state is not maintained then the value should be changed to OFF.
- ViewState - Default is ON. Turn it off if not being used. If ViewState is being used there are different levels of security that need to be considered which can impact the performance of the application.
- AutoEventWireup - Turning off AutoEventWireup means that the page will not try and match up method names to events and hook them up (i.e. Page_Load, etc). Instead, if the application writer wishes to receive them, they need to override the methods in the base class (i.e. override OnLoad for the page load event instead of using a Page_Load method). By doing so, the page will get a slight performance boost by not having to do the extra work itself, but leaving it to the page author.
- For efficient debugging Use ASP.NET trace feature instead of Response.Write.
Phase |
What a control needs to do |
Method or event to override |
Initialize |
Initialize settings needed during the lifetime of the incoming Web request. See Handling Inherited Events. |
Init event (OnInit method) |
Load view state |
At the end of this phase, the ViewState property of a control is automatically populated as described in Maintaining State in a Control. A control can override the default implementation of the LoadViewState method to customize state restoration. |
LoadViewState method |
Process postback data |
Process incoming form data and update properties accordingly. See Processing Postback Data.
Note Only controls that process postback data participate in this phase. |
LoadPostData method
(if IPostBackDataHandler is implemented) |
Load |
Perform actions common to all requests, such as setting up a database query. At this point, server controls in the tree are created and initialized, the state is restored, and form controls reflect client-side data. See Handling Inherited Events. |
Load event
(OnLoad method) |
Send postback change notifications |
Raise change events in response to state changes between the current and previous postbacks. See Processing Postback Data.
Note Only controls that raise postback change events participate in this phase. |
RaisePostDataChangedEvent method
(if IPostBackDataHandler is implemented) |
Handle postback events |
Handle the client-side event that caused the postback and raise appropriate events on the server. See Capturing Postback Events.
Note Only controls that process postback events participate in this phase. |
RaisePostBackEvent method
(if IPostBackEventHandler is implemented) |
Prerender |
Perform any updates before the output is rendered. Any changes made to the state of the control in the prerender phase can be saved, while changes made in the rendering phase are lost. See Handling Inherited Events. |
PreRender event
(OnPreRender method) |
Save state |
The ViewState property of a control is automatically persisted to a string object after this stage. This string object is sent to the client and back as a hidden variable. For improving efficiency, a control can override the SaveViewState method to modify the ViewState property. See Maintaining State in a Control. |
SaveViewState method |
Render |
Generate output to be rendered to the client. See Rendering an ASP.NET Server Control. |
Render method |
Dispose |
Perform any final cleanup before the control is torn down. References to expensive resources such as database connections must be released in this phase. See Methods in ASP.NET Server Controls. |
Dispose method |
Unload |
Perform any final cleanup before the control is torn down. Control authors generally perform cleanup in Dispose and do not handle this event. |
UnLoad event (On UnLoad method) |
Note To override an EventName event, override the OnEventName method (and call base. OnEventName).
The methods and events in the third column are inherited from System.Web.UI.Control, with the following exceptions: LoadPostData and RaisePostDataChangedEvent are methods of the IPostBackDataHandler interface, and RaisePostBackEvent belongs to the IPostBackEventHandler interface. If your control participates in postback data processing you must implement IPostBackDataHandler. If your control receives postback events you must implement IPostBackEventHandler.
The CreateChildControls method is not listed in the table because it is called whenever the ASP.NET page framework needs to create the controls tree and this method call is not limited to a specific phase in a control's lifecycle. For example, CreateChildControls can be invoked when loading a page, during data binding, or during rendering.
|
|
2. Caching Overview
Caching is a technique widely used in computing to increase performance by keeping frequently accessed or expensive data in memory. In the context of a Web application, caching is used to retain pages or data across HTTP requests and reuse them without the expense of recreating them.
ASP.NET has three kinds of caching that can be used by Web applications:
- Output caching, which caches the dynamic response generated by a request.
- Fragment caching, which caches portions of a response generated by a request.
- Data caching, which caches arbitrary objects programmatically. To support this, ASP.NET provides a full-featured cache engine that allows programmers to easily retain data across requests.
Output caching is useful when the contents of an entire page can be cached. On a heavily accessed site, caching frequently accessed pages for even a minute at a time can result in substantial throughput gains. While a page is cached by the output cache, subsequent requests for that page are served from the output page without executing the code that created it.
Sometimes it is not practical to cache an entire page - perhaps portions of the page must be created or customized for each request. In this case, it is often worthwhile to identify objects or data that are expensive to construct and are eligible for caching. Once these items are identified, they can be created once and then cached for some period of time. Additionally, fragment caching can be used to cache regions of a page's output.
Choosing the time to cache an item can be an interesting decision. For some items, the data might be refreshed at regular intervals or the data is valid for a certain amount of time. In that case, the cache items can be given an expiration policy that causes them to be removed from the cache when they have expired. Code that accesses the cache item simply checks for the absence of the item and recreates it, if necessary.
The ASP.NET cache supports file and cache key dependencies, allowing developers to make a cache item dependent on an external file or another cache item. This technique can be used to invalidate items when their underlying data source changes.
Introduction
In classic ASP, one of the techniques developers commonly relied on to speed up processing was the use of caching. One could, fairly easily, build their own caching system using Application variables, as highlighted in the FAQ, How can I use Application-level variables to cache information? There were also third-party options, like XCache. The main benefits of caching are performance-related: operations like accessing database information can be one of the most expensive operations of an ASP page's life cycle. If the database information is fairly static, this database-information can be cached.
When information is cached, it stays cached either indefinitely, until some relative time, or until some absolute time. Most commonly, information is cached for a relative time frame. That is, our database information may be fairly static, updated just a few times a week. Therefore, we might want to invalidate the cache every other day, meaning every other day the cached content is rebuilt from the database.
While caching in classic ASP was a bit of a chore, it is quite easy in ASP.NET. There are a number of classes in the .NET Framework designed to aid with caching information. In this article, I will explain how .NET supports caching and explain in detail how to properly incorporate each supported method into Web-based applications.
Caching Options in ASP.NET
ASP.NET supports three types of caching for Web-based applications:
- Page Level Caching (called Output Caching)
- Page Fragment Caching (often called Partial-Page Output Caching)
- Programmatic or Data Caching
We'll look at each of these options, including how, and when, to use each option to increase your site's performance!
Output Caching
Page level, or output caching, caches the HTML output of dynamic requests to ASP.NET Web pages. The way ASP.NET implements this (roughly) is through an Output Cache engine. Each time an incoming ASP.NET page request comes in, this engine checks to see if the page being requested has a cached output entry. If it does, this cached HTML is sent as a response; otherwise, the page is dynamically rendered, it's output is stored in the Output Cache engine.
Output Caching is particularly useful when you have very static pages. For example, the articles here on 4GuysFromRolla.com are very static. The only dynamic content is the banners, the dynamic selection being performed on a separate ad server. Hence, the articles on 4Guys would be prime candidates for Output Caching.
Output caching is easy to implement. By simply using the @OuputCache page directive, ASP.NET Web pages can take advantage of this powerful technique. The syntax looks like this:
<%@OutputCache Duration="60" VaryByParam="none" %> |
The Duration parameter specifies how long, in seconds, the HTML output of the Web page should be held in the cache. When the duration expires, the cache becomes invalid and, with the next visit, the cached content is flushed, the ASP.NET Web page's HTML dynamically generated, and the cache repopulated with this HTML. The VaryByParam parameter is used to indicate whether any GET (QueryString) or POST (via a form submit with method="POST" ) parameters should be used in varying what gets cached. In other words, multiple versions of a page can be cached if the output used to generate the page is different for different values passed in via either a GET or POST.
The VaryByParam is a useful setting that can be used to cache different "views" of a dynamic page whose content is generated by GET or POST values. For example, you may have an ASP.NET Web page that reads in a Part number from the QueryString and displays information about a particular widget whose part number matches the QueryString Part number. Imagine for a moment that Output Caching ignored the QueryString parameters altogether (which you can do by setting VaryByParam="none" ). If the first user visited the page with QueryString /ProductInfo.aspx?PartNo=4 , she would see information out widget #4. The HTML for this page would be cached. The next user now visits and wished to see information on widget #8, a la /ProductInfo.aspx?PartNo=8 . If VaryByParam is set to VaryByParam="none" , the Output Caching engine will assume that the requests to the two pages are synonymous, and return the cached HTML for widget #4 to the person wishing to see widget #8! To solve for this problem, you can specify that the Output Caching engine should vary its caches based on the PartNo parameter by either specifying it explicitly, like VaryByParam="PartNo" , or by saying to vary on all GET/POST parameters, like: VaryByParam="*" .
Partial-Page Output Caching
More often than not, it is impractical to cache entire pages. For example, you may have some content on your page that is fairly static, such as a listing of current inventory, but you may have other information, such as the user's shopping cart, or the current stock price of the company, that you wish to not be cached at all. Since Output Caching caches the HTML of the entire ASP.NET Web page, clearly Output Caching cannot be used for these scenarios: enter Partial-Page Output Caching.
Partial-Page Output Caching, or page fragment caching, allows specific regions of pages to be cached. ASP.NET provides a way to take advantage of this powerful technique, requiring that the part(s) of the page you wish to have cached appear in a User Control. One way to specify that the contents of a User Control should be cached is to supply an OutputCache directive at the top of the User Control. That's it! The content inside the User Control will now be cached for the specified period, while the ASP.NET Web page that contains the User Control will continue to serve dynamic content. (Note that for this you should not place an OutputCache directive in the ASP.NET Web page that contains the User Control - just inside of the User Control.)
Now that we've tackled Output Caching and Fragment Caching, there is still one more caching technique worth discussing: Data Caching. In Part 2 we'll examine what, exactly, Data Caching is and how you can use it to improve the performance of your ASP.NET Web pages. We'll also examine a really cool, real-world caching demo!
In Part 1 we looked at how to use Output Caching and Fragement Caching of an ASP.NET Web page. These two techniques cached either the full HTML output of an ASP.NET Web page, or a portion of the HTML output of an ASP.NET Web page (by caching the HTML output of a User Control). In this part, we'll examine Data Caching, which is an in-memory cache used for caching objects.
Data Caching
Sometimes, more control over what gets cached is desired. ASP.NET provides this power and flexibility by providing a cache engine. Programmatic or data caching takes advantage of the .NET Runtime cache engine to store any data or object between responses. That is, you can store objects into a cache, similar to the storing of objects in Application scope in classic ASP. (As with classic ASP, do not store open database connections in the cache!)
Realize that this data cache is kept in memory and "lives" as long as the host application does. In other words, when the ASP.NET application using data caching is restarted, the cache is destroyed and recreated. Data Caching is almost as easy to use as Output Caching or Fragment caching: you simply interact with it as you would any simple dictionary object. To store a value in the cache, use syntax like this:
Cache["foo"] = bar;
// C#
Cache("foo") = bar
' VB.NET |
To retrieve a value, simply reverse the syntax like this:
bar = Cache["foo"];
// C#
bar = Cache("foo")
' VB.NET |
Note that after you retrieve a cache value in the above manner you should first verify that the cache value is not null prior to doing something with the data. Since Data Caching uses an in-memory cache, there are times when cache elements may need to be evicted. That is, if there is not enough memory and you attempt to insert something new into the cache, something else has gotta go! The Data Cache engine does all of this scavenging for your behind the scenes, of course. However, don't forget that you should always check to ensure that the cache value is there before using it. This is fairly simply to do - just check to ensure that the value isn't null/Nothing. If it is, then you need to dynamically retrieve the object and restore it into the cache.
For example, if we were storing a string myString in the cache whose value was set from some method named SetStringToSomething() , and we wanted to read the value of myString from the cache, we'd want to:
- Read the myString from the cache: str = Cache("myString")
- Ensure that str wasn't null/Nothing. If it was, we'd want to get the value of str from SetStringToSomething() , and then put it in the cache, like so:
'Try to read the cache entry MyString into str str = Cache("myString")
'Check if str is Nothing If str is Nothing then 'If it is, populate str from SetStringToSomething() str = SetStringToSomething()
'Now insert str into the cache entry myString Cache("myString") = str End If |
Besides using the dictionary-like key/value assignment, as shown in the example above, you can also use the Insert or Add method to add items to the cache. Both of these methods are overloaded to accommodate a variety of situations. The Add and the Insert methods operate exactly the same except the Add method returns a reference to the object being inserted to the cache. Because of the similarity of the two methods, I will concentrate on the Insert method. Note that the Insert method allows you to simply add items to the cache using a key and value notation as well. For example to simply add an instance of the object bar to the cache named foo , use syntax like this:
Cache.Insert("foo", bar);
// C#
Cache.Insert("foo", bar)
' VB.NET |
(Note that this is synonymous to using the Cache("foo") = bar syntax we looked at earlier.)
Note that with inserting items into the Data Cache using the Cache(key) = value method or the Cache.Insert(key, value) we have no control over when (if ever) the items are evicted from the cache. However, there are times when we'd like to have control over when items leave the cache. For example, perhaps we want to have an inserted item in the cache to only live for n seconds, as with Output Caching. Or perhaps we'd like to have it exit the cache n seconds after it's last accessed. With Data Caching, you can optionally specify when the cache should have a member evicted.
Additionally, you can have an item evicted from the cache when a file changes. Such an eviction dependency is called a file dependency, and has many real-world applications, especially when working with XML files. For example, if you want to pull data out of an XML file, but you don't want to constantly go to disk to read the data, you can tell the ASP.NET caching engine to expire the cached XML file whenever the XML file on disk is changed. To do this, use the following syntax:
Cache.Insert("foo", bar, new CacheDependancy(Server.MapPath("BarData.xml"))) |
By using this syntax, the cache engine takes care of removing the object bar from the cache when BarData.xml file is changed. Very cool! There are also means to have the inserted cache value expire based on an interval, or at an absolute time, as discussed before. For more information on these methods, consult the documentation for the Cache.Insert method.
A Cached XML File Example
Hopefully by now you'll agree that one of the most interesting and useful uses of the Cache.Insert method involves using the version of the method that takes advantage of the CacheDependancy parameter. By using this parameter, developers can create web pages that contain "semi-static" data. In other words, the rendering of the pages is based on configuration-like data which can be stored in an XML file (or anywhere really, I just like to use XML for this type of data). But I digress. The point is, why go back to disk or, worse yet, a SQL Server just to retrieve data that only changes periodically when I can have it done automatically.
To illustrate this point, I've created a simple example. In this example, an XML file is used to house data that is used to create a simple navigation control. Each <Destination> element contains a <LinkText> and a <NavigateURL> tag to house the appropriate data. Below is a section of this XML file:
<Destinations>
<Destination>
<LinkText> Bazquirk </LinkText>
<NavigateURL> Bazquik.aspx </NavigateURL>
</Destination>
<Destination>
<LinkText>Blah</LinkText>
<NavigateURL>Blah.aspx</NavigateURL>
</Destination> .... |
In a User Control a DataList control is used to bind the XML data using a HyperLink control. The Text property is set to the values contained in the <LinkText> tags. The HyperLink control's NavigateUrl property is set to the values contained in the <NavigateURL> tags. A Label control is used in the code behind class to output the time the cache is updated. (All of the code, and the output, can be seen at this live demo!)
A simple method, BindDestinations , does the work of binding the XML data to the DataList control. This method is called everytime the Page_Load event is fired. A DataSet object is created and then filled with the XML data by using the DataSet's ReadXML method.
In the BindDestinations method, an attempt is made to pull the data out of the Cache object. If nothing is found, as is the case when the XML file is changed, the data is re-read from the XML file and re-inserted into the Cache object. The time this occurs is also displayed via the lblTime Label control. Finally, the data is bound to the DataList control and displayed. In this manner, the data of the page is cached until it needs to be refreshed (i.e., the XML file data is changed). Neat!
Conclusion
The .NET caching services will prove to be one of the most powerful ways to squeeze performance out of new Web-based applications. Whether using Output Caching, Fragment Caching, or the Cache object directly, your web applications will see dramatic improvements in throughput and scalability through the technique of caching expensive dynamic data computations.
Introduction
Data caching was introduced with Internet Information Server (IIS) in order to optimize the transfer of Web pages and speed up the user’s access to these pages. ASP 2.x did not have any native caching ability and simply made use of the caching provided by IIS.Third-party utilities could also be used to increase the caching abilities of ASP 2.x and provide a greater level of control over the IIS cache.
Caching is now available natively within ASP.NET and has three new faces:
output , data, and fragment caching. Each of these methods provides new and powerful methods of optimizing the utilization of system resources and increasing application performance.
Output caching is more like the old method of caching provided by IIS; a single page is stored within memory for a small period of time, for any reason that the programmer sees fit.While this model is troublesome in some instances, it can be helpful to the end-user at times.This allows for faster access to pages that contain some dynamic content without having to regenerate the entire page. Fragment caching is an innovation to output caching; it enables the programmer to determine which parts of a page should be cached for future reference. This is done by breaking the code into separate user controls and then
caching the control.This new feature greatly expands on our caching options. Data caching enables the programmer to have full control over the caching at the object level.You can define which objects and which areas are to be cached and for what length of time, as you see fit.This detailed level of control enables you to save any object to memory that you wish, in order to speed up access to that object.
In this chapter, we are going to go over the three methods of caching that are available in ASP.NET.We will also discuss how and why to use each method and in what situations each method should be used.The options and parameters for each method will be discussed and illustrated. By using this information, you can greatly increase the performance of your application.This objective is key in creating an application that fits well with the needs of your users.
Caching Overview
Caching is a technique used in various aspects of computing to increase performance by decreasing access times for obtaining data.This is accomplished by retaining frequently accessed data within memory.This technique is used by many operating systems to cut down on the number of times that a hard drive must be accessed or a network connection utilized, by storing the needed data in the system’s memory. It is also used by some databases to store data retrieved from queries that may be needed again later.As it pertains to a Web application, data is retained from across multiple HTTP requests, and can then be reused without incurring additional access times that would normally be necessary to recreate the data.
ASP.NET makes available three different types of caching, which, when used properly, can greatly increase the overall performance of your application.These types are as follows:
- Output Caching
- Fragment Caching
- Data Caching
We will go into detail in this chapter on each of these caching types, but they all are based off of the basic concept of saving all or a portion of the data generated by your application, with the purpose of presenting the same data again at a later time. Output caching basically caches the entire content of an output Web page. This can be very useful when the content of your pages changes very little.
Programmers familiar with ASP 2.x should be familiar with this concept, as it was the only available caching method for ASP.This method provides the greatest performance increase, but can only be used when nothing on the output page is expected to change within the valid timeframe of the cache. Fragment caching, which is new in ASP.NET, allows for the caching of portions of your output page.This is an excellent improvement in caching technique, and is best used when your application’s output page has content that changes constantly in addition to content that changes very little.While this method does not provide as much of a performance increase as output caching, it does increase performance for applications that would formerly have been unable to use any caching at all due to the strict requirements of output caching.
Data caching, also new in ASP.NET, provides the ability to cache individual objects. Placing objects into the cache in this manner is similar to adding items to a dictionary. By using a simple dictionary-style interface, this method makes for an easy-to-use temporary data storage area while conserving server resources by releasing memory as cached objects expire. A major consideration in planning your caching strategy is the appropriate utilization of server resources.There is a trade-off when it comes to the use of any kind of caching, in that for every item cached, less memory is available for other uses.While output caching provides the greatest performance increase, it also utilizes more memory than caching a few objects using data caching. On the other hand, due to the overhead required to store multiple objects by using data caching, it may be more logical to cache a portion of the output page by using fragment caching. Suggested uses are listed in Table 6.1; however, the best caching method for your specific application is dependant upon your output.
www.syngress.com
Table 6.1 Suggested Uses of Caching Types
Situation Suggested Caching Type
1.The generated page generally stays the same, but there are several tables shown within the output that change regularly.
2.The generated page constantly changes, but there are a few objects that don’t change very often.
3.The generated page changes every few hours as information is loaded into a database through automated processes.
1.Use Fragment Caching in this situation. Cache the portions of the page that remain somewhat static, while dynamically generating the table contents. Also consider using Data Caching for storing some individual objects.
2.Use Data Caching for the objects.
3.Use Output Caching and set the duration to match the frequency of the data changes.
Components of an XML Document
In this section, we will introduce the major components of an XML document. An XML document contains a variety of constructs. Some of the frequently used ones are as follows:
_ Declaration Each XML document may have the optional entry
<?xml version=“1.0”?>. This standard entry is used to identify the document as an XML document conforming to the W3C (World Wide
Web Consortium) recommendation for version 1.0.
_ Comment An XML document may contain html-style comments like
<!--Catalog data -->.
_ Schema or Document Type Definition (DTD) In certain situations,
a schema or DTD may precede the XML document. A schema or DTD contains the rules about the elements of the document. For example, we may specify a rule like “A product element must have a ProductName, but a ListPrice element is optional.”We will discuss schemas later in the chapter.
_ Elements An XML document is mostly composed of elements.An element has a start-tag and end-tag. In between the start-tag and end-tag, we include the content of the element.An element may contain a piece of character data, or it may contain other elements. For example, in the Catalog1.xml, the Product element contains three other elements: ProductId, ProductName, and ListPrice. On the other hand, the first ProductName element contains a piece of character data like Shimano Calcutta.
_ Root Element In an XML document, one single main element must contain all other elements inside it.This specific element is often called the root element. In our example, the root element is the Catalog element. The XML document may contain many Product elements, but there must be only one instance of the Catalog element.
_ Attributes Okay, we agree that we didn’t tell you the whole story in our first example. So far, we have said that an element may contain other elements, or it may contain data, or both. Besides these, an element may also contain zero or more so-called attributes. An attribute is just an additional way to attach a piece of data to an element. An attribute is always placed inside the start-tag of an element, and we specify its value using the “name=value” pair protocol. Let us revise our Catalog1.xml and include some attributes to the Product element. Here, we will assume that a Product element will have two attributes named Type and SupplierId.As shown in Figure 8.5, we will simply add the Type=“Spinning Reel” and SupplierId=“5” attributes in the first product element. Similarly, we will also add the attributes to the second product element.
Table 9.2 Sections in a Trace Page
Sections Description Request Details Describes information pertaining to the request (e.g., SessionID, Encoding, and time of request). Trace Information Contains detailed information about the application currently running. Trace information is displayed in this section. Control Tree Displays information about controls used in a page and the size of the Viewstate hidden field. Cookies Collection Displays the cookie set by the page and its value. Headers Collection Displays HTTP header information like content length and user agent. Forms Collection Displays the name of controls in a page and its value. Server Variables Displays the environment variables on the server side. Notice that our Trace message is written under the “Trace Information” section. The Trace class contains the following members (Table 9.3 and Table 9.4).
Table 9.3 Properties in the Trace Class Property Description IsEnabled Indicates whether tracing is enabled for the current request. TraceMode Sets the trace mode: sortByCategory or sortByTime.
Methods in the Trace Class
Methods() Description
Warn Writes the trace information in red.
Write Writes the trace information.
Handling Errors
# There are four main categories of programming errors: syntax, compilation, runtime, and logic errors.
# Visual Studio .NET IDE provides help for detecting syntax errors.
# Runtime errors can be handled using structured and unstructured error handling mechanisms.
# Structured handling using the Try-Catch-Finally statement is the recommended mode for handling runtime errors in .NET.
Page Tracing
# The Trace class provides tracing capability.
# Turning tracing on and off is easy.
# Trace information can be grouped into multiple categories for easier viewing and it can be written into log files, viewable using the Event Viewer.
# Tracing can be done at the page level or at the application level.
www.syngress.com
Using Visual Studio .NET Debugging Tools
# Programmers can use the Visual Studio .NET IDE to set breakpoints in their application.
# Breakpoints allow you to examine variables and trace the execution flow of your application.
# The Object Browser and Class Viewer provide quick reference to the various class libraries.
|
|
3. Choosing Between User Controls and Custom Controls
ASP.NET provides two models of creating Web controls – user controls and custom controls. This article assumes basic knowledge of the two models and will not provide detailed information on writing controls. Instead, this article will present the reasons why one should choose one model over the other.
User Controls:-
User controls are authored in the same fashion as a standard Web Form. This makes user controls relatively easy to create, especially when aided by a visual designer such as Visual Studio .NET. Hence, given the same WYSIWYG and declarative environment as an ASP.NET page, user controls can be created with or without a code-behind file, and can handle their own events independent of the parent page. Design-time support for user controls, however, is limited. User controls are represented only by a dull placeholder and properties cannot be set via the Properties window. Also, user controls cannot be added to the Toolbox; sharing of user controls is achieved through placing the necessary user control files in each Web application directory.
Custom Controls:-
Unlike user controls which are authored in the same fashion as a Web Form, custom controls are compiled and distributed in binary format. Control authors must create their own classes which subclass from System.Web.UI.Control either directly or indirectly by subclassing another control. Custom controls are created without the aid of a designer and require the author to overcome a much steeper learning curve. On the other hand, custom controls provide strong designer-time support. Once compiled, custom controls can be added to the Toolbox and be used the same fashion as the other controls that ship with the .NET SDK such as the TextBox and Button controls. Furthermore, custom controls can expose properties which can easily be set by page developers using the Properties window of the visual designer. Finally, custom controls allow authors to extend or modify the functionality provided by existing controls.
Performance:-
With regards to performance, neither has a distinct advantage over the other. Both derive from System.Web.UI.Control and both are compiled into assemblies. Hence, performance is not a factor to consider when choosing between user and custom controls.
Conclusion:-
In conclusion, the single most important factor is how the control will be used – will the control be application specific or generic and redistributable? If the control is application specific and contains a lot of static layout, such as a site header and footer, a user control would make sense. If the control is generic, redistributable, and contains dynamic layout, such as the server controls that ship with the .NET SDK, then a custom control would be more suitable.
Summary:-
Ease of Authoring – User controls win hands down
Design-Time Suppor t – Custom controls can be added to the toolbox, can expose simple or complex properties, and can be bound to a data source
Deployment – Custom controls are compiled into binary format and are easily deployed across applications
Layout – User controls suite static layout while custom controls are better suited for complex layouts
Performance – Equal. Consider the other factors.
|
|
4. COM INTEROPERABILITY
The .NET platform is a major shift from the earlier COM technology, which dominated the Microsoft world for many years. Although new development may be carried out using .NET, there will be a need to reuse some of the functionality existing in the form of COM components. In this article, I examine some COM and .NET interoperability techniques.
COM to .NET: A shift in technology
Though a COM component and a .NET assembly share the same .dll extension, things are not the same internally. A .NET assembly does not need information about it to be stored in the registry, but instead holds the type information in the form of metadata. This metadata is present within the assembly itself. Further, a .NET assembly is not based on the IUnknown interface, which is an interface exposed by all COM objects.
The code that exists in the form of COM is known as unmanaged code, because the execution of this code is not managed by the common language runtime (CLR). Code written with the .NET Framework is managed by the CLR and is hence known as managed code.
It is impractical to rewrite every piece of code in .NET, because a lot of functionality exists in COM form. Moreover, more code exists in COM today than .NET, because .NET is a relatively new platform. From this fact arises the need for interoperating between COM and .NET. The .NET Framework has dedicated a namespace for this purpose. The System.Runtime.InteropServices namespace provides classes that can be used for accessing COM objects from .NET. We will begin by calling COM objects from .NET—a common necessity.
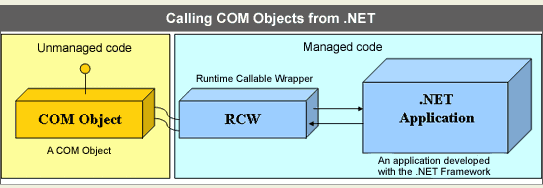
Calling COM objects from .NET
The code within a COM object is not executed by the CLR. The mechanism followed to expose a COM object to .NET is as follows: The COM object is encapsulated within a wrapper class, and this exposes the COM object as a .NET assembly to the CLR. This wrapper is known as the runtime callable wrapper (RCW). This process is illustrated in Figure A.
Figure A |
|
Runtime callable wrapper (RCW) |
This wrapper class (RCW) acts as a bridge between the unmanaged and managed code, and all operations are routed through this class. That's enough theory; let’s take a quick look at how this can be done. The entire process of generating an RCW is automatically handled by Visual Studio.NET.
Interoperability using Visual Studio.NET
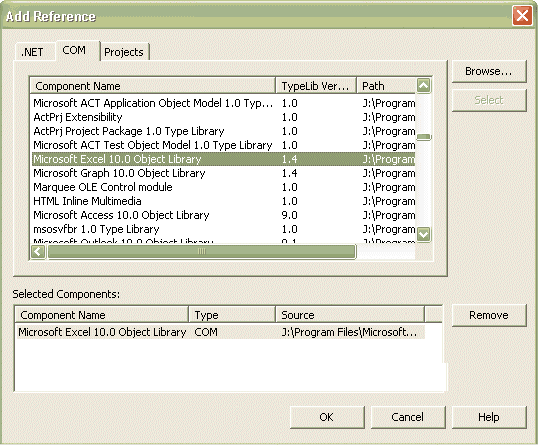
Let’s assume we need to utilize Microsoft Excel in our application. We can do so by accessing the Project menu and References and choosing Microsoft Excel Object Library from the COM tab, as shown in Figure B.
|
|
Choosing the Microsoft Excel Object Library |
As soon as we do so, Visual Studio.NET automatically generates an RCW. The naming convention followed is Interop.COMObject.dll. In this case, the RCW is called Interop.Excel.dll, which is referenced in the .NET application; we can instantiate and use Excel objects in code. The same is true for any custom COM component authored by you. The only requirement is that the COM component must be registered.
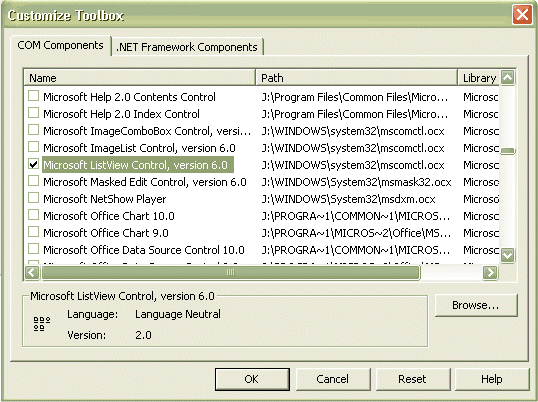
You can also use ActiveX Controls from .NET. To do so, right-click on the Toolbox and select Customize Toolbox. From the COM Components tab, select (for example) Microsoft ListView Control and check the checkbox beside it (see Figure C). The Listview control will be added to the Toolbox.
Figure C |
|
Selecting the Microsoft ListView Control |
As soon as you place the Listview control on the form, Visual Studio.NET generates the RCW for the ActiveX Control. The naming convention followed is AxInterop.ActiveXControl.dll, so in this case it is called AxInterop.MSComctlLib.dll.
Interoperability without Visual Studio.NET
Suppose you are not using Visual Studio.NET. Another way of achieving the same result is to use the .Net Framework tool called the Type Library Importer (tlbimp.exe). This tool can be used to convert type definitions in a COM library into a .NET assembly.
For example, if you have a COM DLL named MyCOMComponent.dll, you can build an RCW for it as follows:
Tlbimp MyCOMComponent.dll /out:MyRCW.dll
In the case of ActiveX Controls, you can use the .NET Framework tool called the ActiveX Importer to convert the type definitions in an ActiveX Control into a Windows Forms Control. It can be used from the command line as follows:
Aximp MyOCX.ocx
Wrap it up
If you are wondering how Visual Studio.NET or the command-line tools generate these wrappers, here is the key. The .NET Framework Class Library has a class called TypeLibConverter (System.Runtime.IneropServices.TypeLibConverter), which exposes a method called ConvertTypeLibToAssembly that can be used to write your own tool; this tool generates an RCW. The same is true for the ActiveX controls—the AxImporter Class (System.Windows.Forms.Design.AxImporter) can be used to generate RCWs for ActiveX controls.
Memory management
One of the main architectural differences between .NET and COM is memory management. The CLR provides automatic memory management by means of a garbage collector that manages the allocation and release of memory. This is done periodically, so an object is not immediately destroyed when it goes out of scope or when it is set to Nothing (Visual Basic.NET, the same as null in C#).
When an RCW goes out of scope or is set to Nothing, the object is not destroyed immediately, and the corresponding COM object will also reside in memory—which might not be desirable. In such situations, steps should be taken to clean up the memory. You can do so by calling the garbage collector, by calling the System.GC.Collect method, or—the preferred way—by calling the Marshal.ReleaseComObject method on the RCW.
Apart from providing backward compatibility, the .NET framework also provides forward compatibility, which means that it is possible to expose a .NET assembly so that it can be consumed from COM. We will now shift our focus to this aspect of utilizing .NET assemblies from COM.
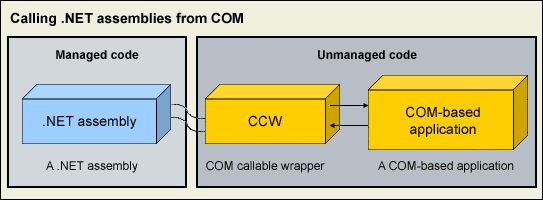
Calling .NET assemblies from COM
Let us now see how we can utilize .NET assemblies from COM (see Figure A).
Figure A |
|
Utilizing .NET assemblies from COM |
imilar to the process of calling COM Objects from .NET, here we have a wrapper class over a .NET Assembly, which can be accessed from a COM-based application. This wrapper class is known as the “COM Callable Wrapper” (CCW). Let’s see how we can do this using Visual Studio.NET.
Start Visual Studio.NET and start a new project of type Class Library. Call it DotnetForCOM (for example). Add a default constructor to the class and some public methods, which you want available in COM. Once you have this ready, right-click on the project in the Solution Explorer and select Properties to bring up the project property pages. Here, choose Configuration properties and select the Build option. You will be presented with the screen displayed in Figure B.
Figure B |
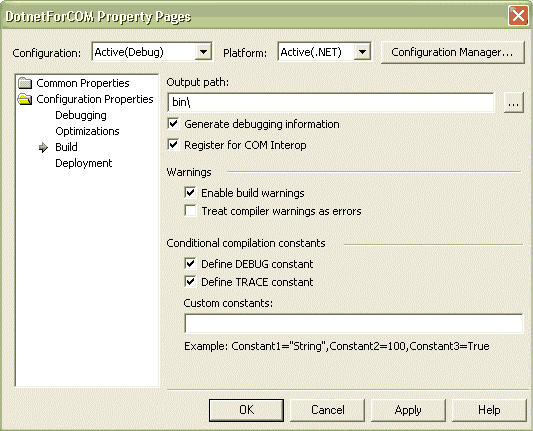
|
Working with property pages |
Check the checkbox Register For COM Interop (in Figure B). Now, when you build this project, the .NET assembly is automatically registered for COM Interop. You will now be able to use this assembly from COM, for example from Visual Basic 6.0. If you start a new Visual Basic 6 project and choose the Project Menu and References, this .NET assembly is available to reference from COM (see Figure C).
Figure C |
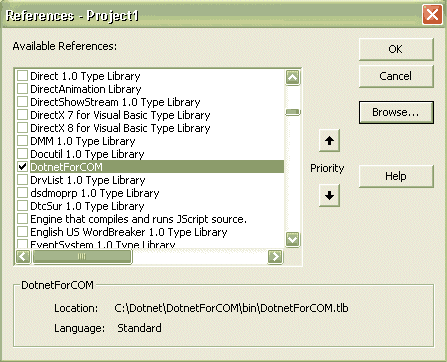
|
Visual Basic project references |
Once this is done, you can access the functionality provided by the .NET assembly from Visual Basic 6.
Working outside Visual Studio.NET
Let us now see what we need to do if we are not using Visual Studio.NET. There are certain requirements for a .NET assembly to be exposed to COM.
Provide a default constructor
Firstly, .NET assembly must provide a default constructor. This is because COM Clients do not support parameterized constructors available in .NET, so make sure you provide a default constructor to the class. You can have constructors with parameters, as well, along with the default constructor, but the default constructor needs to be present to instantiate the .NET assembly from COM client.
Generating type libraries
Generate the type library for the .NET assembly, and make entries in the System Registry. There are two ways to achieve this:
· Use the Type Library Exporter tool provided with the .NET Framework SDK to generate the type library for the .NET assembly. Then register the type library using the Assembly Registration tool.
Tlbexp test.dll /out:test.tlb Regasm test.dll
· Directly generate the type library, and register it using Regasm.
Regasm test.dll /tlb:test.tlb
The .NET Assembly must have a Strong Name and must reside in the Global Assembly Cache. For this purpose you will need to generate a key for the Assembly using the Strong Name tool (Sn.exe). Once this is done, you can add the assembly to the Global Assembly Cache (GAC) using the Global Assembly Cache Tool (Gacutil.exe). You can add an assembly to the GAC using:
gacutil –I SampleAssembly.dll
Once this has been done, you will be able to add a reference to the .NET assembly from COM and use it. The COM Callable Wrapper (CCW) is generated at the time when a call is given to the .NET Assembly from COM; it acts as a bridge between the managed and unmanaged boundaries. |
|
5. Web garden:
An application pool that uses more than one worker process is called a Web garden. The worker processes in a Web garden share the requests that arrive for that particular application pool. If a worker process fails, another worker process can continue to process requests.
This feature of IIS 6.0 is available only when IIS is running in worker process isolation mode.
In IIS 6.0 worker process isolation mode, application pools enhance Web site or application reliability by isolating applications and the worker processes that service those applications. For even greater reliability, you can configure an application pool to be supported by multiple worker processes. An application pool that uses more than one worker process is called a Web garden. The worker processes in a Web garden share the requests that arrive for that particular application pool. If a worker process fails, another worker process can continue to process requests.
 Note Note
Web gardens are different from Web farms. A Web garden is configured on a single server by specifying multiple worker processes for an application pool. Web farms use multiple servers for a Web site.
Creating a Web garden for an application pool can also enhance performance in the following situations:
• |
Robust processing of requests: When a worker process in an application pool is tied up (for example, when a script engine stops responding), other worker processes can accept and process requests for the application pool. |
• |
Reduced contention for resources: When a Web garden reaches a steady state, each new TCP/IP connection is assigned, according to a round-robin scheme, to a worker process in the Web garden. This helps smooth out workloads and reduce contention for resources that are bound to a worker process. |
Procedures
Important You must be a member of the Administrators group on the local computer to perform the following procedure or procedures. As a security best practice, log on to your computer by using an account that is not in the Administrators group, and then use the runas command to run IIS Manager as an administrator. At a command prompt, type runas /user:Administrative_AccountName "mmc %systemroot%\system32\inetsrv\iis.msc".
To configure a Web garden by using IIS Manager
1. |
In IIS Manager, expand the local computer, expand Application Pools, right-click the application pool, and then click Properties. |
2. |
Click the Performance tab, and under Web garden, in the Maximum number of worker processes box, type the number of worker processes that you want to assign to the application pool. (You must type a number greater than 1 for the application pool to become a Web garden. |
3. |
Click OK. |
Optionally, you can configure a Web garden by setting the metabase property MaxProcesses. The MaxProcesses property determines the maximum number of worker processes that an application pool allows to service its requests. A value of zero indicates an unmanaged application pool that is not served by a worker process.
The default value for the MaxProcesses property is 1, which is the default number of worker processes that service an application pool. To configure an application pool so that it is a Web garden, set the MaxProcesses property to a value greater than 1.
Important You must be a member of the Administrators group on the local computer to run scripts and executables. As a security best practice, log on to your computer by using an account that is not in the Administrators group, and then use the runas command to run your script or executable as an administrator. At a command prompt, type runas /profile /user:MyComputer\Administrator cmd to open a command window with administrator rights and then type cscript.exeScriptName (include the script's full path and any known parameters).
To configure a Web garden by using Adsutil.vbs
1. |
In the Run dialog box, type cmd, and then click OK. |
2. |
At the command prompt, type:
cscript %SystemDrive%\Inetpub\AdminScripts\adsutil.vbs set W3SVC/AppPools/ApplicationPoolName/MaxProcesses n
Replace n with the number of worker processes that you want to service the application pool. |
|
|
6. DELEGATES
Introduction
A delegate is an object that can refer to a method. Thus, when you create a delegate, you are creating an object that can hold a reference to a method. Furthermore, the method can be called through this reference. Thus, a delegate can invoke the method to which it refers (It’s Like a function pointer in c/c++).
Paragraph Heading 1
Even though a method is not an object, it still has a physical location in memory. This address is the entry point of the method and is the address called when the method is invoked. The address of a method can be assigned to a delegate. Once a delegate refers to a method, the method can be called through that delegate. Furthermore, the same delegate can be used to call a different method by simply changing the method to which the delegate refers. The principal advantage of a delegate is that it allows you to specify a call to a method, but the method actually invoked is determined at runtime, not at compile time.
A delegate is declared using the keyword delegate. The general form of a delegate declaration is shown here:
delegate ret-type name(parameter-list);
Here, ret-type is the type of value returned by the methods that the delegate will be calling. The name of the delegate is specified by name. The parameters required by the methods called through the delegate are specified in the parameter-list. Once declared, a delegate can call only methods whose return type and parameter list match those specified by the delegate.
As mentioned, the key point about delegates is that a delegate can be used to call any method that agrees with its signature. This makes it possible to determine which method to invoke at runtime. Furthermore, the method invoked can be an instance method associated with an object, or a static method associated with a class. All that matters is that the signature of the method agrees with that of the delegate.
To see delegates in action, let’s begin with the simple example shown here:
[]CODE]
// A simple delegate example.
using System;
// Declare a delegate.
delegate string strMod(string str);
class DelegateTest
{
// Replaces spaces with hyphens.
static string replaceSpaces(string a)
{
Console.WriteLine("Replaces spaces with hyphens.");
return a.Replace(' ', '-');
}
// Remove spaces.
static string removeSpaces(string a)
{
string temp = "";
int i;
Console.WriteLine("Removing spaces.");
for(i=0; i < a.Length; i++)
if(a[i] != ' ') temp += a[i];
return temp;
}
// Reverse a string.
static string reverse(string a)
{
string temp = "";
int i, j;
Console.WriteLine("Reversing string.");
for(j=0, i=a.Length-1; i >= 0; i--, j++)
temp += a[i];
return temp;
}
public static void Main()
{
// Construct delegates.
strMod strOp = new strMod(replaceSpaces);
string str;
// Call methods through delegates.
str = strOp("This is a test.");
Console.WriteLine("Resulting string: " + str);
Console.WriteLine();
strOp = new strMod(removeSpaces);
str = strOp("This is a test.");
Console.WriteLine("Resulting string: " + str);
Console.WriteLine();
strOp = new strMod(reverse);
str = strOp("This is a test.");
Console.WriteLine("Resulting string: " + str);
}
[]/CODE]}
Multicasting
One of the most exciting features of a delegate is its support for multicasting. In simple terms, multicasting is the ability to create a chain of methods that will be automatically called when a delegate is invoked. Such a chain is very easy to create. Simply instantiate a delegate, and then use the += operator to add methods to the chain. To remove a method, use – =. (You can also use the +, –, and = operators separately to add and subtract delegates, but += and – = are more convenient.) The only restriction is that the delegate being multicast must have a void return type.
Example
[]CODE]
// Demonstrate multicasting.
using System;
// Declare a delegate.
delegate void strMod(ref string str);
class StringOps
{
// Replaces spaces with hyphens.
static void replaceSpaces(ref string a)
{
Console.WriteLine("Replaces spaces with hyphens.");
a = a.Replace(' ', '-');
}
// Remove spaces.
static void removeSpaces(ref string a)
{
string temp = "";
int i;
Console.WriteLine("Removing spaces.");
for(i=0; i < a.Length; i++)
if(a[i] != ' ') temp += a[i];
a = temp;
}
// Reverse a string.
static void reverse(ref string a)
{
string temp = "";
int i, j;
Console.WriteLine("Reversing string.");
for(j=0, i=a.Length-1; i >= 0; i--, j++)
temp += a[i];
a = temp;
}
public static void Main()
{
// Construct delegates.
strMod strOp;
strMod replaceSp = new strMod(replaceSpaces);
strMod removeSp = new strMod(removeSpaces);
strMod reverseStr = new strMod(reverse);
string str = "This is a test";
// set up multicast
strOp = replaceSp;
strOp += reverseStr;
// Call multicast
strOp(ref str);
Console.WriteLine("Resulting string: " + str);
Console.WriteLine();
// remove replace and add remove
strOp -= replaceSp;
strOp += removeSp;
str = "This is a test."; // reset string
// Call multicast
strOp(ref str);
Console.WriteLine("Resulting string: " + str);
Console.WriteLine();
}
[/CODE]}
In general, delegates are useful for two main reasons.
First, delegates support events. Second, delegates give your program a way to execute a method at runtime without having to know precisely what that method is at compile time. This ability is quite useful when you want to create a framework that allows components to be plugged in. For example, imagine a drawing program (a bit like the standard Windows Paint accessory). Using a delegate, you could allow the user to plug in special color filters or image analyzers. Furthermore, the user could create a sequence of these filters or analyzers. Such a scheme would be easily handled using a delegate.
|
|
7. NET Remoting Versus Web Services
With the advent of .NET and the .NET Framework, Microsoft introduced a set of new technologies in the form of Web services and .NET remoting. .NET remoting and ASP.NET Web services are powerful technologies that provide a suitable framework for developing distributed applications. It is important to understand how both technologies work and then choose the one that is right for your application.
The Web services technology enables cross-platform integration by using HTTP, XML and SOAP for communication thereby enabling true business-to-business application integrations across firewalls. Because Web services rely on industry standards to expose application functionality on the Internet, they are independent of programming language, platform and device.
Remoting is .a technology that allows programs and software components to interact across application domains, processes, and machine boundaries. This enables your applications to take advantage of remote resources in a networked environment.
Both Web services and remoting support developing distributed applications and application integration, but you need to consider how they differ before choosing one implementation over the other. In this article, I will show the differences between these two technologies. I will present samples for each type of implementation and identify when to use which technology.
DCOM
If you are a real Microsoft platform developer then you have done some work on COM and interface based components. When it comes to distributing your program logic, you are almost tied to Distributed COM (DCOM).
DCOM is a very proprietary RPC-based communication protocol for COM-based distributed component architectures. Even though DCOM allows us to create scalable and reliable architectures in the Intranet environment, there are a lot of problems with DCOM when you try to integrate with different platforms and technologies in an Internet environment. |
A Look at .NET Remoting
.NET Remoting uses a flexible and extremely extensible architecture. Remoting uses the .NET concept of an Application Domain (AppDomain) to determine its activity. An AppDomain is an abstract construct for ensuring isolation of data and code, but not having to rely on operating system specific concepts such as processes or threads. A process can contain multiple AppDomains but one AppDomain can only exist in exactly one process. If a call from program logic crosses an AppDomain boundary then .NET Remoting will come into place. An object is considered local if it resides in the same AppDomain as the caller. If the object is not in the same appdomain as the caller, then it is considered remote.
In .NET remoting, the remote object is implemented in a class that derives from System.MarshalByRefObject. The MarshalByRefObject class provides the core foundation for enabling remote access of objects across application domains. A remote object is confined to the application domain where it is created. In .NET remoting, a client doesn't call the methods directly; instead a proxy object is used to invoke methods on the remote object. Every public method that we define in the remote object class is available to be called from clients.
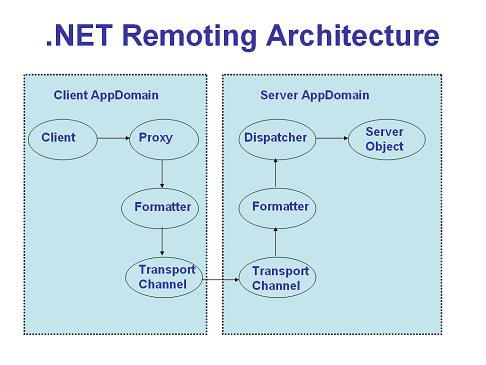
When a client calls the remote method, the proxy receives the call, encodes the message using an appropriate formatter, then sends the call over the channel to the server process. A listening channel on the server appdomain picks up the request and forwards it to the server remoting system, which locates and invokes the methods on the requested object. Once the execution is completed, the process is reversed and the results are returned back to the client.
Out of the box, the remoting framework comes with two formatters: the binary and SOAP formatters. The binary formatter is extremely fast, and encodes method calls in a proprietary, binary format. The SOAP formatter is slower, but it allows developers to encode the remote messages in a SOAP format. If neither formatter fits your needs, developers are free to write their own and plug it in as a replacement.
Different Types of Remote Objects
The remoting infrastructure allows you to create two distinct types of remote objects.
- Client-activated objects - A client-activated object is a server-side object whose creation and destruction is controlled by the client application. An instance of the remote object is created when the client calls the new operator on the server object. This instance lives as long as the client needs it, and lives across one to many method calls. The object will be subject to garbage collection once it's determined that no other clients need it.
- Server-activated objects - A server-activated object's lifetime is managed by the remote server, not the client that instantiates the object. This differs from the client-activated object, where the client governs when the object will be marked for finalization. It is important to understand that the server-activated objects are not created when a client calls New or Activator.GetObject. They are rather created when the client actually invokes a method on the proxy. There are two types of server activated objects. They are:
- Single call . Single-call objects handle one, and only one, request coming from a client. When the client calls a method on a single call object, the object constructs itself, performs whatever action the method calls for, and the object is then subject to garbage collection. No state is held between calls, and each call (no matter what client it came from) is called on a new object instance.
- Singleton - The difference in a singleton and single call lies in lifetime management. While single-call objects are stateless in nature, singletons are stateful objects, meaning that they can be used to retain state across multiple method calls. A singleton object instance serves multiple clients, allowing those clients to share data among themselves.
A Look At ASP.NET Web Services
With the arrival of .NET, creating an ASP.NET Web service is a breezy experience with the .NET framework taking away all the complexities in creating and consuming Web services. To create a Web service, all you need to do is create a Web service class that derives from the System.Web.Services.WebService class and decorate the methods (that you want to expose as Web services) with the WebMethod attribute. Once this is done, these methods can be invoked by sending HTTP requests using SOAP.
Consuming a Web service is very straightforward too. You can very easily create a proxy class for your Web service using either wsdl.exe utility or the Add Web Reference option in VS.NET. The Web service proxy hides all the network and marshaling plumbing from the application code, so using the Web service looks just like using any other local object.
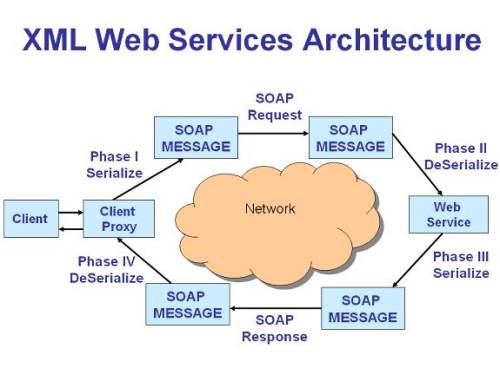
As you can see from the above diagram, the client proxy receives the request from the client, serializes the request into a SOAP request which is then forwarded to the remote Web service. The remote Web service receives the SOAP request, executes the method, and sends the results in the form of a SOAP response to the client proxy, which deserializes the message and forwards the actual results to the client.
ASP.NET Web Services Vs .NET Remoting
Now that we have understood the basic concepts of .NET remoting and Web services, let us identify the differences between these two technologies. For this, I present different factors such as performance, state management, etc and then identify which technology to use in what situations.
Performance
In terms of performance, the .NET remoting plumbing provides the fastest communication when you use the TCP channel and the binary formatter. In the case of Web services, the primary issue is performance. The verbosity of XML can cause SOAP serialization to be many times slower than a binary formatter. Additionally, string manipulation is very slow when compared to processing the individual bits of a binary stream. All data transported across the wire is formatted into a SOAP packet. However if your Web service performs computation intensive operations, you might want to consider using caching to increase the performance of your Web service on the server side. This will increase the scalability of the Web service, which in turn can contribute to the increase in performance of the Web service consumers. A remoting component, using the TCP channel and the binary formatter, provides the greatest performance of any remoting scenario, primarily because the binary formatter is able to serialize and deserialize data much faster.
If you use .NET remoting with a SOAP formatter, you will find that the performance provided by ASP.NET Web services is better than the performance provided by NET remoting endpoints that used the SOAP formatter with either the HTTP or the TCP channel. However the .NET remoting provides clear performance advantages over ASP.NET Web services only when you use TCP channels with binary communication.
State Management
Web services are a stateless programming model, which means each incoming request is handled independently. In addition, each time a client invokes an ASP.NET Web service, a new object is created to service the request. The object is destroyed after the method call completes. To maintain state between requests, you can either use the same techniques used by ASP.NET pages, i.e., the Session and Application objects, or you can implement your own custom solution. However it is important to remember that maintaining state can be costly with Web services as they use extensive memory resources.
.NET remoting supports a range of state management options that you can choose from. As mentioned before, SingleCall objects are stateless, Singleton objects can share state for all clients, and client-activated objects maintain state on a per-client basis. Having three types of remote objects (as opposed to one with Web services) during the design phase helps us create more efficient, scalable applications. If you don't need to maintain state, use single-call objects; if you need to maintain state in a small section of code, use single call and singletons together. The ability to mix and match the various object types facilitates creation of solid architectural designs.
Security
.NET remoting plumbing does not provide out of the box support for securing cross-process invocations. However a .NET remoting object hosted in IIS, can leverage all the same security features provided by IIS. If you are using the TCP channel or the HTTP channel hosted in a container other than IIS, you have to implement authentication, authorization and privacy mechanisms yourself.
Since ASP.NET Web services are hosted, by default, in IIS, they benefit from all the security features of IIS such as support for secure communication over the wire using SSL, authentication and authorization services.
Reliability
.NET remoting gives you the flexibility to host remote objects in any type of application including a Windows Form, a managed Windows Service, a console application or the ASP.NET worker process. If you host your remote objects in a windows service, or a console application, you need to make sure that you provide features such as fault tolerance within your hosting application so that the reliability of the remote object is not compromised. However if you do host remote objects in IIS, then you can take advantage of the fact that the ASP.NET worker process is both auto-starting and thread-safe. In the case of ASP.NET Web services, reliability is not a consideration as they are always hosted in IIS, making it easy for them to take advantage of the capabilities provided by IIS.
Extensibility
Both the ASP.NET Web services and the .NET remoting infrastructures are extensible. You can filter inbound and outbound messages, control aspects of type marshaling and metadata generation. .NET remoting takes extensibility to the next level allowing you to implement your own formatters and channels.
Since ASP.NET Web services rely on the System.Xml.Serialization.XmlSerializer class to marshal data to and from SOAP messages at runtime, we can very easily customize the marshaling by adding a set of custom attributes that can be used to control the serialization process. As a result, you have very fine-grained control over the shape of the XML being generated when an object is serialized.
Ease of programming and deployment
In this section, we will consider a simple remoting object and an ASP.NET Web service to understand the complexities involved in creating and consuming them. We will start off by creating a simple remote object.
Creating a remote object
Creating a remoting object is a simple process. To create a remote object, you need to inherit from MarshalByRefObject class. The following code shows a remotable class.
using System; namespace RemoteClassLib { public class MyRemoteObject : System.MarshalByRefObject { public MyRemoteObject() { Console.WriteLine("Constructor called"); } public string Hello(string name) { Console.WriteLine("Hello Called"); return "Hello " + name; } } }
The above code is very simple and straightforward. We start off by defining a class that inherits from MarshalByRefObject. After that we add code to the constructor of the class to write out a message to the console. Then we have a method named Hello that basically takes a string argument and appends that with the string and returns the concatenated value back to the caller. Once the remote object is created, the next step is to create a host application that hosts the remote object. For the purposes of this article, we will create a console application that reads the details of the remote object from its configuration file.
using System; using System.Runtime.Remoting; namespace RemoteClassLibServer { class RemoteServer { [STAThread] static void Main(string[] args) { RemotingConfiguration.Configure( "RemoteClassLibServer.exe.config"); Console.WriteLine("Press return to Exit"); Console.ReadLine(); } } }
In the main method, we just read the configuration settings from the configuration file using the RemotingConfiguration.Configure method and wait for the client applications to connect to it.
The configuration file used by the above hosting application looks like the following. In the configuration file, we specify that we want to expose the remote object using the TCP channel by using the channel element.
<?xml version="1.0" encoding="utf-8" ?> <configuration> <system.runtime.remoting> <application name="RemoteClassLibServer"> <service> <wellknown mode="SingleCall" type="RemoteClassLib.MyRemoteObject,RemoteClassLib" objectUri="MyRemoteObject"> </wellknown> </service> <channels> <channel ref="tcp server" port="9000"/> </channels> </application> </system.runtime.remoting> </configuration>
Once the hosting application is started, then client applications can start creating instances of the remote object and invoke its methods. In the next section, we will understand the processes involved in creating an ASP.NET Web service.
Creating an ASP.NET Web Service
As mentioned before, creating an ASP.NET Web service is pretty easy in VS.NET. Select the ASP.NET Web Service template using Visual Studio.NET New Project dialog box. Enter the name of the project and click OK to create the project. Once the project is created, modify the default service1.asmx file to look like the following.
using System; using System.Collections; using System.ComponentModel; using System.Data; using System.Diagnostics; using System.Web; using System.Web.Services; namespace XmlWebServicesExample { public class Service1 : System.Web.Services.WebService { public Service1() { } [WebMethod (EnableSession=true)] public string HelloWorld() { return "Hello World"; } } }
As you can see from the above, the Web service class named Service1 is derived from System.Web.Services.WebService. Inheriting from the WebService class is optional and it is used to gain access to common ASP.NET objects like Application, Session, User, and Context. Then we also add a method named HelloWorld that basically returns a simple string back to the callers of the Web service. In the WebMethod attribute of the HelloWorld method, we also specify that we want to enable session state for our ASP.NET Web service by setting the EnableSession attribute to true.
Creating the consumer for the ASP.NET Web Service
You can consume the Web service by using the Add Web Reference option in VS.NET to create a proxy for the Web service. When you create a Web reference, the VS.NET IDE creates a proxy for you based on the WSDL file published by the Web service. Once the proxy is generated, you can treat the proxy class methods as if they are the actual Web service methods. At runtime, when the proxy class methods are invoked, they will connect to the actual Web service, invoke the Web service method, retrieve the results returned by the Web service and hand it back to the consumers. The following screenshot shows how to use the Add Web Reference option to create a proxy for the Web service.
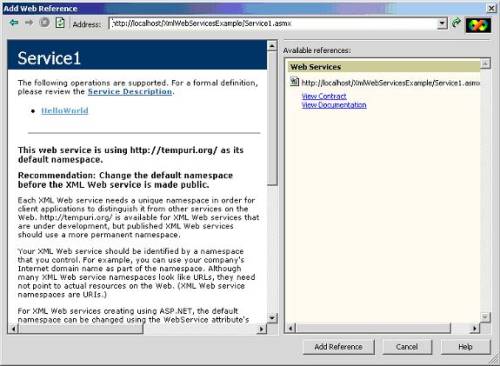
So far, we have seen the steps involved in creating a .NET remoting object and an ASP.NET Web service. As can be seen from the above code, ASP.NET Web services are very easy-to-create. Consuming ASP.NET Web service is also a very simple process due to the excellent Web service support provided by Visual Studio.NET. With .NET remoting, you need to create the remote object first and then write a hosting application (assuming that you are not using IIS) to expose that remote object. You also need to make sure that the information about the remote object is retrieved from the configuration file to allow for extensibility in the future. If you all these factors into consideration, you will agree that .NET remoting objects are complex to develop and deploy.
Type Fidelity
ASP.NET Web services favor the XML schema type system, and provide a simple programming model with broad cross-platform reach. .NET remoting favors the runtime type system, and provides a more complex programming model with much more limited reach. This essential difference is the primary factor in determining which technology to use.
Putting it all together
So far, we have looked at the differences between these two technologies. Let us summarize the difference in a table.
|
ASP.NET Web Services |
.NET Remoting |
Protocol |
Can be accessed only over HTTP |
Can be accessed over any protocol (including TCP, HTTP, SMTP and so on) |
State Management |
Web services work in a stateless environment |
Provide support for both stateful and stateless environments through Singleton and SingleCall objects |
Type System |
Web services support only the datatypes defined in the XSD type system, limiting the number of objects that can be serialized. |
Using binary communication, .NET Remoting can provide support for rich type system |
Interoperability |
Web services support interoperability across platforms, and are ideal for heterogeneous environments. |
.NET remoting requires the client be built using .NET, enforcing homogenous environment. |
Reliability |
Highly reliable due to the fact that Web services are always hosted in IIS |
Can also take advantage of IIS for fault isolation. If IIS is not used, application needs to provide plumbing for ensuring the reliability of the application. |
Extensibility |
Provides extensibility by allowing us to intercept the SOAP messages during the serialization and deserialization stages. |
Very extensible by allowing us to customize the different components of the .NET remoting framework. |
Ease-of-Programming |
Easy-to-create and deploy. |
Complex to program. |
Though both the .NET Remoting infrastructure and ASP.NET Web services can enable cross-process communication, each is designed to benefit a different target audience. ASP.NET Web services provide a simple programming model and a wide reach. .NET Remoting provides a more complex programming model and has a much narrower reach.
As explained before, the clear performance advantage provided by TCPChannel-remoting should make you think about using this channel whenever you can afford to do so. If you can create direct TCP connections from your clients to your server and if you need to support only the .NET platform, you should go for this channel. If you are going to go cross-platform or you have the requirement of supporting SOAP via HTTP, you should definitely go for ASP.NET Web services.
Combination of .NET Remoting and ASP.NET Web Services in Action
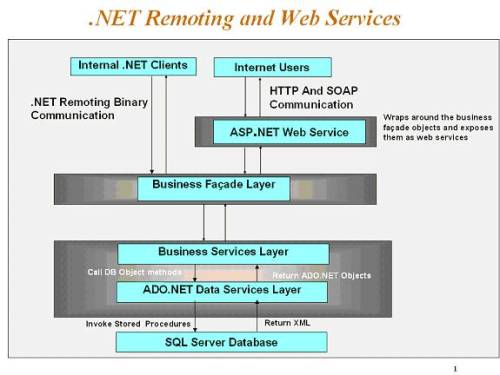
So far, we have understood how the .NET remoting and ASP.NET Web services technologies differ in implementation. We have also had a detailed look at different factors to understand what technology to choose in what situation. Even though these two technologies are meant for different purposes, there are times where you will be able to use the combination of these technologies in your application. For example, in an application scenario where you are trying to address the needs of both internet and intranet clients, you might consider using both .NET remoting and Web services as shown in the above diagram. For the intranet .NET clients, you can use .NET remoting to enable cross appdomain communication. For the internet clients, you can expose the same functionality as Web services, allowing client applications running in different platforms to take advantage of the Web service.
Conclusion
Both the .NET remoting and ASP.NET Web services are powerful technologies that provide a suitable framework for developing distributed applications. It is important to understand how both technologies work and then choose the one that is right for your application. For applications that require interoperability and must function over public networks, Web services are probably the best bet. For those that require communications with other .NET components and where performance is a key priority, .NET Remoting is the best choice. In short, use Web services when you need to send and receive data from different computing platforms, use .NET Remoting when sending and receiving data between .NET applications. In some architectural scenarios, you might also be able to use.NET Remoting in conjunction with ASP.NET Web services and take advantage of the best of both worlds. |
|
8. REMOTING
What is .NET Remoting? .NET Remoting is an enabler for application communication. It is a generic system for different applications to use to communicate with one another. .NET objects are exposed to remote processes, thus allowing interprocess communication. The applications can be located on the same computer, different computers on the same network, or even computers across separate networks.
.NET Remoting versus Distributed COM
In the past interprocess communication between applications was handled through Distributed COM, or DCOM. DCOM works well and the performance is adequate when applications exist on computers of similar type on the same network. However, DCOM has its drawbacks in the Internet connected world. DCOM relies on a proprietary binary protocol that not all object models support, which hinders interoperability across platforms. In addition, have you tried to get DCOM to work through a firewall? DCOM wants to communicate over a range of ports that are typically blocked by firewalls. There are a ways to get it to work, but they either decrease the effectiveness of the firewall (why bother to even have the firewall if you open up a ton of ports on it), or require you to get a firewall that allows support for binary traffic over port 80.
.NET Remoting eliminates the difficulties of DCOM by supporting different transport protocol formats and communication protocols. This allows .NET Remoting to be adaptable to the network environment in which it is being used.
.NET Remoting versus Web Services
Unless you have been living in a cave, or are way behind in your reading, you have probably read something about Web services. When you read the description of .NET Remoting it may remind you a lot of what you're read about Web services. That is because Web services fall under the umbrella of .NET Remoting, but have a simplified programming model and are intended for a wide target audience.
Web services involve allowing applications to exchange messages in a way that is platform, object model, and programming language independent. Web services are stateless and know nothing about the client that is making the request. The clients communicate by transferring messages back and forth in a specific format known as the Simple Object Access Protocol, or SOAP. (Want to get some funny looks in the hallway? Stand around in the hallway near the marketing department with your colleagues and discuss the benefits of using SOAP).
The following list outlines some of the major differences between .NET Remoting and Web services that will help you to decide when to use one or the other:
- ASP.NET based Web services can only be accessed over HTTP. .NET Remoting can be used across any protocol.
- Web services work in a stateless environment where each request results in a new object created to service the request. .NET Remoting supports state management options and can correlate multiple calls from the same client and support callbacks.
- Web services serialize objects through XML contained in the SOAP messages and can thus only handle items that can be fully expressed in XML. .NET Remoting relies on the existence of the common language runtime assemblies that contain information about data types. This limits the information that must be passed about an object and allows objects to be passed by value or by reference.
- Web services support interoperability across platforms and are good for heterogeneous environments. .NET Remoting requires the clients be built using .NET, or another framework that supports .NET Remoting, which means a homogeneous environment.
Channels
Remote objects are accessed through Channels. Channels physically transport the messages to and from remote objects. There are two existing channels TcpChannel and HttpChannel. Their names give away the protocols that they use. In addition, the TcpChannel or HttpChannel can be extended, or a new channel created if you determine the existing channels do not meet your needs.
Create a Remotable Object
A remotable object is nothing more than an object that inherits from MarshalByRefObject. The following sample demonstrates a simple class to expose the omnipresent hello world. This object exposes a single method HelloWorld that will return a string. The only values that can be returned from methods are the classes in the .NET Framework that are serializable such as string and DataSet. In addition, if you need to return a user-defined object then the object needs to be marked as serializable.
Create a new C# class library project. Add a class called SampleObject and put in the following code. Add a reference to System.Runtime.Remoting in the project, otherwise the TcpChannel will not be found. Compile the class to make sure you have everything correct.
using System;
using System.Runtime.Remoting;
using System.Runtime.Remoting.Channels;
using System.Runtime.Remoting.Channels.Tcp;
namespace CodeGuru.Remoting
{
/// <remarks>
/// Sample object to demonstrate the use of .NET Remoting.
/// </remarks>
public class SampleObject : MarshalByRefObject
{
/// <summary>
/// Constructor
/// </summary>
public SampleObject()
{
}
/// <summary>
/// Return a hello message
/// </summary>
/// <returns>
Hello world message
</returns>
public string HelloWorld()
{
return "Hello World!";
}
}
}
Create a Server To Expose the Remotable Object
We need to create a server object that will act as a listener to accept remote object requests. For this example we will use the TCP/IP channel. We first create an instance of the channel and then register it for use by clients at a specific port. The service can be registered as WellKnownObjectMode.SingleCall, which results in a new instance of the object for each client, or as WellKnownObjectMode.Singleton, which results in one instance of the object used for all clients.
It is not necessary to create the server listener if you are planning to use IIS. For obvious reasons, IIS only supports the use of the HttpChannel. Create a virtual directory for your application and then put code to register your service in the Application_Start event.
For our example, we'll go ahead and create a server listener in case you don't have IIS. Since the service needs to be bound to an available port, for our example I chose 8080, which is a port that I know to be unused on my computer. You may need to choose a different port depending upon what ports you have available. To see a list of the used ports on your computer open a command prompt and issue the command "netstat --a". It may produce a long listing so make sure the command prompt buffer sizes are set to allow scrolling. Compile the class to make sure you have everything correct.
Create a new C# console application project. Add a class called SampleServer and paste in the following code. Add a reference to System.Runtime.Remoting in the project, otherwise the TcpChannel will not be found. In addition, add a reference to the project containing the SampleObject, otherwise the code will not compile because it won't know how to find a reference to SampleObject.
using System;
using System.Runtime.Remoting;
using System.Runtime.Remoting.Channels;
using System.Runtime.Remoting.Channels.Tcp;
namespace CodeGuru.Remoting
{
/// <remarks>
/// Sample server to demonstrate the use of .NET Remoting.
/// </remarks>
public class SampleServer
{
public static int Main( string [] args)
{
// Create an instance of a channel
TcpChannel channel = new TcpChannel(8080);
ChannelServices.RegisterChannel(channel);
// Register as an available service with the name HelloWorld
RemotingConfiguration.RegisterWellKnownServiceType( typeof(SampleObject), "HelloWorld", WellKnownObjectMode.SingleCall );
System.Console.WriteLine("Press the enter key to exit...");
System.Console.ReadLine();
return 0;
}
}
} Create a Client To Use the Remotable Object
Now that we have our remotable object and a server object to listen for requests, let's create a client to use it. Our client will be very simple. It will connect to the server, create an instance of the object using the server, and then execute the HelloWorld method.
Create a new C# console application project. Add a class called SampleClient and paste in the following code. Add a reference to System.Runtime.Remoting in the project, otherwise the TcpChannel will not be found. In addition, add a reference to the project containing the SampleObject, otherwise the code will not compile because it won't know how to find a reference to SampleObject. Compile the class to make sure you have everything correct.
using System;
using System.Runtime.Remoting;
using System.Runtime.Remoting.Channels;
using System.Runtime.Remoting.Channels.Tcp;
namespace CodeGuru.Remoting
{
/// <remarks>
/// Sample client to demonstrate the use of .NET Remoting.
/// </remarks>
public class SampleClient
{
public static int Main( string [] args)
{
// Create a channel for communicating w/ the remote object
// Notice no port is specified on the client
TcpChannel chan = new TcpChannel();
ChannelServices.RegisterChannel(chan);
// Create an instance of the remote object
SampleObject obj = (SampleObject) Activator.GetObject( typeof(CodeGuru.Remoting.SampleObject), "tcp://localhost:8080/HelloWorld" );
// Use the object
if( obj.Equals( null) )
{
System.Console.WriteLine("Error: unable to locate server");
}
else
{
Console.WriteLine(obj.HelloWorld());
}
return 0;
}
}
} Test the Remoting Sample
Once you have created the projects and successfully compiled each of them you are ready to try it out. Assuming you chose a free TCP/IP port for the service, start the server executable. After the server successfully starts it will result in a console window being displayed with the message "Press the enter key to exit". The server is listening so you are now ready to run the client. Executing the client should result in "Hello World!" being displayed in a separate console window. The client window will then close while the server remains open and available.
If you have multiple computers available to you on a network you could execute the server on one machine and the client on another just to prove to yourself that it really is remoting. In order to run on separate machines you would need to change the reference to localhost in the sample client to point to the appropriate location.
Summary
.NET Remoting is a powerful way to enable interprocess communication. It is more complicated to program against than Web services. You need to decide for yourself whether your standard architecture is to use .NET Remoting or Web services.
The following list provides an overview of the key elements of the architecture:
- A remote object is an object that’s running on the server. The client doesn’t call methods on this object directly, but uses a proxy instead. With .NET it’s easy to distinguish remote objects from local objects; every class that derived from MarshalByRefObject never leaves its application domain. The client can call methods of the remote object via a proxy.
- A channel is used for communication between the client and the server. There are client and server parts of the channel .NET Framework 1.1 offers two channel type that communicate via TCP or HTTP. You can also create a custom channel that communicates by using a different protocol.
- Messages are sent into a channel. Messages are created for communication between the client and the server. These messages hold the information about the remote object, the method name called, and all of the arguments.
- The formatter defines how messages are transferred into the channel. With .NET Framework 1.1, we have SOAP binary formatters. The SOAP formatter can be used to communicate with Web services that are not based on .NET Framework. Binary formatters are much faster and can be used efficiently in an intranet environment of course; you also have the possibility to create a custom formatter.
- A formatter provider is used to associate a formatter with a channel. By creating a channel, you can specify what formatter provider to use, and this in turn defines the formatter that is used to transfer the data into the channel.
- The client calls method on a proxy instead of the remote object. There are two types of proxies: the transparent proxy and real proxy. To the client, the transparent proxy looks likes the remote object. On the transparent proxy, the client can call the methods implemented by the remote objects. In a turn, the transparent proxy calls the Invoke() method on the real proxy. The Invoke() method uses the message sink to pass to the channel.
- Messages sink , or sink for short, is an interceptor object. Interceptors are used on both the client and server. A sink is associated with the channel. The real proxy uses the message sink to pass the message into the channel. Depending on where the sink is used, is known as envoy sink, a server context sink, an object context sink, and so on.
- The client can use an activator to create a remote object on the server or to get a proxy of a server-activated object.
- Remotingcongiguration is a utility class to configure remote servers and clients. This class can be used either to read configuration files, or to configure remote objects dynamically.
- Channelservices is a utility class to register channels and then to dispatch messages to them.
|
|
9. State Management in ASP.NET
Web form pages are HTTP-Based, they are stateless, which means they don’t know whether the requests are all from the same client, and pages are destroyed and recreated with each round trip to the server, therefore information will be lost, therefore state management is really an issue in developing web applications
Mainly there are two different ways to manage web page’s state: Client-side and Server-side.
1. Client-side state management:
There is no information maintained on the server between round trips. Information will be stored in the page or on the client’s computer.
A. Cookies.
A cookie is a small amount of data stored either in a text file on the client's file system or in-memory in the client browser session. Cookies are mainly used for tracking data settings. Let’s take an example: say we want to customize a welcome web page, when the user request the default web page, the application first to detect if the user has login before, we can retrieve the user information from cookies:
if (Request.Cookies[“username”]!=null)
lbMessage.text=”Dear “+Request.Cookies[“username”].Value+”, Welcome shopping here!”;
else
lbMessage.text=”Welcome shopping here!”;
If you want to store client’s information, you can use the following code:
Response.Cookies[“username’].Value=username;
So next time when the user request the web page, you can easily recognize the user again.
B. Hidden Field
A hidden field does not render visibly in the browser, but you can set its properties just as you can with a standard control. When a page is submitted to the server, the content of a hidden field is sent in the HTTP Form collection along with the values of other controls. A hidden field acts as a repository for any page-specific information that you would like to store directly in the page. Hidden field stores a single variable in its value property and must be explicitly added it to the page.
ASP.NET provides the HtmlInputHidden control that offers hidden field functionality.
protected System.Web.UI.HtmlControls.HtmlInputHidden Hidden1;
//to assign a value to Hidden field
Hidden1.Value=”this is a test”;
//to retrieve a value
string str=Hidden1.Value;
Note: Keep in mind, in order to use hidden field, you have to use HTTP-Post method to post web page. Although its name is ‘Hidden’, its value is not hidden; you can see its value through ‘view source’ function.
C. View State
Each control on a Web Forms page, including the page itself, has a ViewState property; it is a built-in struture for automatic retention of page and control state, which means you don’t need to do anything about getting back the data of controls after posting page to the server.
Here, which is useful to us is the ViewState property; we can use it to save information between round trips to the server.
//to save information
ViewState.Add(“shape”,”circle”);
//to retrieve information
string shapes=ViewState[“shape”];
D. Query Strings
Query strings provide a simple but limited way of maintaining some state information. You can easily pass information from one page to another, But most browsers and client devices impose a 255-character limit on the length of the URL. In addition, the query values are exposed to the Internet via the URL so in some cases security may be an issue.
A URL with query strings may look like this:
http://www.examples.com/list.aspx?categoryid=1&productid=101
When list.aspx is being requested, the category and product information can be obtained by using the following codes:
string categoryid, productid;
categoryid=Request.Params[“categoryid”];
productid=Request.Params[“productid”];
Note: you can only use HTTP-Get method to post the web page, or you will never get the value from query strings.
2. Server-side state management:
Information will be stored on the server, it has higher security but it can use more web server resources.
A. Application object
The Application object provides a mechanism for storing data that is accessible to all code running within the Web application, the ideal data to insert into application state variables is data that is shared by multiple sessions and does not change often. And just because it is visible to the entire application, you need to used Lock and UnLock pair to avoid having conflit value.
Application.Lock();
Application[“mydata”] =”mydata”;
Application.UnLock();
B. Session object
Session object can be used for storing session-specific information that needs to be maintained between server round trips and between requests for pages. Session object is per-client basis, which means different clients generate different session object.The ideal data to store in session-state variables is short-lived, sensitive data that is specific to an individual session.
Each active ASP.NET session is identified and tracked using a 120-bit SessionID string containing URL-legal ASCII characters. SessionID values are generated using an algorithm that guarantees uniqueness so that sessions do not collide, and SessionID’s randomness makes it harder to guess the session ID of an existing session.SessionIDs are communicated across client-server requests either by an HTTP cookie or a modified URL, depending on how you set the application's configuration settings.
Every web application must have a configuration file named web.config, it is a XML-Based file, there is a section name ‘sessionState’, and the following is an example:
‘cookieless’ option can be ‘true’ or ‘false’. When it is ‘false’(default value), ASP.NET will use HTTP cookie to identify users. When it is ‘true’, ASP.NET will randomly generate a unique number and put it just right ahead of the requested file, this number is used to identify users, you can see it on the address bar of IE:
http://localhost/Management/(2yzakzez3eqxut45ukyzq3qp)/Default.aspx
//to store information
Session[“myname”]=”Mike”;
//to retrieve information
myname=Session[“myname”];
C. Database
Database enables you to store large amount of information pertaining to state in your Web application. Sometimes users continually query the database by using the unique ID, you can save it in the database for use across multiple request for the pages in your site.
Summary
Choosing among the options will depand upon your application, you have to think about the following before making any choose:
1. How much information do you need to store?
2. Does the client accept persistent or in-memory cookies?
3. Do you want to store the information on the client or server?
4. Is the information sensitive?
5. What kind of performance experience are you expecting from your pages?
Cookies- You need to store small amounts of information on the client and security is not an issue.
Viewstate- You needs to store small amounts of information for a page that will post back to itself. Use of the ViewState property does supply semi-secure functionality.
Hidden fields- You need to store small amounts of information for a page that will post back to itself or another page, and security is not an issue. Note You can use a hidden field only on pages that are submitted to the server.
Querystring- You are transferring small amounts of information from one page to another and security is not an issue. Note You can use query strings only if you are requesting the same page, or another page via a link.
Application state object- You are storing infrequently changed, application-scope information that is used by many users and security is not an issue. Do not store large quantities of information in an application state object.
Session state object - You are storing short-lived information that is specific to an individual session, and security is an issue. Do not store large quantities of information in a session state object. Be aware that a session state object will be created and maintained for the lifetime of every session in your application. In applications hosting many users, this can occupy significant server resources and affect scalability.
Database support- You are storing large amounts of information, managing transactions, or the information must survive application and session restarts. Data mining is a concern, and security is an issue.
|
|
|
|