
For this solution, you must hold the puzzle horizontally, which is a lot cooler than using the term vertically. Unfortunately, the solution refers to each side as a row, which is not as cool as using the word column.
Each diagram will show two rows only; the top and the front using a "flat map". I have a rather poor graphics editor, making it difficult to do any mind-blowing 3-D images.

A word about the notation itself: at first it seems redundant to say "slide x-amount of tiles on the front/top row", because the blank tile can only exist in one row anyway. But just in case you get lost, at least you know if you're on the correct track or not.
L+ | Twist the LEFT ear UP |
L- | Twist the LEFT ear DOWN |
R+ | Twist the RIGHT ear UP |
R- | Twist the RIGHT ear DOWN |
T+1 |
Slide 1/2/3 tiles on the TOP side to the RIGHT |
T-1 |
Slide 1/2/3 tiles on the TOP side to the LEFT |
F+1 |
Slide 1/2/3 tiles on the FRONT side to the RIGHT |
F-1 |
Slide 1/2/3 tiles on the FRONT side to the LEFT |
M+ | Twist the MIDDLE body UPWARDS |
M- | Twist the MIDDLE body DOWNWARDS |
(Practice these moves first before diving head-first into the solution)
The first move is a general, simple move that exchanges 5 tiles around without disturbing the back or bottom rows. At only 4 steps long, it should be easy enough to memorize.
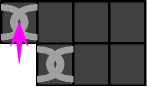
| Set up: Blank tile at the left edge of the front row. |
Result: Swaps five of the tiles counter-clockwise. |
M- F-3 M+ F+3 |
 |
The following move (and its variations) shifts the blank tile from row to row. Its basic purpose it to move the blank tile without moving the bulk of the real tiles. 13 tiles do remain intact, while 2 other solid tiles will indeed switch rows.
You may ask, "Why not merely twist the ear itself (to shift the blank tile)?" The answer is that yes, you could, but the other solid tiles on that same ear will stray far from home.
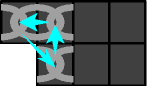
| Set up: Blank tile at the left edge of the front row. |
Result: Bumps up the blank tile. |
~~~Variations:~~~ | ||
F-1 L- F+1 L+ |
 |
Set up: Blank tile at the left edge of the top row. |
T-1 L+ T+1 L- |
Result: Bumps down the blank tile. | Set up: Blank tile at the right edge of the front row. |
F+1 R- F-1 R+ |
Result: Bumps up the blank tile. |
Set up: Blank tile at the right edge of the top row. |
T+1 R+ T-1 R- |
Result: Bumps down the blank tile. |
The next move (and its variations) is another swapping combo, but this time 3 tiles are exchanged instead of 5. At 8 steps long they may be hard to memorize, but that's the price you have to pay to minimize the number of swapped tiles. On the other hand there is a second-nature feel about these moves, and memorizing may not be necessary at all.
| Set up: Blank tile at the left edge of the front row. |
Result: Swaps 3 tiles on the left side counter-clockwise. |
~~~Variations:~~~ | ||
F-1 L- F+1 L+ |
 |
Set up: Blank tile at the left edge of the top row. |
T-1 L+ T+1 L- |
Result: Swaps 3 tiles on the left side clockwise. | Set up: Blank tile at the right edge of the front row. |
F+1 R- F-1 R+ |
Result: Swaps 3 tiles on the right side clockwise. |
Set up: Blank tile at the right edge of the top row. |
T+1 R+ T-1 R- |
Result: Swaps 3 tiles on the right side counter-clockwise. |
NOTE: You really do NOT have to memorize ANY of the above moves. They are only here as a guide for the "set-up" phase during the rest of the solution.