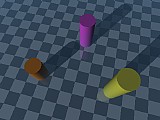
We've seen how splines can be used as the basis for objects in POV-Ray scenes, but what we haven't looked at yet is one of the most common uses of splines: animation. Using POV-Ray's clock variable and math functions can create many different animation actions, but making objects move smoothly along anything but the simplest path can get very complicated Splines offer a powerful solution, and the Spline Macro File makes animating by splines easy. To get an idea of how, let's start with a simple scene:
plane {y, 0 pigment {checker rgb 0.3, rgb 0.7} finish {reflection 0.2} scale 5}
fog {fog_type 2 rgb <0.3, 0.5, 0.7> distance 50 fog_alt 10}
light_source {<-200, 200, -300> rgb 1}

cylinder {0, y*10, 3 pigment {rgb <1, 0.5, 0>} translate -x*15}
cylinder {0, y*15, 3 pigment {rgb <1, 0.3, 1>} translate z*20}
cylinder {0, y*20, 3 pigment {rgb <1, 1, 0.3>} translate x*15}

camera {location <5, 50, -10> look_at <0, 0, 10>}
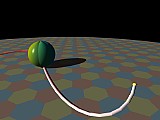
So far, so good, but where do the splines fit in? Well, if we're going to use a spline as a motion path then the first step is to design the spline we want to use:
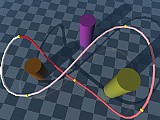
#include "spline.mcr"

#declare MyPath = create_spline (
   array[5] {<-25, 10, 10>, <0, 3, 0>, <25, 6, -5>, <15, 10, 25>, <-15, 5, -10>},
   spline_loop (yes) + spline_tension (-1))

preview_spline (MyPath, default_options)
Now we have a path that travels through our scene (following the spline preview from red to white) without running into any of the other scene objects. It's not too hard to see how we could create an animation by moving (translating) an object along the length of spline. But for convincing motion the object will need more than just a translation - as well as position, the spline changes direction and speed, so it's obvious rotations will also be needed.
Fortunately, the Spline Macro File will perform these rotations and translations automatically to the object or objects of our choice, tilting, twisting and banking the object around the corners of the spline curve. To use these features we just have to follow some simple rules: as with any other POV-Ray rotation the object to animate should be centred around the origin. Also, the object should face along the positive z-axis with its top pointing towards the positive y-axis (and hence, with its left side towards the negative x-axis and its right side towards the positive x-axis).
Any POV-Ray object can be animated along the spline, whether CSG, a triangle mesh, or a predeclared object, as long as we follow the positioning rules above. In fact, any POV-Ray construct that supports rotations and translations can be animated, including pigments and textures, media densities, light sources and the camera. For our first spline animation let's use that last option: if we remove the spline preview we can add a new, animated camera (which will replace the previous camera):
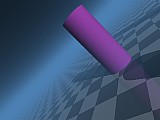
camera {right x*4/3 up y
   location <0, 0, 0> look_at z
   animate_by_spline (MyPath, default_options)}
The right and up options aren't strictly necessary (as these are the default POV-Ray camera values), but they do illustrate the correct positioning and orientation of the camera, with its nose pointing towards +z, its top to +y, and its right side to +x. When we look at the resulting animation, though, we can see that the top and right values certainly don't stay at these values throughout the animation - in fact, the camera tilts quite a bit as it follows the spline's curves. This is due to the automatic banking.
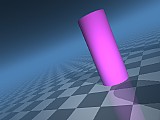
Flying vehicles generally bank to one side or the other in order to turn, so to simulate this the macros look at the direction of the spline at the current point and the direction it will be travelling over the next few frames, and applies a banking rotation based on the difference between the directions. We can control the amount of banking using the auto_banking option. The default is a value of 1, but we could use autobanking (off) to remove the tilting all together, or other values to control the degree of tilting:
camera {right x*4/3 up y
   location <0, 0, 0> look_at z
   animate_by_spline (MyPath, auto_banking (1/2))}

light_source {<0, 1, -1>, rgb 2
   spotlight point_at z*4 radius 30 falloff 33
   animate_by_spline (MyPath, auto_banking (1/4))}
Now we've halved the banking angle of the camera, and we've added a nice, bright headlight to guide our way through the animation. The spotlight itself is located just above and behind the camera (remember, before we animate by the spline we must position the object with respect to the origin), and banks a little less than the camera itself.
We can see now how we could animate many separate objects using the same spline path (or different paths, for that matter). This way we could position the camera inside a cockpit, say, or make the camera follow behind another object. For example, setting the camera location to <-5, -1, 0> and the camera look at to <0, 0, 1> would make the camera pan to the left as it travelled along the spline, keeping the animated object on the right of frame.
In the previous section we used a spline to animate objects and the camera in their entirety. Obviously this is fine for flying objects - but what about animations where the moving object is itself made up of other moving parts? And what if we want to animate aspects of our scene that don't use the rotate and translate transformations, such as a declared vector?
In this case, what we can do is evaluate the spline: this means extracting values relating to the spline (such as the position and direction) so that we can use them to control our scene. The Spline Macro File gives us a number of ways to evaluate splines we've created, returning both static and dynamic values. The first type include the number of points in the spline, whether or not the spline loops back on itself, the length of the spline, and the direct length between the spline points, all of which remain the same throughout an animation.
Dynamic values, on the other hand, depend on the clock value of the spline, ranging from 0 at the start of the spline to 1 at the end. In the previous animation the spline clock was the same as the POV-Ray scene clock, and so the motion along the spline path matched the length of the rendered animation. We can, however, use any value we like for the spline clock to evaluate it at any point along the spline's length.
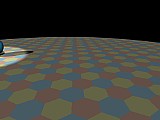
Here's a scene (with a previewed path) to illustrate how we can evaluate splines:
camera {location <10, 5, -10> look_at <3, 0, 4>}
light_source {<-200, 200, -300> rgb 1}
disc {0, y, 30
   pigment {hexagon rgb <1, 1, 0.7>, rgb <0.7, 0.9, 1>, rgb <1, 0.8, 0.7>}
   }

#include "spline.mcr"

#declare RollPath = create_spline (array[4] {-x*10, z*50, x*10, z*50},
   create_hermite_spline + spline_sampling (on))

#declare Ball = sphere {0, 1.5 pigment {radial}
   normal {radial 0.5 scallop_wave frequency 6}
   finish {phong 0.5}}

preview_spline (RollPath, spline_accuracy (3))
object {Ball translate y*1.5}
We can see that if we were to use the animate_by_spline feature the ball would seem to glide across the floor - not at all realistic! Instead, we can use the evaluate_spline macro function. This performs the same calculations as the animate_by_spline function (including direction changes and banking), but rather than transforming the current object directly it declares for us the spline_pos and spline_tangent vectors, the spline_accel and spline_distance values, and the spline_roll, spline_pitch and spline_heading rotations.
So, to make our ball roll correctly along the path, slowing to a stop at the end of the animation we can remove the last two lines and instead use:
#declare BallClock = 1 - pow(1 - clock, 3);
evaluate_spline (RollPath, spline_clock (BallClock))

object {Ball
   rotate x*360*spline_distance/(2*pi*1.5)
   rotate spline_heading
   translate spline_pos + y*1.5
   }

light_source {<10, 20, -10> rgb 1 spotlight radius 8 falloff 10
   point_at spline_pos
   }
With the ball centred on the origin the first thing we do is rotate it in the direction of travel (remember that before animating objects by splines they must point in the +z direction). To work out how many rotations are required for the current frame we divide the distance travelled along the spline by the circumference of the ball. Then we rotate the ball to face in the direction of travel - in this case only this last rotation is required because we don't want the ball to bank or pitch. Finally, we translate the ball into position (remembering to shift it up so it doesn't cut through the floor).
The spotlight we've added shows how evaluating the spline lets us modify aspects of our scene that can't be rotated or translated - here, only the spotlight's point at location changes, not its position. Also, we've used the same spline position value as previously returned. When we use the evaluate_spline or animate_by_spline functions the return values listed above are available for use in whichever way we choose, until we use either function with another spline (or with different options). Another feature we can use when we just want the position of a spline at a particular clock value is the spline_value and spline_even_value functions - see the Spline Macro File documentation for more information.