Shock Tactics 
Home Made Coil-Over Shock Absorbers
"There is no such thing as a cheap coil-over"
- a quote from a suspensions shop when I ask why a set of four coil-overs
& springs would cost $1400. Seems frightening when a set of reasonable
shocks like Monroe Sensatrac cost only $139
a pair.
It's true that 'real' coil-overs like Spax and AVO are
adjustable for ride height, shock stiffness, preload etc., but the real
problem is that all the coil-overs available in Australia are imported,
mostly from the U.K. and the exchange rate which is currently 0.35-0.40p
to the $AUD is the real set back.
Monroe are probably the only shock absorber manufacturer
left in Australia. I suspect Pedders,
K-Mac & Whiteline etc. probably
just buy in Sensatrac shocks, after doing their own R&D (... .i.e.
decide what bright colour to paint their shockies, before you sue me, e-mail me
me, if you know the truth, note that I have used different suspension products
from these three companies on my Commodore and have been most impressed).
|
WARNING
The shock absorbers described on
this page are a budget alternative and my alterations to the design hasn't
actually been tested on a road driven car, my Locost is still a collection
of parts in a shed.
My design is based on that published in
the Locost Club Newsletter, and has apparently been used on numerous cars
built in the United Kingdom, but those using them recognize the deficiencies
compared to purpose built adjustable coil-over shock absorbers.
|
This page is about making budget
coil-overs from Leyland/BMC Mini front shock absorbers.
The Monroe GT-Gas II Mini shock absorbers have an open
length of 14 inches and a closed length of 8 inches, close to the specifications
in 'the Book'.
The procedure on this page was adapted from that published
in the Locost Club Newsletter. The plans in the Newsletter used a type
of shock absorber not readily available in Australia (top mounting eye
can be unscrewed). Also the Newsletter plans mentioned welding the shock
absorber body (dunking in water regularly for cooling), the gas shocks
I used had "do not heat" stamped on them so I looked for alternatives that
didn't require welding the shock body.
I telephoned John Slater in the UK a couple of times,
and he says using Mini Shocks is OK. He welded the shocks by immersing
the whole shock absorber in iced water - he did say mixing welding and
water is not a good safety procedure.
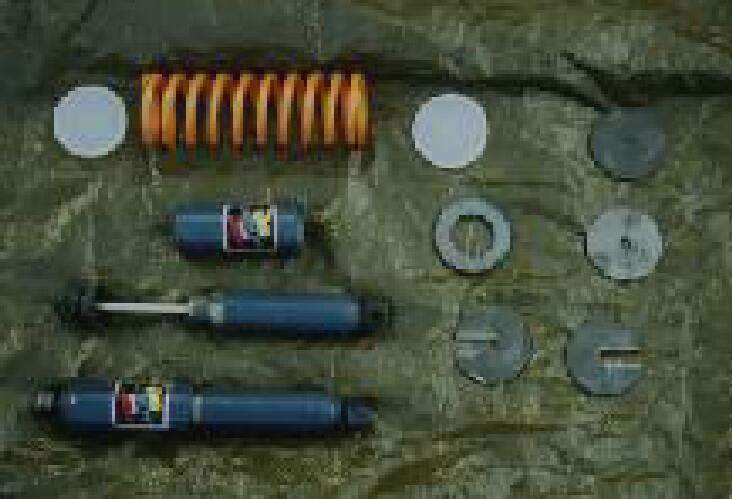
PARTS
Here is the parts I used for each shock absorber:
-
Monroe "GT Gas 2" Mini shock absorber -'front' (catalogue
shows same part numbers 15-0309, specified
for all years/models of Minis, noted that 'Sensatrac' shocks not available
for Minis, Sensatrac shocks would have been better, they have magic grooves
in the tubes, and are actually fitted to Holden
Special Vehicles products)
-
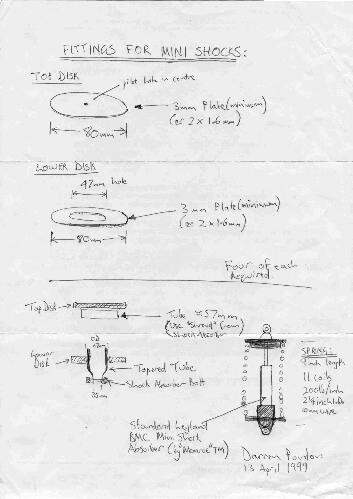
Spring - 13 coils, 6 mm wire, 230 mm free length, 200lb/in
rate (too high??)
-
two 'top plates', 80 mm diameter disc of 3 mm mild
steel plate, with a 12 mm hole (for shock shaft)
-
one 'bottom spring seat', 80 mm diameter disc of 6 mm
mild steel plate with a 47 mm hole
-
Lower collar, a 47 mm Outside Diameter 1.6 mm round tubing
(exhaust pipe), swaged down to 35 mm Internal Diameter, at one end. This
results in the narrow end of the tube having a wall thickness of around
2 mm.
-
two M5 Unbrako screws 10 mm long
-
Two Plastic spring seat, believe it or not these are actually
the lids from small "Pringles" chips tins, making this probably the only
imported part used!
-
Rubber stopper or seat leg rubber to act as bump stop
-
rubber strip 25 mm wide, self adhesive on one side.
Top of the page
COSTS
All prices in Australian Dollars
| 4 Monroe GT-Gas2 Shock Absorbers |
$178 |
| 4 Springs |
$120 |
| Cut 10 top plates, and 5 bottom spring seats (as described
above) |
$24.50 (note quotes ranged $47-$210!) |
| Lower collar tubing, and swaging |
$40 |
| 8 Romek M5 Cap head (unbrako-style) screws |
$4.70 |
| 8 tins of Pringles (spew) , I mean spring seats |
$10.32 (sh*t!! it all adds up) |
| welding bottom plate to lower collar tubing, 1/2 shock
shroud to top plate |
$35 |
| rubber seat leg stopper(or large door stop) to act as bump stop |
$1.05 ea. |
| 1 metre self adhesive rubber strip |
$0.75 (guess, can't remember) |
| Paint - Wattyl Kilrust Etch Primer, Wattyl Kilrust
Epoxy Enamel |
$20.25 |
| TOTAL: |
$437.72
(or $109 per coil-over) |
These costings don't include the time taken to do all this,
I have been thinking, planning, working on, running around trying to make
these shock absorbers for about 12 months on and off. Another way of putting
this is that it is the satisfaction of doing it yourself....
Those on the Locost Mailing
List may remember the discussion about the Grok that comes
from the 5 days spent filing your suspension wishbones by hand - I found
the Grok returns when you start tapping threads into the shock absorber
top plates, 8 times....
Some rough quotes:
-
Proven Products (Spax Distributor N.S.W.)
4 coil-overs (springs?) $990 + postage
-
Demon Tweaks 4 coil-overs (224 UK pounds) springs (76
UK pounds) $750 AUD PLUS postage to
Australia, and Sales tax & Import Duty
Top of the page
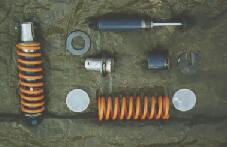
Shock Absorber Photos
Here are my photos on the different stages of the construction - the diagrams and text in the following sections may help you visualize the parts,
I tried to make the pictures are 'self explanatory', therefore you
will probably end up needing to email
me.....
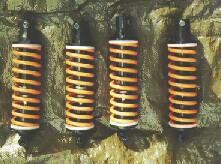
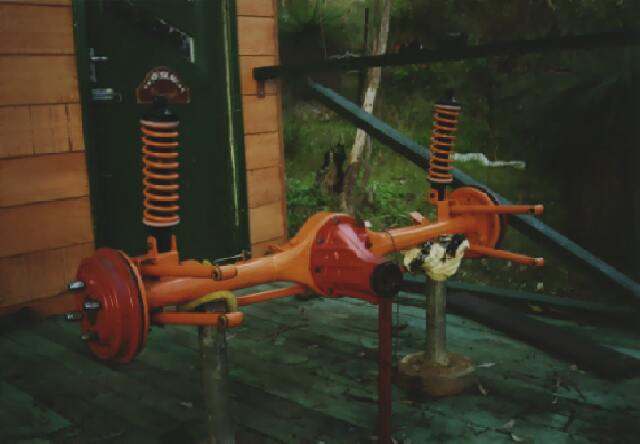
Below is the finished product mounted on the rear axle
Top of the page
How-to
This is roughly how I made these coil-overs, you can follow
the Locost Club Newsletter Diagrams (below)if you like or adapt both procedures to suit-
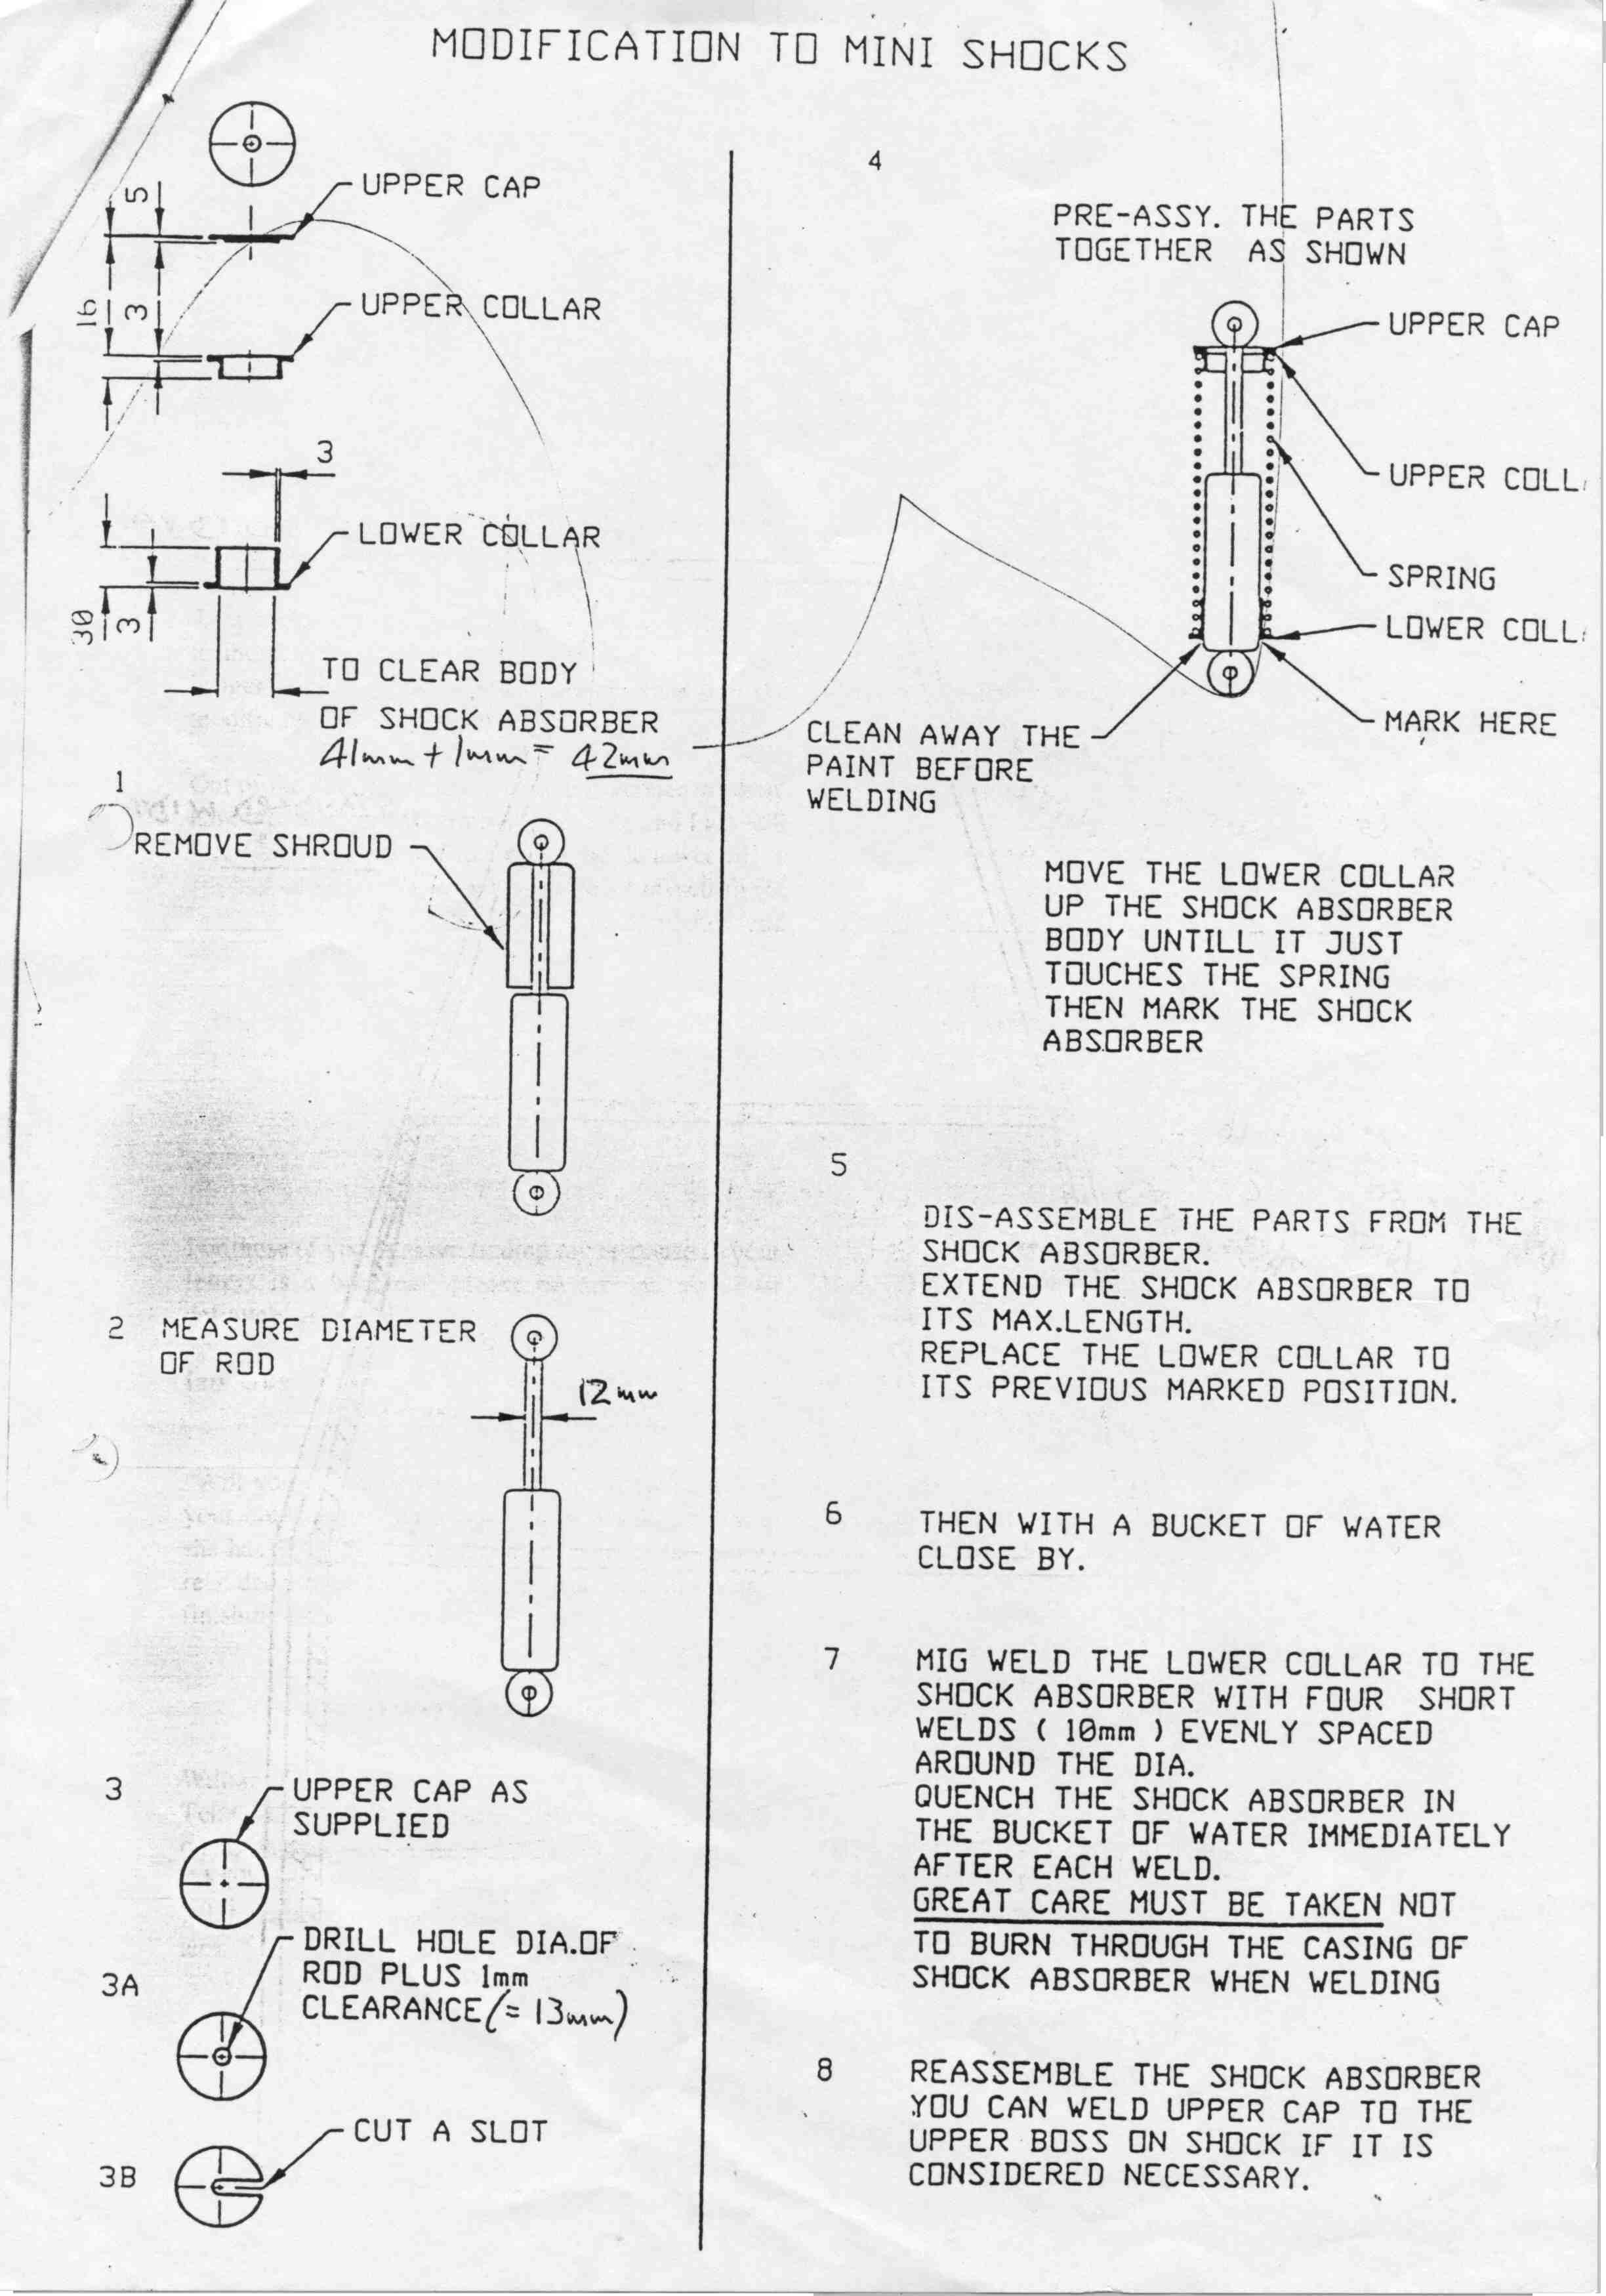
My modifications to the design (yes, I did fail Tech Drawing at High School!) :
Tools out, follow the diagrams, this is how it's done:-
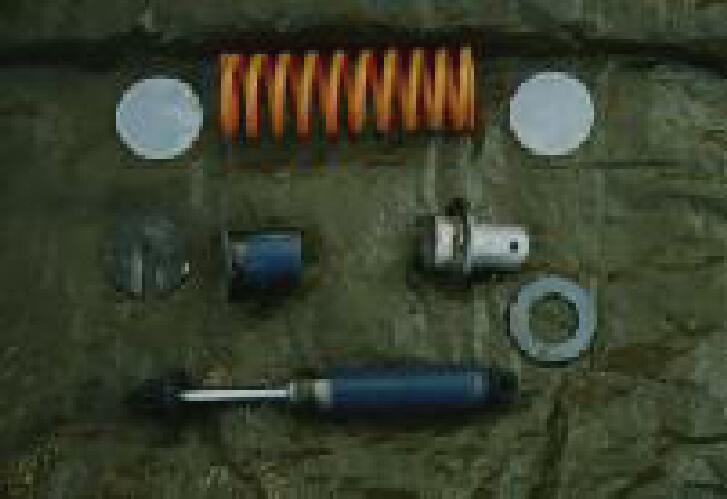
-
Cut "shroud" of the Mini Shock absorbers, leave the hemispherical
'hat' under the mounting 'eye',
-
Cut two of the shrouds, in half to form 4 short tubes, hereafter
referred to as "upper collars"
-
Cut a 13 mm slot (diameter of shock absorber piston rod)
length ways along the upper collars, it will probably result in a stronger
piece over all if you remove the weld line when cutting this slot
-
Measure the diameter of the lower shock body, add 1 mm (for
clearance), and this will be the internal diameter (ID) of the tubing required
to make the lower collar (for mine this was 47 mm),
-
Measure the space between the flanges of the suspension brackets
(usually around 42 mm), take of 2-3 mm each side, for clearance,
and this becomes the outside diameter (OD) for the lower portion of the
lower collar,
-
Have an exhaust shop make four 100 mm long sections of exhaust
tube, with the ID found in 4., swaged down at one end to the OD measured
in 5.
-
Fit this swaged tube to the bottom of the shock absorber,
so that the "conical" section of the tube contacts the lower rounded section
of the shock body. Cut the narrow section of the tube of level with the
top of the lower shock mounting 'eye'. Drill a 13 mm diameter hole through
the narrow section of the tube to fit a 1/2 inch HT bolt through the shock
lower mounting eye. Check fit of the bolt, then remove all these parts
from the shock absorber.
-
Spring seats - these are basically discs of steel plate to
match the OD of your coil springs (in my case my 2,25 inch ID springs had
an OD of 80 mm). The top spring seats are made of 3 mm plate,
and have a 13 mm hole in the centre, for the shock piston rod (two are
required for each shock). The lower spring seat has a 47 mm hole for the
lower spring collar.
-
How do you make these?
-
cut the discs from plate with an angle grinder, then use
a drill to make the holes. Very messy, hard to make circles 'round'
-
As above, BUT using a heavy duty jigsaw or sawzall,
or saw that cuts plate. dunno, but has possibility if you have these
tools
-
Give a sketch to engineering shop who can laser cut or plasma
cut the plate to the shape. Very accurate but expensive.
-
As above but engineering shop uses traditional cutting technique.
I chose this option.
-
Cunning option: find a catalogue from a supplier of
large washers, look for big washers with specs such as 80 mm OD, 13 mm
ID, 3 mm thickness, and also 80 mm OD, 47 mm ID, and 6 mm material thickness.
-
Cut a 13 mm slot in both of the top spring seats from the
central hole to the outside,
-
Weld the upper collar to one of the upper spring seats, aligning
the slots
-
Place the upper spring seat disc on top of the seat and collar
just welded, and rotate the discs so that the slots are 180 degrees apart,
fit a M12 nut and bolt through' the 13mm hole to hold the whole upper spring
seat and collar together. Drill two 4.2 mm (or 11/64 in) hole through the
two discs, approx. 15 mm from the central (13 mm) hole, 180 degrees apart
(note that once the holes are drilled these two parts become a matched
pair, unless you want to be super accurate with your measurements).
-
Remove the M12 nut and bolt, fit the parts around the 13
mm shock shaft, check the 4.2 mm holes align, if not some enlarging
of the central 13 mm hole may be required,
-
Tap an M5 thread into the drilled hole on the (lower) 3 mm
thickness disc with the collar,
-
Drill the 4.2 mm hole in the upper 3 mm thickness disc, out
to 5 mm clearance for the bolt,
-
Fit the top spring seat and collar parts to the shock shaft
again, secure the plates together with the M5 cap head bolts, and slide
the assembly up the shaft till it contacts the bottom of the 'hat',
-
Fit the spring, into the upper collar, then fit the lower
collar, to determine the location on the lower spring seat disc (6
mm plate) on the lower collar prior to welding (this may be a tight fit).
A small amount of 'preload' may be possible, by moving the spring seat
up the collar, but may be harder to assemble later. Weld the seat to the
collar, Fully welding around the tube on the side facing 'up' will help
prevent dirt and moisture entering the small gap between the two parts.
-
Put it all together and it will be lookin' like a real coil-over,
trial fit the coil-over to the car, you will probably need to grind a radius
to the end of the lower collar tubing.
-
Cut the 'Pringles' TM
plastic lids to match the diameter of the holes in the spring
seats and fit them to the coil springs
-
Clean, prep and paint all the parts (mask the shiny shock
piston rod, over spray will wear out the rubber seal)
-
drill a 13mm hole in the middle of the doorstopper/seat leg rubber, and cut a slit through it to from bump rubber, that wraps around the shiny piston rod
-
Put it all back together, and fit the bump rubber up into the top collar - FINISHED
Top of the Page
Heres an alternative idea:
At a swap meet/car show I went to there was a VW powered sand rail dune buggy that had a set home-made coil overs on the rear. The guy used almost the same method as yours on the top of his shocks. But, at the bottom for the spring perches he used a muffler clamp the size of the shock body with the 6mm plate welded to the non threaded portion of the clamp. He had a small spacer welded to the 6mm disc where it would contact/rest on the u-bolt portion of the clamp. This clamp setup allow him to set preload and ride height. Oddly enough, the clamp holds even with all the abuse from an off road vehicle. I think it actually dented the shock body slightly creating a ridge for the clamp to sit in.
What I was thinking was maybe the clamp could be used to set the preload and ride height. Then mark the location, remove the clamp and then weld the 6mm disc on. A spring compressor would need to be used to re-assemble the unit, but I'm pretty sure it would all work.
Just an idea.
--
Jeff Mirch
Newport, MI USA
Another opinion from the Locost Mailing List was that Dune Buggy/Sandrail/Baja coil-overs shocks (eg made by "Empi"), although l;ooking the part, may not be suitable for Locost use. Buggies apparently fit 2-3 per side, and usually the stroke is to long.
Click here for an alternative using Jaguar shock absorbers
...and another:
One of the guys at the Chatsworth day out had some converted Mini shocks
fitted to the front. He used a length of 2" int. diameter (I think) plumbers
pipe fitting which was threaded externally (BSP) and had a section of
threaded fitting screwed on as a spring seat. The whole then passed over the
Mini shock which was mounted upside down with a ring welded around the metal
dust shroud. this seemed much better than welding the pressure part.
If the description is a bit sketchy then apologies, I hope to be able to
track the gent down and get more info. Ron Champion was there and he took
pictures of the shocks as he was impressed with their simplicity. He has the
guys number so I will try to get it.
Rob Lane
Top of the Page
Index
Locost Library
FAQ