Miniature University Workshop: Stained Glass Greenhouse
Lesson #3
Instructor: Melissa Darnell; based on projects featured in the book "Miniature Worlds in 1/12th Scale," by Susan and Martin Penny.
Email for questions: [email protected]
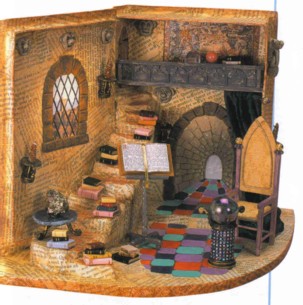
Wizard's Spell Book Room
Materials/Tools Needed:
cardboard box that is shaped to look like a book
foam core board, 1/4” thick
florist foam block (used for arranging flowers, available at all local craft and department stores as well as at gardening centers)
white/school glue
disposable plastic bowl
sponge brush
cold coffee or strong tea
spray acrylic seal in a matte finish
script paper pattern (included with that day's lesson)
faux tunnel picture (included with that day's lesson)
craft knife
scissors
hot glue gun and low temp glue sticks
brown polymer clay OR Dori’s egg carton project for making stones (see our archives, Stained Glass Greenhouse folder, Lesson #4)
various flat-backed rhinestones to decorate the banister railing with
small rectangle of velvet or similar type of cloth for making the curtain panel with
magazine picture showing an outdoor view
clear plastic found on store-bought packages
brown and cream acrylic paints
small paintbrush
fine-tipped black pen
1. Use your craft knife to cut a piece of foam core board for the base of the book that is rounded in front to allow room for the curved stairs to end at.
2. Hot glue the book in an open position to the top of the foam core base and hold in place for 15-30 seconds until the glue sets and holds.
3. Cut the curved staircase out of the florist foam block using a sharp knife. Then create each step by pressing the flat side of your finger into the top of the block. Use your fingertips to round off the edges of each step as well.
4. Glue the staircase into place (see picture of complete book for location of staircase).
5. Now print off several sheets of the script paper pattern below onto regular white copy/printer paper and tear these sheets into small squares. Pour a small amount of white/school glue into the disposable bowl and add water to thin the glue. Stir the water and glue until well mixed together, then coat one side of a sheet of script paper to cover an area of the book or staircase. Repeat often, adding the sheets of paper in a haphazard fashion until the entire book, staircase, and foam core board base are completely covered. Let dry completely.
6. To create the aged effect you see in the completed room above, paint the sheet paper covering with cold coffee to tint it slightly brown. Let dry.
7. To highlight the steps, use an old cloth to lightly rub on red acrylic paint to the surface of each step. You only want a hint of color though, so if you apply too much, just rub off the extra paint. Let dry.
8. Spray the entire structure with clear acrylic seal to seal and protect it. Let it dry completely.
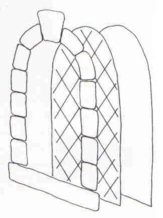
9. To create the windows, find a picture of an outdoor view from a magazine and cut it into an arched window shape. Glue this magazine picture to the left wall of the book. Cut a piece of clear plastic (found from many store-bought packages) to the same shape as the magazine picture. Use a fine-tipped black permanent marker to draw diagonal lines to simulate a leaded window, then glue just the edges of the decorated plastic to cover the magazine picture on the wall. Surround the window with stones made from either brown polymer clay or stones cut from egg carton material (see Dori’s Egg Carton Stone flooring in our archives in the Stained Glass Greenhouse folder, Lesson #4, for complete directions and pictures).
10. The stone flooring used in the room pictured above was created using various shades of polymer clay shaped into various sizes of rectangles with curved corners, fitted together like a jigsaw puzzle, baked to harden them, then glued in place on the foam core base of the book room. However, you could also use Dori’s egg carton stone flooring for an even more realistic effect here as well.
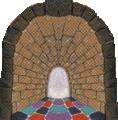
11. Measure the area where you want to feature the faux stone tunnel at, then resize the faux stone tunnel picture below to that size. Print out in full color on regular white printer/copy paper, then glue into place. Surround with stones using the same technique you chose to use for the arched window on the other wall.
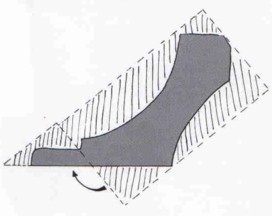
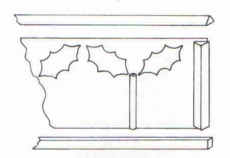
12. To create the balcony, cut a rectangle out of foam core board for the floor of the balcony, and a second rectangle for the balcony rail. The rectangle for the floor can be hot glued in place with no decoration, as it will be very hard for anyone to see this floor. For the balcony rail decoration, try playing around with different arrangements of flat-backed rhinestones in various shapes (the balcony in the picture was created using arrangements of bugle beads and flat-backed holly leaf shaped rhinestones, see below for example of bead/rhinestone layout). Once you’ve found a repeating design you like, glue these in place and let the glue dry. Then paint over the entire balcony rail and decorations using a dark gray acrylic paint. Let dry, then lightly brush on streaks of cream or beige colored paint for highlights. Let dry, then hot glue the balcony rail in place. (See illustration below for example of one possible layout for your rhinestones and beads.)
13. Use dark brown paint to paint on a small wooden door at one end of the balcony, let dry, then use a black fine-tipped marker to add vertical lines to simulate a paneled wooden door and a black door knob. Let dry.
14. Finish by adding a rectangle of velvet or other similar cloth to the other end of the balcony for a curtain. Make sure all cut edges are turned under out of view.
This setting can be used for many room themes, including a wizard’s study, a medieval princess’s sitting room (use pretty jeweled touches and satin type cloth for the curtain), the entrance to a castle (cover the book’s walls, staircase, and base with Dori’s egg carton stone or polymer clay stone instead of the script paper covering), etc. This would also make a neat library by simply replacing the faux tunnel picture with shelves full of books, or a man’s den by replacing the script paper covering with a wood grain design scrapbook paper. Use your imagination, and the possibilities for what this room could become will be endless! And don't forget, the group would love to see what you do with YOUR spell book room... you can post pictures of your completed room any time at the group website in the Photos section (look for the Class Show & Tell folder!).
Many mini hugs,
Melissa Darnell