A Simple Brakedrum Forge
A simple forge can easily be constructed using a salvaged automotive brakedrum. It is possible to do this without using a welder or cutting torch, but they allow you more options in using available materials.
This information is offered to help in the design and construction of a small portable coal forge. As with any project, safety should be the primary concern. All normal shop safety guidelines should be followed. If you decide to use a torch or welder in the construction of this forge, make sure you have been trained in the safe and proper use of your equipment. NEVER use a torch or welder on galvanized pipe or galvanized pipe fittings! Doing so can produce toxic fumes! Plumbing suppliers should be able to provide an acid solution for removing the galvanizing from the pipe.
Basic materials list:
brakedrum
a piece of steel plate (at least 1/4" thickness)
one steel plumbing tee
one steel plumbing cap
one steel plumbing flange
one steel plumbing nipple of about 6" length
two steel plumbing nipples of about 3 or 4" length
(all plumbing fittings should be of the same size/diameter - 2"
minimum, 3" will probably be the largest you would need)
assorted bolts, nuts, etc.
Construction:
The steel plate should fit in the bottom of the brakedrum and cover all holes (lug holes and axle hole). If you can't find a piece of steel that happens to fit, you will have to cut one from a larger section or have someone cut it for you. Drill at least three holes to match lug holes in the brakedrum. Use these holes to bolt the steel plate inside the brakedrum.
Center the plumbing flange in the axle hole of the brakedrum. Drill holes in the steel plate to allow the flange to be bolted in place. Mark the inside diameter of the flange on the steel plate, then remove the flange. Drill several 1/4" diameter holes inside the circle you just marked on the steel plate. Assemble the brakedrum, steel plate, and plumbing flange. You now have a forge pot ready to attach the air pipe plumbing.
Screw the plumbing cap loosely on one end of the 6" nipple. Screw the other end of the 6" nipple tightly into one of the straight ends of the tee. Screw the shorter nipples tightly into the other two ends of the tee. Screw the short nipple (opposite the long nipple) tightly into the plumbing flange.
You should now have a firepot with an airpipe extending straight down a little less than 1' to the threaded cap (which functions as an ashdump). The short section of pipe extending horizontally from the tee allows you to connect a pipe (solid or flexpipe, whatever you have available) from your blower. You can now attach legs to the brakedrum (for a small portable forge) or cut a hole in a metal table and drop the brakedrum into the hole (to provide a larger hearth area).
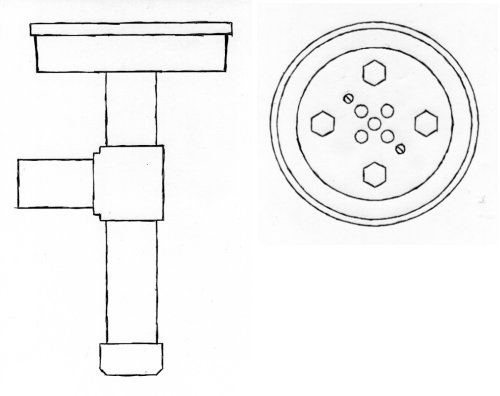
Below is a rough, two view drawing of the assembled firepot. On the left is a side view, showing how the plumbing is assembled with the ashdump at the bottom and the air inlet coming into the side of the tee. On the right is a top view, showing how the plate is bolted inside the drum and the plumbing flange is bolted underneath the plate.
This drawing should only be used as a rough guide. How the finished firepot looks, will depend on the materials you have and how you choose to put them together.
Back to my Forge Page
My Champion portable forge
My new forge (currently under construction)