Each cultural
has its own way of decorating Easter eggs with their own meanings.
In Greece Crimson eggs, which represents the blood of Christ are exchanged.
In parts of Germany and Austria green eggs are used on Maudry Thursday.
Slavic people decorate their eggs in special patterns of gold and silver.
In Austria artists design patterns by fastening ferns and tiny plants around
the eggs, which are then boiled. The plants are then removed, leaving
a striking white pattern. The Poles and Ukrainians decorate eggs
with simple designs and colors. There are a certain number of eggs
which are made in a distinctive manner called pysanki(to design or to write).
Pysanki eggs require great skill and workmanship.

Preparation of Eggs Prior to Decorating
Many people pefer to use hollow eggs. These are eggs have the insides remove and have been thoroughly washed and dried. There is no danger of contamination and the eggs can be kept as long as the person wishes.
It is important to take proper precautions preparing eggs before decorating as they can become contaminated with bacteria. Keep fresh eggs refrigerated until you are ready to cook them. It is recommended that eggs be cooked until both the yolk and the white are firm, not runny. To hard cook eggs simmer them in 185-190 degree water for approximately 10 minutes. Cool them in cold water or by air. Once cooked it is safe to air dry them as they are no longer considered a threat for contamination. Always wash hand thoroughly and do not handle eggs excessively. The shell of the egg is extremly porous and bacteria may enter. Lightly coat the eggs with mineral oil to close the pores against contamination prior to use. Some producers coat their eggs with resin for extra protection again contamination. These eggs can be kept for two weeks instead of the usual one week.
American Egg Board Guideline for Easter Eggs
1. Once cooked and cooled place eggs in their cartoon and keep in the refrigerator until you are ready to use them. Once that have been hidden and found refrigerate them again.
2. Do not eat cracked eggs or eggs that have been out of the refrigerator for more than two hours.
3. If you have
used decorated eggs as a centerpiece or other decoration, do not use these
for consumption. Discard these eggs once they have been left out
for a few days or even after a couple of hours.
Decorating Eggs
There are a variety of ways in which eggs can be decorated for Easter. The usual method used for children are dying the eggs various colors and using other articles which can be glued onto the eggs. Which ever method a person or child uses, the important thing is to have fun while decorating your eggs. It can also be a really great activity for the whole family to enjoy.
How to Blow Out Eggs
eggs,
needle
bowl
Using the needle, poke a small hole in the narrow end of the egg, and a slightly larger hole in the other end. Move the pin around to make sure you tear the membrane around the yolk. Holding the egg over the bowl, blow through the small hole. The egg will be forced out the larger hole and into the bowl. Make sure you rinse the egg well with water prior to decorating. Your eggs are now ready to be decorated in whichever method you choose.
Articles You Can Use For Decorating Eggs
| paints | colored foil |
| ribbons | felt tip pens |
| sequins | fabric scraps |
| glitter | tassels |
| lace | dye kit |
Other supplies
you may need are paint brushes, water, glue, and scissors.
Craft stroes also sell egg forms made from styrofoam, papier mache, or
wood if you prefer not to use real eggs.
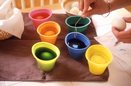
Preparing or Making Dye for Eggs
Natural Method
You can make egg dye from many natural products which can be found in the kitchen. To dye the eggs place in a single layer in a pan. Pour water in pan until the eggs are covered. Add one teaspoon of vinegar. Add the natural dye according to the color you want your egg. Remember to increase the quantity of dye according to the number of eggs being done. Bring water to a boil and simmer for 15 minutes. Remove the substance you used to color the eggs. Put eggs in a bowl. If you prefer to have a darker shade, cover them with the dye and let stand overnight in the refrigerator.
Pale Red Fresh
beets or cranberries, frozen raspberries
Orange Yellow
onion skins
Light yellow
Orange or lemon peels, carrot tops, celery seed or ground cumin
Yellow Ground
turmeric
Pale green
Spinach leaves
Green-gold
Yellow Delicious apple peels
Blue Canned
blueberries or red cabbage leaves
Beige to brown
Strong brewed coffee
Crepe Paper Dye
Different color
crepe paper
hot water
small bowls
or cups
slotted
spoon
cooking oil
soft
cloth
Soak crepe
paper in hot water in individual bowls or cups for each color. Add
eggs and allow to sit in water until he desired color is achieved.
Remove with slotted spoon and allow to dry. Polish with small amount of
cooking oil and soft cloth.
Food Coloring Dye
Food
coloring
hot water
white
vinegar
small bowls
or cups
slotted
spoon
cooking oil
soft
cloth
For each color
measure 1/4 teaspoon food coloring in small bowl. Add 3/4 cup hot water
and 1 tablespoon white vinegar to each color. Add eggs and allow
to sit until they are the desired color. Remove with slotted spoon.
Polish dry eggs with small amount of cooking oil and soft cloth.
Swirled Eggs
hard boil egg,
or blown out egg
Food
coloring
White
Vinegar
Construction
paper, scissors
Rubber
cement
Disposable
cups
Popsicle
sticks
Spoons
Paper
towel
To make dye for eggs, mix ½ cup boiling water, 30-40 drops of food coloring, and 1 teaspoon of white vinegar. Let the dye cool completly before using.
Cover the table with newspapers. Pour approximately ½ cup of rubber cement into a cup. Be sure to wash your hands thoroughly with soap before touching the eggs. The eggs will not dye evenly if they are dirty.
Cut a strip of construction paper and staple it into a circle to make a stand for the egg. Dip a popsicle stick into the rubber cement and dribble it onto the egg. Let it dry for about 15 minutes, then turn it over and dribble on the bottom.
With a spoon, place the egg into the dye. It is at this point that you will start to see a design taking place. Leave the egg in the dye until it has reached the color you want.
Remove the egg from the dye with a spoon and gently pat the egg with the paper towel. Let it dry for approximately 30 minutes.
Remove the rubber cement with your fingers. Once it is removed you will have an egg with many swirls in it.
Spotted or Striped Eggs
eggs
dye for eggs
bowls
cooking oil
electrical
tape
Spotted Eggs: Place about 2 teaspoons of cooking oil in your dye. You might want to make two containers of your dye, so you don't mess up all of your regular dye.) When you dip your eggs, the part of the egg which the oil has touched will not change colors. The oil prevents the dye from sticking to the egg. There for you will have an egg which is dotted.
Stripped Eggs: Wrap electrical tape around an egg to make stripes and an interesting design. Take one or two pieces and wrap them around or stick them in various places. Then dye your egg. The dye will seem in along the edges of the tape and make great patterns.
Marble Eggs
Large glass
jar
Crayon
stubs
Vegetable
grater
Hot water
Waxed paper
or newspaper
Empty egg
carton
Clear acrylic
spray (optional)
Grate peeled crayons over waxed paper. Fill jar with very hot water. Drop bits of grated crayon into water. Add hard boiled or blown egg as soon as crayon begins to melt. Twirl egg in water with spoon. the wax should make a design on the egg. Carefully remove egg and set upside-down in egg carton to dry. Once dry spray with clear acrylic to seal.
Waxed Eggs
Wax crayons
paper
towels
egg dyes in
different colors
slotted
spoon
cooking oil
soft
cloth
Draw a heavy crayon pattern on hard boiled egg. Dip egg in egg dye, preferably a dark color. Leave in dye until desired color is reached. Remove with slotted spoon and place in 200 degree F oven for a few minutes until wax is melted. Wipe with paper towel and dip again in lighter dye to fill in pattern where wax was. Polish finished eggs with cooking oil and soft cloth
Sponge Painted Eggs
Liquid tempra
paint
paper cups
(for each color)
small pieces
of foam or sponge
clothes pins
(for each color)
egg cups
clear acrylic
spray
Place hard boiled or blown eggs in egg cups. Partially fill paper cups with different colors of paint. Clip a piece of sponge to a clothes pin and dip into paper cups, use the clothes pin as a handle. Lightly dab the sponge over the top half of the egg. Let dry. Turn egg over and repeat procedure. Let the egg dry completely. If using blown eggs, spray with acrylic spray for a permanent finish.
CHOCOLATE EGGS
Eggs Made From Chocolate
Many people prefer to give chololate eggs at easter and children actually pefer these as they all seem to love chocolate. It is very easy to make your own chocolate eggs, bunnies or baskets. All it takes is a mold for chocolate which are easily found in many stores these days. You can find molds for various occasions as well most of these stores sell chocolate in various colors which can be used for these molds.
Egg Molds
It is extremly to use molds. The only thing required is to melt the chocolate and pour it in. The easiest way is to make a solid egg by filling the two halves, setting them and then using a thin spread of melted chocolate to "glue" them together. The more econonmic way is to coat the inside of the shell with chocolate and to make a hollow egg, joining the two halves the same way.
You can also
use hollowed out eggs as a chocolate mold. Prepare the eggs in the
same way as previously mention in the blow out method. The
only difference is that the hole will have to made larger in order to allow
for the chocolate to be poured throug the hole. You can make a hollow
egg by pouring in a little and swirling it around until the inside of the
egg is thoroughly covered or if you prefer a solid egg, just fill the egg
shell with chocolate. Let the chocolate set completly befor gently
peeling the eggshell away to reveal your creation. Setting time depends
upon the amount of chocolate used. Icing sugar may be used to decorate
these eggs.
Index
Home Page


This page hosted by