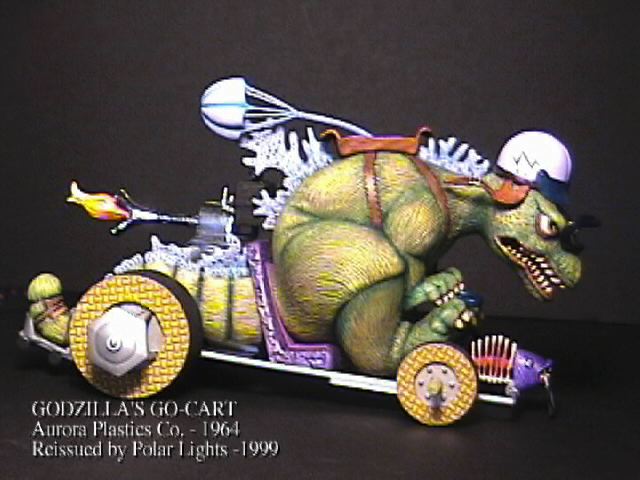
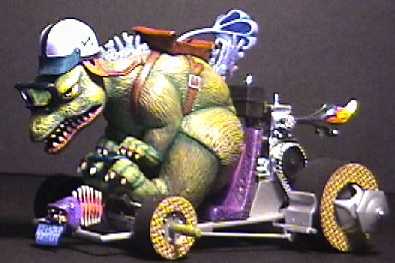
 But then, we all know who drives the Go-Cart, don't we?
The figure of Godzilla in this kit has always been one of my
favourites, a nice parody that anticipated the squeezed out-of-shape "super
deform" craze by a couple of decades. Though he doesn't "exactly" look
like Godzilla, in some ways this lampoon is more accurate than Aurora's
earlier Godzilla kit. Once again, the inspiration for the image seems to
be the broad, reptilian head on view in KING KONG VERSUS GODZILLA.
But then, we all know who drives the Go-Cart, don't we?
The figure of Godzilla in this kit has always been one of my
favourites, a nice parody that anticipated the squeezed out-of-shape "super
deform" craze by a couple of decades. Though he doesn't "exactly" look
like Godzilla, in some ways this lampoon is more accurate than Aurora's
earlier Godzilla kit. Once again, the inspiration for the image seems to
be the broad, reptilian head on view in KING KONG VERSUS GODZILLA.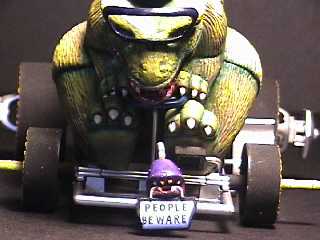 A little sign reading "people beware" dangles from the mouth of a
hood-ornament that is a skeletal fish with an intact head.
A little sign reading "people beware" dangles from the mouth of a
hood-ornament that is a skeletal fish with an intact head.
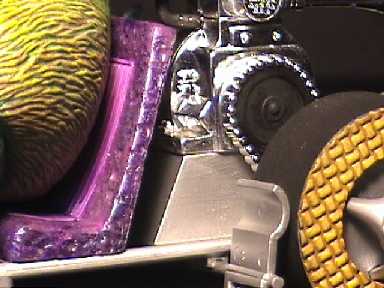
BUILDUP:
The monster car series is especially fun to build because it
combines the joys of figure model construction with the joy of building a
whacked-out custom car. Let's start by looking at the figure.
Paint the inside of Godzilla's mouth first, as it becomes quite
inaccessible once the figure is put together.
There are no details inside the mouth, and I suppose a stickler for
details might want to sculpt a tongue. However, the many teeth that make
it almost impossible to work a paint brush in through the mouth also
conceal the lack of detail inside.
The instructions are quite good, but be sure to read them
carefully. Cementing inner leg sections, as well as hind and forefoot
sections, is essential before mating the two body halves. As well, spend
the time to clean up seams in those areas, and perhaps even paint them.
Speaking as someone who did it wrong the first time, it is much easier to
work in those areas before finishing assembly. Godzilla's hunkered down,
hunched over pose makes it quite difficult to get between his legs. As
well, don't forget to cement the dorsal plates to pins in his back before
joining the two body halves.
There is an unusual "bat-shaped" belly sections which seals the
upper stomach and lower chest area of the figure. Glue this to one side of
the body, and adjust as you glue the other body half down.
A quick word about glue. I generally use both Zap-a-Gap super glue
and Testors non-toxic polystyrene glue in the plastic applicator bottle (it
also is available in tube form).
I like Zap to join pieces where I want an immediate, strong bone.
Typically these are pieces like the dorsal plates which will not show
seams. I use the Testor's product on areas that will need de-seaming when
completed. The advantage here is that when tightly squeezed together, the
melted plastic and glue will bubble up out of the seam. This mix
solidifies and, when dry, can be scrapped away with a hobby knife to
produce a seamless finish.
Some cheap plastic clamps are a good investment, to make sure the
drying pieces are squeezed hard enough. (Check out your local LEE VALLEY -
besides cheap clamps, you'll probably find some good deals on dremel heads
as well as mini-files and chisels. Quite often tool shops are much
cheaper than Hobby shops.)
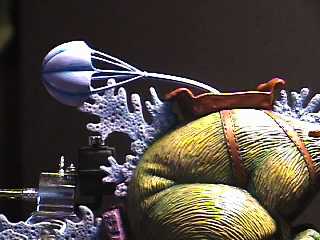 Sometimes I will use both glues on a single piece. For instance,
when joining the parachute halves, I used Testor's glue on the chute
material to make it easier to de-seam later, and a drop of Zap on the
parachute cords to spot-weld them together instantly.
Sometimes I will use both glues on a single piece. For instance,
when joining the parachute halves, I used Testor's glue on the chute
material to make it easier to de-seam later, and a drop of Zap on the
parachute cords to spot-weld them together instantly.
Since the Polar Lights instruction sheet is an exact reproduction
of the original except for a brief thank-you note and the Polar Lights
logo, there is no mention of how to deal with the chrome engine parts.
Remember that chrome will not seal with ordinary model glue (although you
can use super glue). If you are going to use standard model glue, remember
to use your hobby knife to adze off the mating edges.
This procedure is exactly like removing a seam-line. Tilt the
hobby knife at a forty-five degree angle to the chrome and gently scrape
off the chrome. Don't push too hard, or you'll chip away plastic which
will have to be filled later.
I also used my curved blade (exacto #28) to clean all the chrome
off the pieces that represent flames belching out of the Go-Cart's exhaust.
Paint doesn't adhere well to chrome either, so the flames can now be
painted more easily in yellows, reds, and oranges.
I did use some Tamiya flat black on a few of the chrome pieces, the
engine gas tank and the interior driving wheels of the chain drive
assembly. Tamiya has really good tooth, but even though it will cover
chrome it can still be brushed off fairly easily, so I'd limit this
technique to a few areas that cannot easily be bumped or brushed till the
paint scrapes free of chrome.
 Polar Lights had to rebuild the moulds of this kit from one of the
original models in the series. (Note the "thank you" to Stephen Agnelli
for providing them with the means to reproduce this kit. In fact, this
reissue is dedicated to Stephen's late friend, Daniel Partin.) This
reproduction work is very good, and in almost all instances, the detail
here compares favorably to the original kit. The one exception is the
Go-Cart's seat, which originally had a pitted, chiselled-out-of-stone look,
but in this edition is perfectly smooth.
The pitted texture can be reproduced with a dremel cutting tool.
Gently scribe a random pattern of depressions on the outside of the seats
upholstery by touching the plastic with the dremel. Vary the pressure to
create different depths of texture.
Polar Lights had to rebuild the moulds of this kit from one of the
original models in the series. (Note the "thank you" to Stephen Agnelli
for providing them with the means to reproduce this kit. In fact, this
reissue is dedicated to Stephen's late friend, Daniel Partin.) This
reproduction work is very good, and in almost all instances, the detail
here compares favorably to the original kit. The one exception is the
Go-Cart's seat, which originally had a pitted, chiselled-out-of-stone look,
but in this edition is perfectly smooth.
The pitted texture can be reproduced with a dremel cutting tool.
Gently scribe a random pattern of depressions on the outside of the seats
upholstery by touching the plastic with the dremel. Vary the pressure to
create different depths of texture.
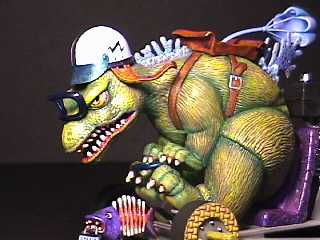
Painting instructions for the kit are a bit unimaginative. I think
a silver chassis for the Go-Cart, or even Candy-Apple red, would be
preferable to the grey cited in the instructions.
As for the figure itself, I'm not sure why the painting
instructions cite the dorsal plates as blue or Godzilla's eyes are red. Of
course, the color it gives for Godzilla himself is 'green.'
In this case, I recommend going wild with the colors on the figure
and the Go-Cart. Paint it to please yourself - after all it is a parody
kit.
I will admit that I painted this Godzilla a vibrant bright green.
Starting with a dark, forest green, I cut the color with Liquitex's
Cadmium Yellow Medium Hue, slowly adding more and more yellow as I leaned
lighter and lighter on the dry brush. (The final coats were, essentially,
yellow paint with a hint of green.) Afterwards I washed with a light
golden brown wash, and later a violet glaze. I reworked the shaded areas
of the figure with a wash made from mixing water into Liquitex Sap Green
Permanent (this makes an excellent green wash).
I touched up with a yellow green mixture, and ended by giving the
highest points on the figure a very light dry-brush coat of Cadmium Yellow
Light.
(NOTE: Liquitex's Cadmium Yellow Light - unlike most of the
Liquitex paints - is TOXIC. Cadmium pigment is very poisonous, should not
definitely not be airbrushed, and is somewhat absorbed through the skin.
So be careful.)
Maybe someday I'll do a grey Godzilla's Go-Cart too . . . but I
have to say that green was a lot more fun.
I decided to follow the instructions and try blue for the dorsal
plates. After coating them with a sky blue, I mixed a white-blue mixture
for dry-brushing. Later I used a violet glaze, and then mixed an even
lighter white-blue to dust the extreme edges of the dorsals.
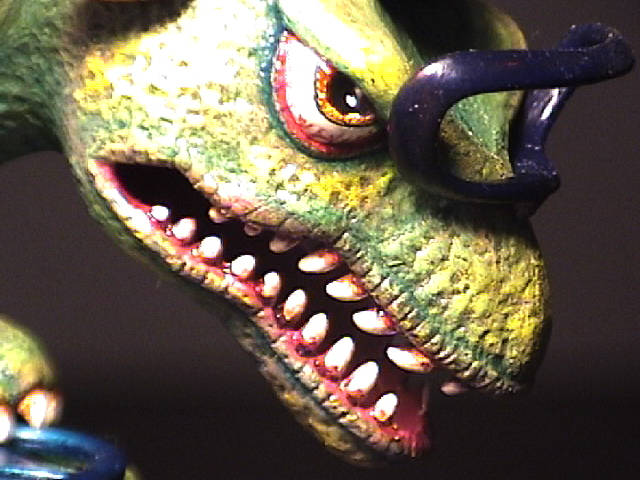 I'm not sure why anyone would paint the eyes red, except to match
the box art. I used the standard - slightly yellow/ivory - white for the
eye, with black for the iris. A red wash into the eyelid nicely accents
the edge of the eye, and a white high-light point in the black of the eye
plays well - as Godzilla is so determinedly focused on the chequered flag.
I'm not sure why anyone would paint the eyes red, except to match
the box art. I used the standard - slightly yellow/ivory - white for the
eye, with black for the iris. A red wash into the eyelid nicely accents
the edge of the eye, and a white high-light point in the black of the eye
plays well - as Godzilla is so determinedly focused on the chequered flag.
Ultimately there's a lot that's fun to paint here: the dissolved
fish ornament at the front of the car, the bamboo axles and rattan wheels,
Godzilla's helmet and chute. There are lots and lots of possibilities, so
don't feel too bound up by the painting instructions. It's more fun to
invent.
Let me end by complimenting POLAR LIGHTS again on getting this kit
out to the fans for a reasonable price. It's fun to build, looks cool when
built up, and really marks the beginning of the long history of Godzilla
parody kits. I'll definitely be building their kit of Kong's Thronster to
go along with him. Like the Snake and the Mongoose, these two were born to
be racing through the same diorama.
Next up from Polar Lights should be Jim Groman's sculpt of Godzilla
'98, which has been announced as coming out with two bases. The first
edition features a wrecked building base, whereas the second edition will
come with an eggs and babies base.
Myself, of course, I'll be buying two and reposing the figure on
the second base to create two distinct kits. (Currently Polar Lights has put the Godzilla '98 kits on hold, however they have released the classic Aurora Godzilla, King Ghidorah, Rodan and King Kong kits - JP)
So hurrah for Polar Lights for keeping this hobby affordable and
fun (as well as hopefully bringing some younger builders into the fold.)
BEST STan
 Back to the Stan's Kaiju Korner