 |
|
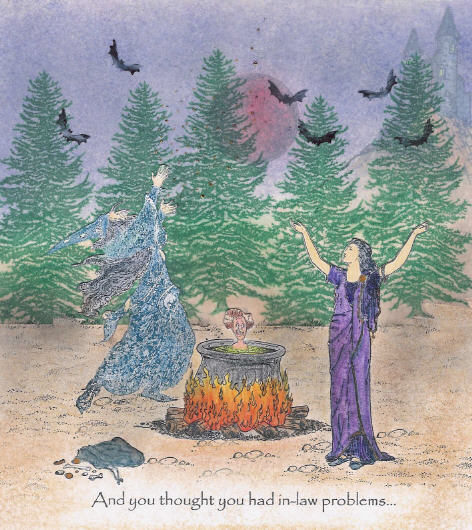
| In-law Problems |
| Stamps Used: Wizard, woman with arms raised, cauldron, diviner's pouch, castle: Third Coast Woman in cauldron, small rocks, tiny grass: Art Impressions Pine Tree: Personal Stamp Exchange Moon: ImaginAir Dirt texture: Beeswax Bat: Cherry Pie |
| How it was Done: I wanted to create a misty background effect, so I stamped part of this scene onto vellum, which I later inserted behind the main figures. For this scene I used several different inks, as follows: the woman with arms raised, cauldron, diviner's pouch, moon, castle, bats and ground texture were inked using a Marvy Brush Art marker (black). The trees were inked using a Marvy Le Plume II in #72 Pine Green. The wizard was inked using two differrent Marvy Brush Art markers, #21 Dark Gray (for his face, beard and hands) and #17 Steel Blue (for his robes, hat and pouch). 1. First I printed out the saying ("And you thought you had in-law problems...") using the Papyrus font on my computer. 2. Stamp woman with raised arms, mask her. 3. Stamp cauldron, leaving a bit of the back rim uninked. Mask cauldron. 4. Stamp just the head and shoulders of the Art Impressions woman, reduce her in size by 50%, or until her head is about the same size as the other people's. 5. Stamp wizard, mask him. 6. On a piece of vellum, stamp five trees, overlapping them a bit and varying their heights. Let this piece dry thoroughly. 7. Using a fine tipped knife (I used an Exact-o knife), carefully cut around upper two thirds of the wizard and about half of the woman with arms raised. 8. Stamp diviner's pouch. 9. Turn the vellum so the inked side is away from you, and carefully slide behind the figures. Decide on the placement you prefer, and lightly mark with a pencil where you want the moon and castle to be - make sure that part of each will show through the trees. Remove vellum and set aside for later. 10. Using your pencil marks for a guide, stamp castle and mask it, then stamp moon. A stamp positioner might come in handy for this. 11. Coloring. I used several different techniques for coloring this scene: a) I colored the background for this scene by sponging various colors for the sky and ground. I used a regular kitchen sponge and the following Marvy colors: #8 Violet, #15 Olive, #21 Dark Gray, and #29 Prussian Blue. I sponged the moon with a bit of #28 English Red. On the ground I used #24 Beige and #13 Ochre. I went over the sky with black chalk, and the ground with dark brown chalk. I went over the moon with orange-red and red chalk. b) I colored the castle, woman with arms raised, diviner's pouch and cauldron using watercolor pencils and a blending pen. I also added more deep red to the moon with a watercolor pencil, and used the blending pen on the moon, too. c) The windows of the castle, accents on the woman's dress, and some of the things spilling out from the pouch were colored with gel pens. d) The wizard and the woman in the cauldron were lightly colored with regular colored pencils. I also went over the ground again with a colored pencil. 12. Stamp dirt texture and rocks. 13. Slide vellum piece (inked side down) behind the cut out figures. Glue the cut out parts of the figures to the vellum. Add woman's head to the cauldron and glue it down, too. 14. Go over the trees and moon with appropriate colored chalks, and color ground between trees with brown chalk. 15. Stamp grass along the line of the vellum to make it look less distinct. 16. Stamp bats onto the vellum. 17. Using a gold glitter glue, add sparkles coming from wizard's hands onto the vellum. |