HOW TO MAKE SOUL CALIBUR SEUNG MINA ZANBATOU
BY- Tin
Tal: First off wanna say thank you to Tryn who kindly reminded me to post a tutorial so it can help anywho needs it :D! Now it's Tin's turn to show you how to make this pretty Zanbatou!

- 1 Wooden dowel (around 4ft, pending on your height, you can get it from AC
Moore)
- 2 Foam Boards
- 6 smooth Styrofoam balls (also can be acquired from AC Moore)
- 1 Smooth Styrofoam cone (can be bought or shaped)
- 1 Smooth Styrofoam square or dome
- One BBQ METAL skewer
- Newspaper
- Elmers glue and tacky glue
- Tape (Packaging tape is best)
- One roll of toilet paper (you won�t need the toilet paper but the cardboard
tube that holds it together)
- One stencil with a vine or flame design
- Paint: Red, Blue, Gold, Purple, Silver
- Nails and Hammer and Hot Glue
Tin�s POV
Okay, so I�ll admit that this project turned out not quite as polished as I
would have liked. Unfortunately Otakon �06 was the year of procrastination and
rushing. However, in the tutorial, I will try to help point out the areas I had
trouble with and where you can improve to make a nice looking Zanbatoh =]
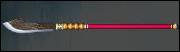
 The
Blade
The
Blade
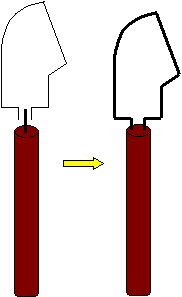
You�ll need 2 Foam Boards to create the blade (they�ll be mirror images of each other. You�ll want the blade to look something like the diagram here. It should also be roughly 10-15% the size of the wooden rod. It is a large blade =]
I recommend making a life size pattern on paper and then tracing it onto the foam board. Then trace the mirror image onto the second foam board. You can sand out the edges if you want to get very precise =]

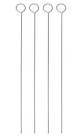
Grab one of your BBQ Metal skewers (pic shown here), which you can find at the dollar store or grocery. Take your two foam boards and sandwich the metal skewer between the two, with the circle part facing the top. Leave about 1�-1.5� of the pointy edge sticking out. You�ll use this pointy edge to insert the blade into the rod.
Tape the two foam board blades and the sandwiched BBQ skewer together very
tightly. I recommend the tape you use to tape up packages for best adhesion.
Now, you can start paper mache the blade.
I am no fan of paper mache, although my sister is a pro. I�m quite unskilled, but I�ll try my best to describe it. In a bowl mix up (and I can�t remember the correct dimensions, sorry) about a bottle of Elmer�s glue with half a bottle of Tacky Glue. Mix in some water to ensure the mixture is liquidy enough to dip in the newspaper strips. Mix your water-glue mixure well to ensure there are no large clumps. Take your newspaper and slice them up into very long strips about an 1�-2� wide. Dip your strips into the paper mache mixture and squeeze out any excess. Wrap the strip around your blade. Continue in this fashion until the WHOLE blade is covered. Don�t forget about the edges as well! Remember to smooth out any air pockets / bubbles as this will make your blade look rather bumpy. Leave your blade covered in paper mache to dry out overnight or longer. If there are pieces that pop up and don�t lie flat against the blade, take a paint brush and brush it over with the glue mixture.
The Gold Balls
 Okay,
so for the gold balls which adorn the Zanbatoh. I used 4 balls for the top of
the blade and then 2 on the bottom. What you�ll need to do is trace out a
circle (the same diameter or less little less than the diameter of your rod)
onto the top and bottom of the ball. Make sure the diameter of the circle you
draw out is not too big otherwise, the ball will slide right off the rod. You
want the ball to be able to fit very snugly onto the rod and hold itself. Core
out the center. I basically took a screwdriver and just started picking away at
the Styrofoam. You�ll end up with donut balls, haha. Repeat this method on the
other 5 balls.
Okay,
so for the gold balls which adorn the Zanbatoh. I used 4 balls for the top of
the blade and then 2 on the bottom. What you�ll need to do is trace out a
circle (the same diameter or less little less than the diameter of your rod)
onto the top and bottom of the ball. Make sure the diameter of the circle you
draw out is not too big otherwise, the ball will slide right off the rod. You
want the ball to be able to fit very snugly onto the rod and hold itself. Core
out the center. I basically took a screwdriver and just started picking away at
the Styrofoam. You�ll end up with donut balls, haha. Repeat this method on the
other 5 balls.
The Bottom of Zanbatoh
Okay, so when I tried to do this part, I royally messed up and had no time to recover or fix the bottom portion. Silly me, thought putting playdoh to cover up the spongy Styrofoam would help. Wrong! In the heat, playdoh cracks�so bad on me. However, here are my recommendations:
For the blue portion of the Zanbatoh (the part that balances the rod and the
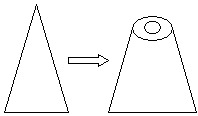
blade), I would recommend finding a smooth Styrofoam cone. Cut off the tip and
then follow the instructions for the gold balls and core out the center so it
can fit into the rod. If you can�t find a smooth Styrofoam cone, you could try
to create a shape out of a Styrofoam block or you can be creative and find
alternative methods =]
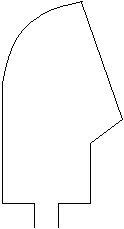
Then there�s that very bottom piece of the Zanbatoh in gold. It kind of
�ends� the rod. Find something pretty durable for this piece because I found
myself resting the Zanbatoh on it a lot when I was resting or shopping. Once
again, I�d recommend taking a piece of Smooth Styrofoam and creating a shape
to resemble the one in Seung Mina�s picture and core out the center to slip
onto the rod.
Painting
- Take the wooden dowel you got from the craft store and paint the entire thing red. Depending on the smoothness of the dowel, you might want to smooth it out with sandpaper first. You may also need a few coats of paint too. I used regular craft paint and that did a good job within 1-2 coats. Let it dry overnight.
- Make sure you get 6 SMOOTH Styrofoam balls. If you get the porous, spongy ones, it will be a massive headache! I made the mistake of using the spongy ones for the bottom of the Zanbatoh and it was messy since I had to coat it with glue several times and the paint multiple times, ugh. So, for BEST results, use the nice smooth Styrofoam balls (as shown in the top part of my Zanbatoh) and paint those gold. For nice results, use multiple layers of paint. Once again, regular craft paint works well.
- Paint the toilet cardboard tube purple. Let that dry. Then paint a gold trim around the top and the bottom. Using the stencil and gold paint, stencil in a design around the tube.
- Paint the blade. First, paint the entire blade a bright silver color. You�ll be painting over the paper mache so you will want to put several coats to ensure the newspaper print is thoroughly covered. Let it dry. Then paint the non-sharp edge of the blade with a dark silver trim. Let dry.
Assembly
Now that you�ve done all your preliminary work, you can put your masterpiece together. You�ll want to focus on making sure the blade fits right. I had a couple of shaky moments with the blade being wobbly, so you�ll want to take extra care in make sure the blade stays on the rod.
Ask a friend or family member to help you out on this one if you�re not a handy person. An extra pair of hands will ensure you don�t get hurt. Get a long, wide nail and hammer it into the top of the rod. Don�t nail it all the way in! You need to be able to pull it out. Do this a couple of times. You need the hole to be able to fit the pointy edge of the BBQ skewer into it.
 Okay,
so it may take a few attempts with hammering until the skewer is able to fit
snugly into the hole. Insert the skewer into the rod hole.
Okay,
so it may take a few attempts with hammering until the skewer is able to fit
snugly into the hole. Insert the skewer into the rod hole.
For extra insurance, I would hot glue around the hole and skewer edge to make sure it stays put!
With the blade firmly in place, slide your painted toilet paper tube from the bottom.
Make sure it sits flush against the blade so the hot glue, the skewer, and bottom portion of the blade is covered.
Start sliding different pieces of the Zanbatoh from the bottom until you have a completed weapon.
You can add other decorations and accessories to enhance the look of your weapon.
I hope this tutorial helped a little bit. Thanks for visiting! Arigato, minna-san!
Tal: Thanks Tin for the tutorial! Any questions? Just e-mail me at [email protected] or leave a message in the guestbook ^_^!

|
This photo and tutorial is property of AnimaeAriesGirl and Cosplay Cosplay Revolution, if you would like to use it or post it on your website, please give credit to either me or my website. Thank you! |
![]()