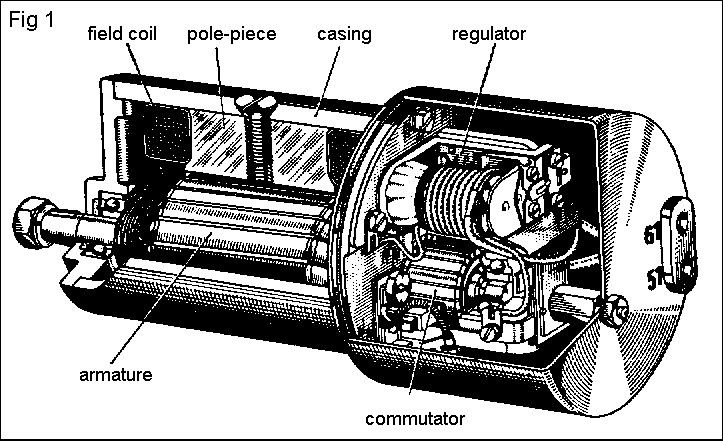
| DC Generators and solid state controller therefore |

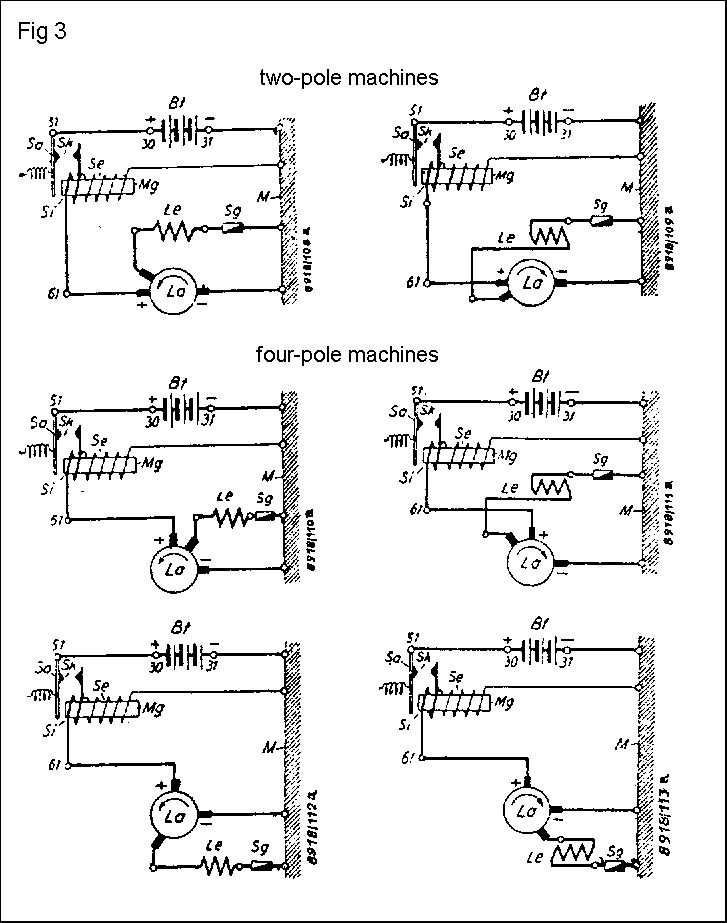
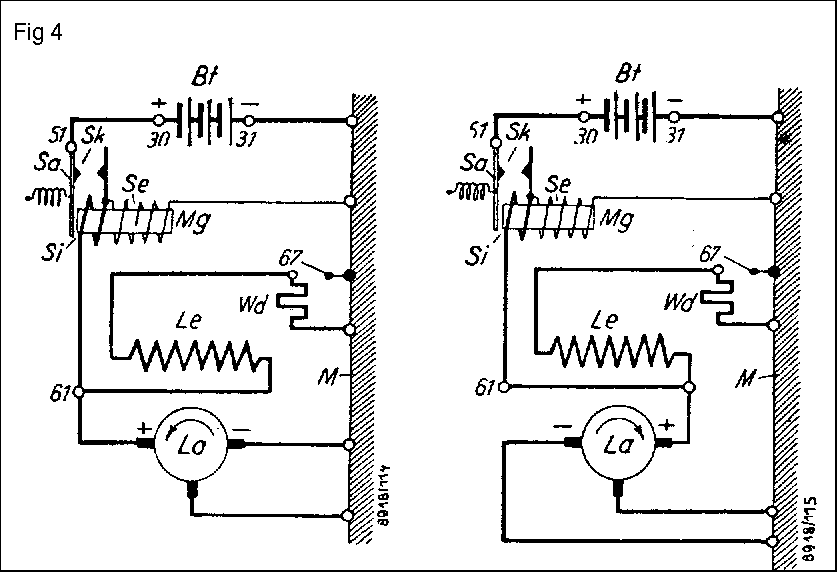
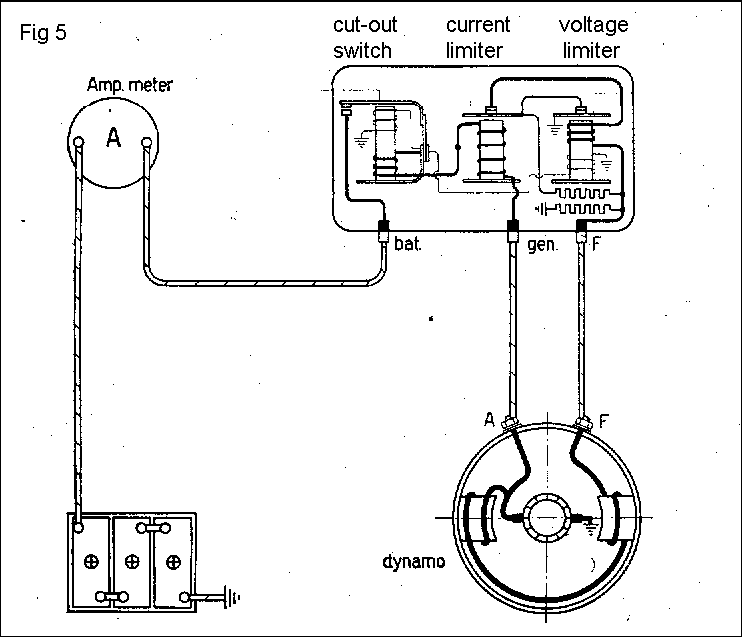
In these circuits Le is the field winding, Sg a fuse and Mg the cut-out solenoid switch. The brush arrangement shown in Figure 4 (two-pole arrangement) is suitable for easy change of direction of rotation of the dynamo.
An example of one of the great variety of such regulators and its electrical circuit is shown in Figure 5
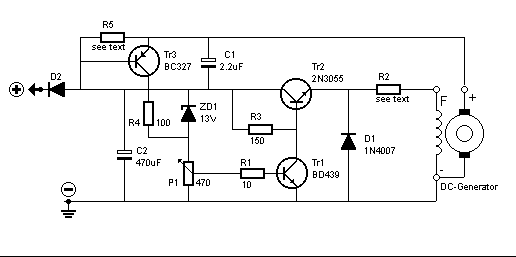
However, for those who have no choice because essential parts are missing or are beyond repair or, if it is thought necessary to improve the reliability of the power output (in particular of a three-brush type of generator), it is suggested that use should be made of the solid state regulator presented in this article.
In some European countries electric lighting is mandatory even for very old motorcycles if they are used on the public roads and in such a case conversion to electric lighting and an electric power generator becomes unavoidable. The oldest generators, sold separately at the time as an accessory and therefore preferred for such a conversion, are nearly always of the 6-Volts three-brush type. They look nice, are small and installation is normally not too difficult, but the electric output is very low. However, when using the regulator presented in this article such a generator can be adapted to become a 12 Volts generator thereby effectively doubling its power output! It is also easy to change the direction of rotation of the adapted generator by just interchanging the connections of the filed windings.
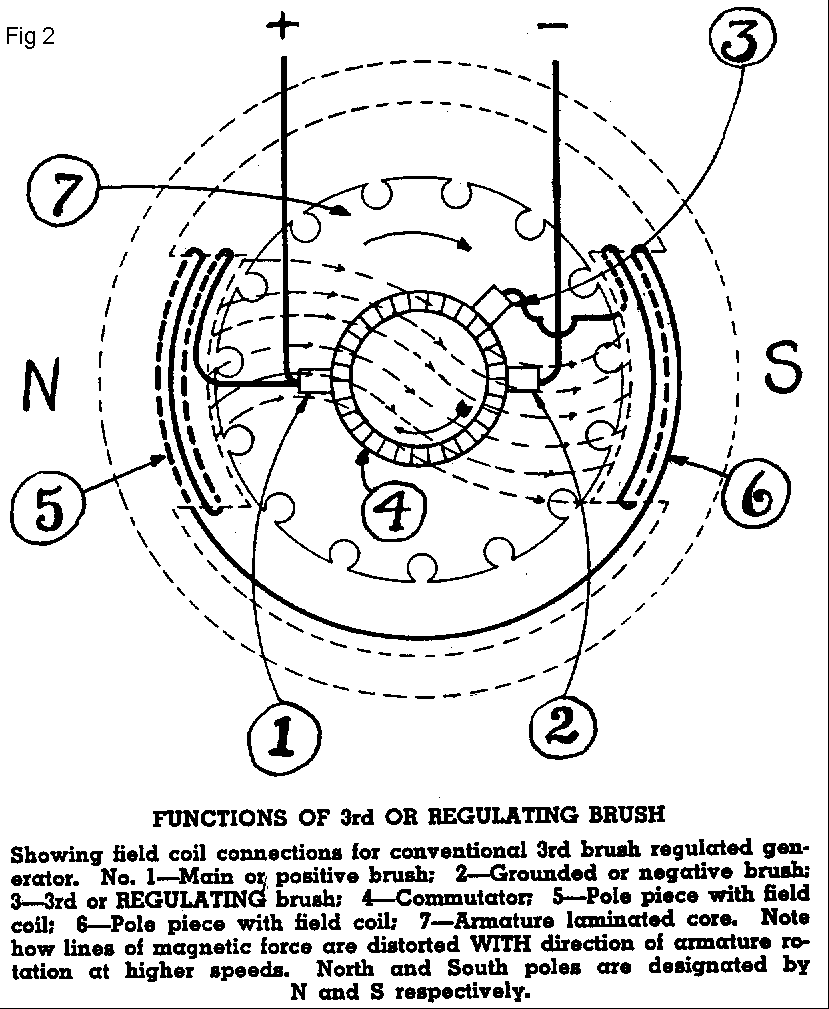
Because the field windings are controlled directly
by the regulator the third brush, the position of which with respect to
the positive brush (see figures 3 and 4) normally determines the sense
of rotation, is not needed anymore.
During regulation these sequences follow in a fast mode such that the dynamo voltage is kept regulated at the desired voltage set by P1.
The components R4, R 5 and T3 form a current limiting
circuit. The value of R5 is selected to limit the maximum output current
in order to avoid overload of the dynamo. The value of resistor R5 is chosen
such that, at the maximum allowable current load of the dynamo, the voltage
across this resistor is so that T3 starts conducting whereby the voltage
across P1 increases, even without diode Dz conducting, and the output voltage
of the dynamo is consequently decreased.
Consequently, for a fixed maximum current rating
and within the rated speed limit, the power output (P) of a dynamo is essentially
directly proportional to the output voltage (V) in accordance with the
function P=V.I.
Taking into account these principles and the
fact that a 6-Volts dynamo easily gives 40 Volts when it is not regulated,
the regulator described can also be used to convert a 6-volt dynamo to
give 12 volts, and thus double its power output, without further modifications
to the dynamo itself !
It is however advised to insert in series with
the field coil a resistor R2 of the same resistance as the field coil resistance
to limit the field current to the 6 volts value and so limit the load of
transistor T2 and reduce the risk of overheating of the field windings
at low dynamo speeds when, as follows from the above explanation, full
voltage (thus up to 13 Volts) is supplied to the field windings.
With some dynamos difficulties have been encountered
when used with a diode D2 instead of a cut-out. An electromagnetic cut-out
allows the tension of the dynamo to rise before the connection to the battery
is made and therefore it is easier for the dynamo to "start-up" in particular
when the remaining magnetism in the field pieces is small. If you
have difficulties with a "black-box" for converting 6 Volts dynamo
to 12 Volts or power is unsufficient, try out whether an electromagnetical
cut-out switch works better and also check if the field windings get enough
power. Normally a bad adaptation of the black-box controller to the dynamo
concerned is the cause of the trouble.
If required, 6 volts regulation may be maintained by using a 6 volts Zener diode instead of a 13 volts Zener diode and by adjusting the trimpot P1 to give battery loading voltage of 7 volts.
It is always possible to maintain the original
cut-out relay, which should then be installed instead of the diode D2.
If maximum current should be limited to 3 amps (up to 5 amps), the resistor R5 should be chosen to be about 0.15 ohms (down to 0.08 ohms). If not available such a resistor can be made from a high load wire-wound resistor, cutting off a wire length in proportion to the known resistance of the wire wound resistor to obtain 0.15 ohms and wrapping this wire on a resistor of say, at least 100 ohms, as a support for the wire and for easy mounting in the circuit.
The value of resistor R2 is selected to be equal or slightly lower than the field coil resistance (to be measured with an Ohm-meter) for the reasons mentioned in point IV above.
Temperature compensation can be obtained by mounting one or two diodes in series with the zener diode Dz. Instead of the Transistor T2 also a darlington pair can be used, such as BD 645. However, in practise these further adaptations proved unnecessary and are mentioned only as alternatives for those who like to experiment.
Adjustment of the voltage should be carried out with a fully charged battery of the type to be used on the motorbike. The maximum voltage, normally between 14 and 14.5 Volts, should be adjusted so that there is still a small charging current, the intensity of which depends on the size of the battery (usually between 0.1 Amps for small and 0.5 Amps for bigger batteries).
Use a high quality trimpot (cermet or equivalent) for P1 and, after setting it to the required battery voltage, seal the setting screw with a blob of paint.
Adjusted in this manner the risk of overloading the battery is effectively prevented and it is ensured that the maximum capacity of the battery is always available.
T2 should be mounted on a small heat sink.
A great advantage of the regulator is that, in
contrast to the three-brush type of regulation, its functioning is independent
of the battery and can thus also be used in case the battery is disconnected
without a risk of blowing the bulbs.
 |