| Harley
Davidson model "F" drum brake |
*The Harley Davidson
drum brake
The model
"F" HD was one of the first motorbikes with a drum brake. A single drum
was used on the rear wheel apparently because at the time a front brake
was considered dangerous (nowadays we are used to almost perfect road surfaces
but at the beginning of the century most of the roads were not surfaced
at all and were very slippery even when it was not raining).Although the
drum brake configuration applied by HD must have given a considerable improvement
in braking efficiency when compared to the brakes then in use, judged by
current standards it is not very effective, in particular when a sidecar
is attached.
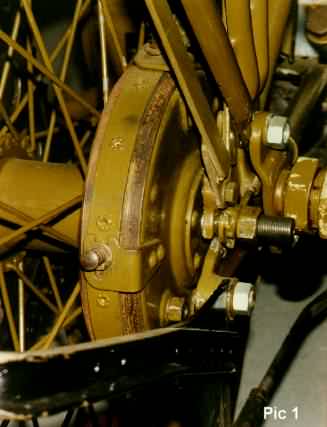
*Brake problems
The Model
"F" drum brake has a foot-operated expanding inner brake band (see Figure
1), on some models combined with a foot- or hand-operated outer band brake
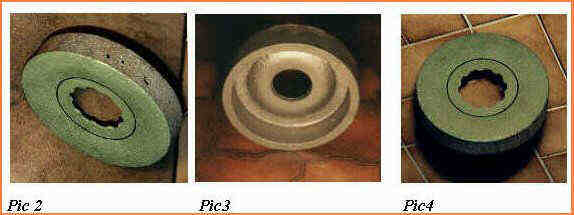
(see pic 1).The drum itself is made out of steel plate, drawn in one-piece
configuration for the early ones, later ones are of two-piece construction
in which the drum is welded to the backplate. The material of the drums
is rather thin (about 2 mm) which may be one of the reasons why they are
not very long-lasting.The early brake drums are mounted on the hub by means
of a toothed connection with rectangular teeth and a retaining ring screwed
onto the hub. On later models the teeth are rounded-off (see pic 4).
If the bike is to pass the German TÜV (corresponding
to the British MOT), then to be approved for road use the bike must have
two independently controlled brakes, which must be effective too.However,
looking at the original brake construction (see pic 1) it is immediately
apparent that the higher the force on the actuating mechanism the higher
the risk that the narrow and thin band supporting the brake material will
distort with consequential reduction in brake efficiency. The original
brake construction, provided the linings are in perfect condition, may
suffice for solo-work with an experienced rider, but with a sidecar adaptations
are certainly necessary to improve braking.
Some restorers provide a front brake to improve
braking but, apart from detracting from the original appearance, the early
front forks are not really capable of resisting the braking forces. Therefore,
when a HD "F" model is regularly used on the road there is no other alternative
but to improve the efficiency of the rear brake.This can be achieved by
using current brake shoes which permit higher brake forces to be applied
effectively but consequently, to avoid distortion of the original drum,
a more substantial brake drum is then needed.A further problem is that
original drums are very difficult to find (this situation might of course
change) and moreover are rusted and/or worn (see pic 1 and 2) so that reclaiming
and adapting them is normally out of the question.
*Brake drum conversion
considerations
In view
of the problems referred to above a new drum construction based on a new
or existing drum seemed the only way to arrive at a satisfactory solution.When
looking for a replacement, it was the toothed connection to the wheel hub
that in particular needed thorough consideration. The narrow teeth are
small in height and are moreover provided on a small diameter of the hub,
so that the resulting surface pressure on each tooth is high; for reasons
of safety only steel can in fact be used in this area. However neither
steel drums of the size needed nor cast iron ones (with enough material
at the area of mounting the drum to the hub, so that an adaptation could
be made) were found, mainly because the original drum has a concave backplate
to give clearance to the spokes; all the available ones had flat rear sides
and would therefore stick out too much when adapted to the HD hub.
There was therefore no other solution than to
manufacture new brake drums myself.Cast iron was preferred because of its
better properties concerning braking, and a small batch (10) of drums (I
still have some available!) of the form approaching the original ones was
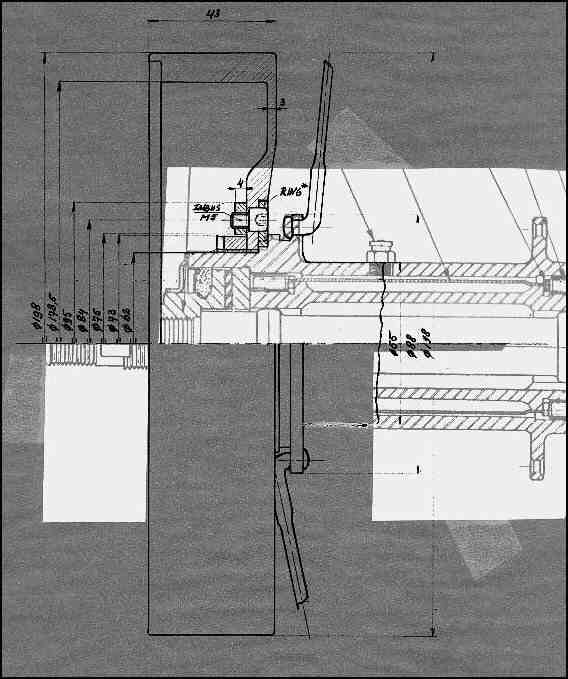
cast (pic 3). The rough castings were machined on a lathe to the form shown
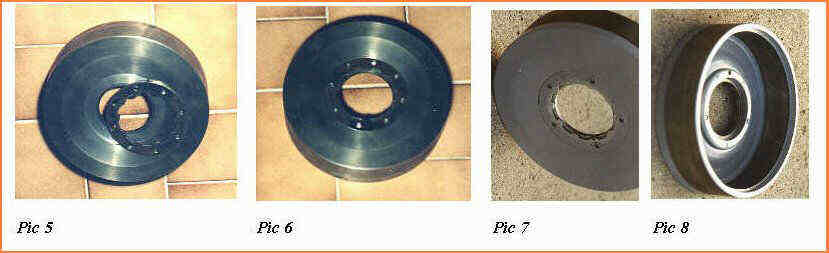
in drawing 1.The toothed connecting part of the original brake drum was
still in order and a large ring was cut out of the back of the original
drum comprising the toothed hole (see pic 4 and 5). This ring was mounted
in a recess machined in the back of the cast drum (see pic 6) and a connection
was provided by means of hexagon socket head screws (the purist may use
"home" made bolts) and an extra mounting ring (see pic 7 and 8); details
of the construction may be seen in drawing 1. In this manner in fact an
additional coupling was made between the iron brake drum and the steel
ring at a larger diameter with larger load bearing surfaces which easily
cope with the reaction forces during braking. Of course machining must
be accurate to give a perfect fit since any play here would soon prove
to be fatal (both to the brake and to the driver!).
*Brake shoes
Brake shoes
can be found in all sorts and sizes at autojumbles and some (probably Japanese
ones...) were found with the same outer diameter as the original inner
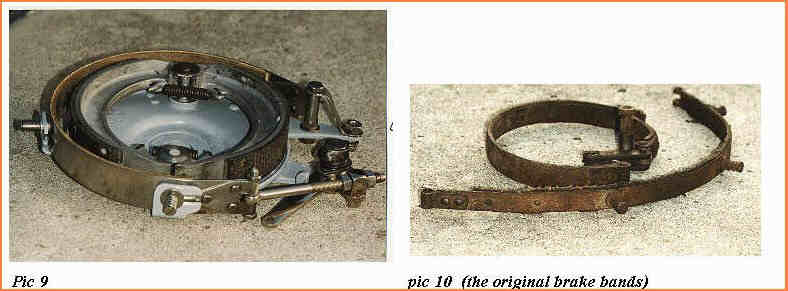
band brake but of slightly larger width (see pic 9).When using brake shoes
of larger width than the original brake band further adaptations become
necessary, essentially a widening of the rear frame fork because the total
hub width becomes larger. This results in further work ensuring alignment
of the rear chain sprockets and in most cases an adjustment of the offset
of the wheel rim with respect to the hub. In view of this extra work, which
normally entails a complete stripping of the bike to provide the necessary
alignment aids, the use of wider brake shoes is advised only when a complete
restoration is undertaken, otherwise brake shoes with the same width as
the original band brake should be selected.It is advisable in any case
to check for the alignment of the sprocket wheels and rim because in each
of the bikes I have restored there was a substantial deviation from the
ideal line giving cause to noise and high sprocket wear.
The new brake shoes were mounted on the original
brake plate, ensuring perfect concentricity with the drum. Concentricity
is essential and the best way to obtain proper lining up is to mount the
new drum to the hub and, with the brake shoes provisionally mounted on
the brake plate, to actuate the brake so that the linings are pressed against
the inner surface of the drum and then to fix the turning point(s) of the
brake shoes to the brake plate. Obviously, the inner diameter of the drum
must be suitably adapted to the outer diameter of the brake shoes so that
the whole surface of the brake lining is in contact with the drum when
the brake is actuated!
A new outer band brake was made of a strip of
spring (or stainless) steel and a strip of ferodo brake lining material
glued to it.The original brake material had been rivetted to the strip
(see pic 10). However, as well as causing distortion of the brake band,
also making it very difficult to obtain proper contact over its entire
surface, it proves impossible to give the brake band the required constant
circular form; this is essential for the brake band to grip and for a constant
clearance over its circumference with respect to the drum. Therefore, adhesively
bonding of the lining is preferred. The strip and brake lining were wrapped
around the drum, the latter being used as a support, with 1 mm carton strip
inserted between the brake lining material and the drum to provide for
the necessary clearance in the finished state and the assembly was baked
in the kitchen oven for 1 hour at 180 C, following the adhesive manufacturer's
instructions (and wife's permission).
(Clutch linings can also be bonded to their supports
instead of being rivetted thereto, resulting in a much smoother and more
progressive action of the clutch!)
Warning!!
-
In view of the serious problems that might be encountered
with adhesively bonded brake linings, in particular when used for drum
brakes with expanding brake shoes, if you have any doubt about the materials
or the quality of the adhesive or clarity of the users' instructions, do
not take any risk and have the brake linings fitted by a competent specialist.
Even then always carefully check (for example by trying to chip off a corner
of the brake lining) whether the bond is sound.
The outer band brake is pulled back
from the drum by means of 2 or 3 (later models) small springs acting against
guiding hooks fixed to the brake plate (see pic 2 and original brake bands
in pic 10). Originally, pins having the spring on them were rivetted to
the brake band but, to avoid any distortion and provide easier assembly
of the brake band to the brake plate, small nuts may be spot welded to
the band to which the springs are mounted by means of screws. Another preferred
mounting alternative of the spring supporting pins is the use of special
nuts which are applied in pop-rivet manner to the brake band and which
are obtainable from the fastener specialist (see pic 9, completed brake
arrangement).
Copyright PRAVG