 |
|
|
|
|
|
|
|
|
|
|
|
|
|
|
|
|
|
|
|
|
|
|
|
|
|
|
|
|
|
|
|
|
|
|
|
|
|
|
|
|
|
|
|
|
|
Rebuilding cathode bypass capacitors in the RF amplifier unit of the Sparton Equasonne |
|
|
|
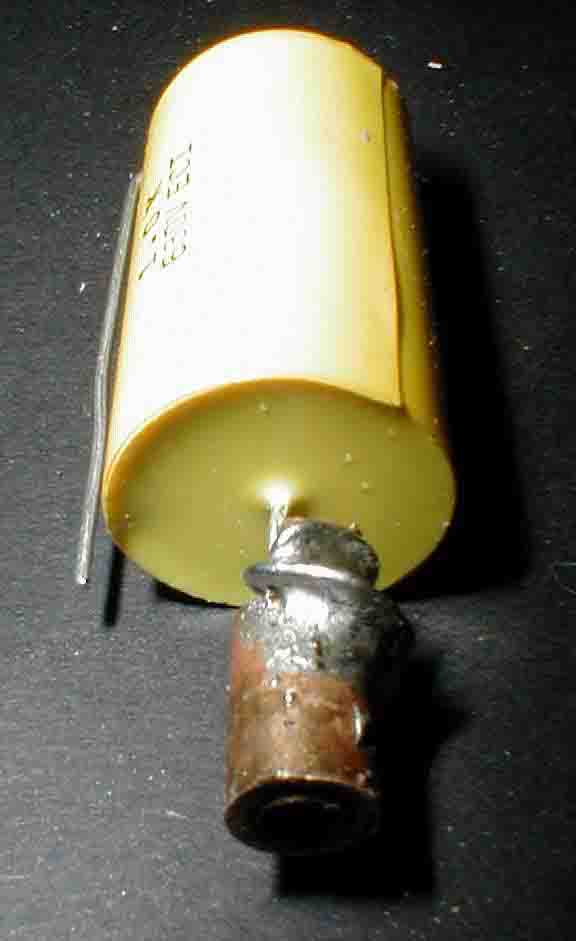
The original paper capacitors in the Sparton Equasonne are rather primative and poorly built. They were highly prone to electrical shorts. If they are still present within your set, they are definitely due for replacement! The factory originals consist of a brass center post wrapped with metal foil and paper and covered with black paper. One end of the capacitor electrically connects to the brass center post. This post is connected to the circuit board via a small screw which threads into the exposed end on the bottom surface of the capacitor. The other end of the capacitor is electrically connected to a small metal tab which projects from the bottom edge of the capacitor. This tab is physically connected to the circuit board either by a screw or by a solder joint. Sadly (happily?) exact replacements are no longer available. Perhaps some or all of yours have already been replaced untold ages ago with ugly and also substandard replacements which are probably crudely shoe-horned into place. These replacements may themselves be in need of replacing. The following is a method to create replacements that very closely resemble the originals. If the orignals are present, they can be disassembled and some of the original parts used in the construction of replacements. If the originals are missing it should still be possible to create replacements similar to those described below by obtaining reasonable facsimilies of parts A, B and C from a hardware store. |
|
|
|
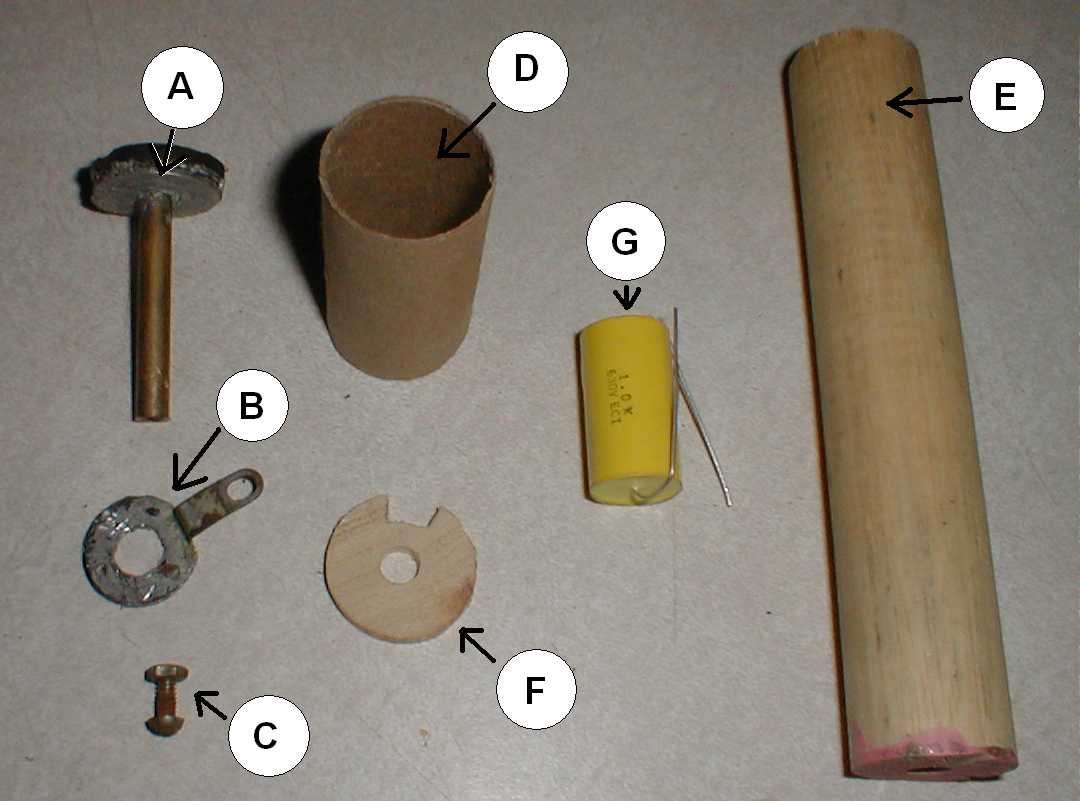
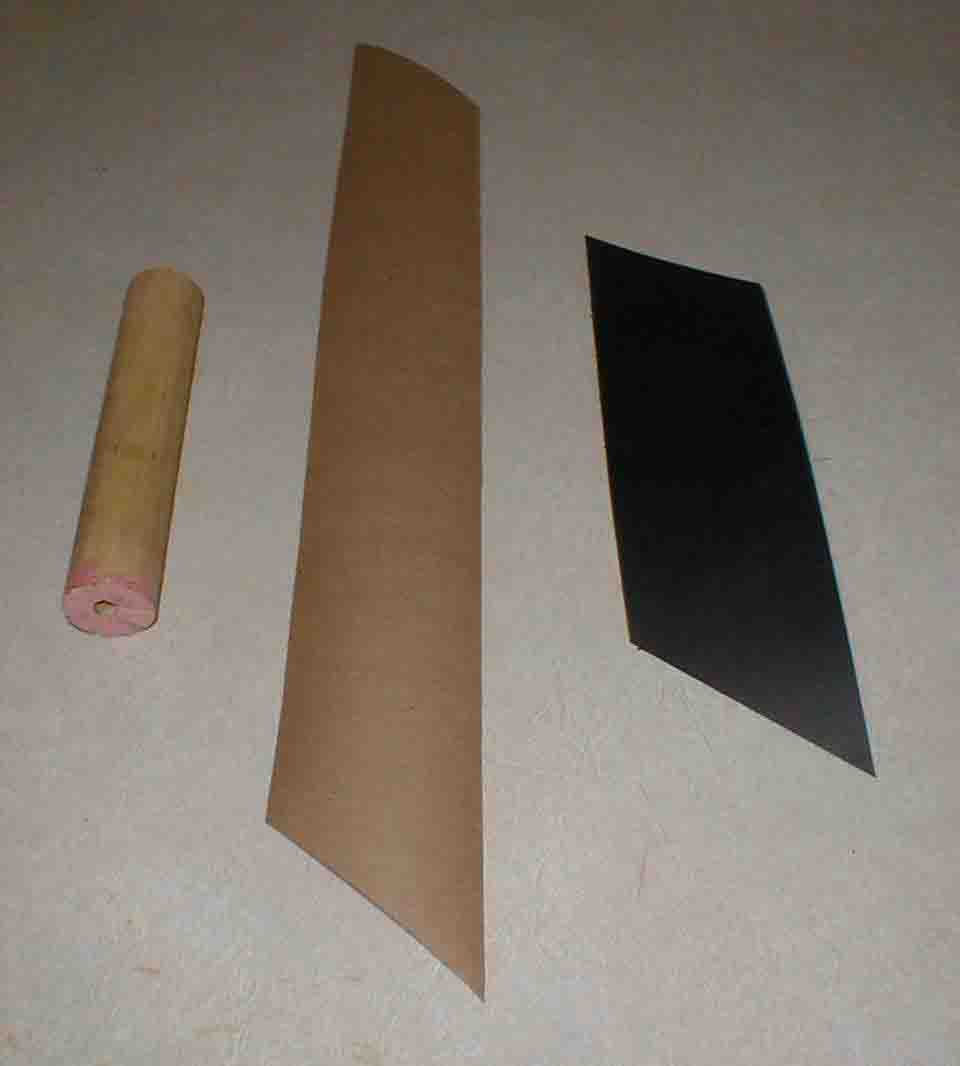
A 1uF paper capacitor (one of 4) from the RF amplifier unit of a Sparton Equasonne radio dissassembled and ready for rebuilding. The black paper cover and the paper and foil windings have been removed by unwinding and/or or by cutting with a razor blade. The brass center post (A), with the wax-coated top piece, the bottom circular electrode (B), and a mounting screw (C) are all that remain of the original capacitor. A wooden dowel (27 mm or 1 and 1/16 inch) diam. (E) is used as a form to create the outer tube for the rebuilt capacitor (D) shown at the top center of the picture. A small slice has been cut off the same dowel to serve as a base for the |
|
|
 |
|
|
|
|
|
 |
|
|
|
|
|
|
|
|
|
|
(yellow) is visible in the picture (G). |
|
|
|
|
|
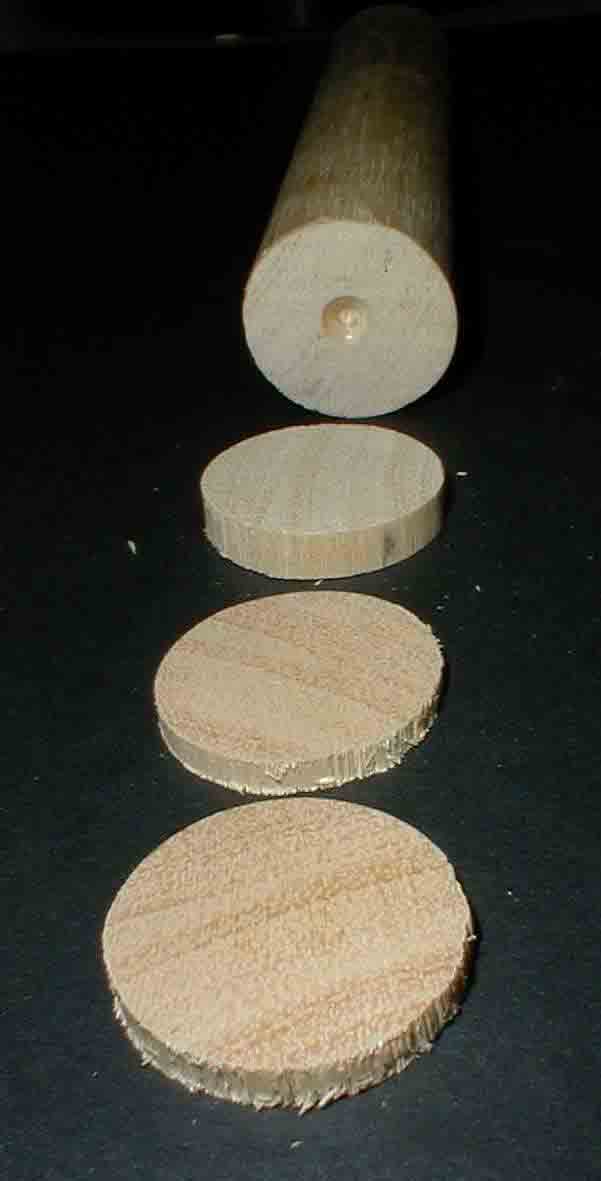
Slices are cut off the wooden dowel to make bases (and tops) for the new capacitor. Cut the slices about 2-3mm thick, and cut a fair number of them, they are prone to break while drilling. Slices used for the base need to modified to resemble (F) in previous figure. Cut a small notch in the side to accomodate the tab on the circular electrode (see (B) in previous figure) and drill a center hole large enough to accomodate the brass center post. |
|
|
|
|
|
 |
|
|
|
|
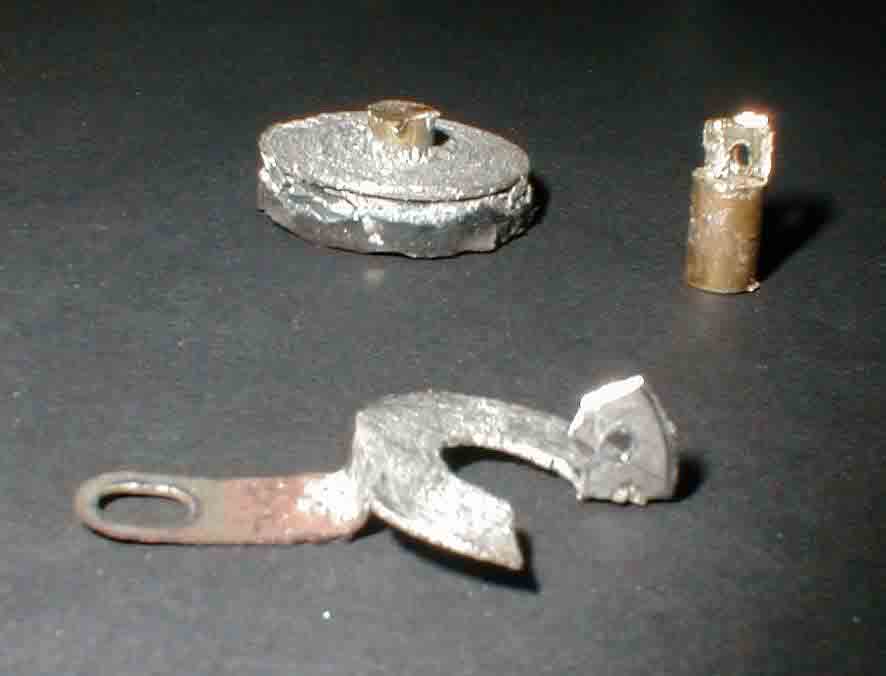
Because the polypropylene capacitor is too big to sqeeze inside the old capacitor with the brass center post intact, the post must be sawn up to make room. Cut off and retain the top end of the post with the wax top piece, and cut off the bottom threaded end. The bottom end will be used as a mounting post for the new capacitor and will be soldered to one of the new capacitors lead wires. The upper end of the stub has been cut and filed to form a tab, and a hole has been drilled in it to accept the capacitor lead wire (see diagrams). On some of these old capacitors the top does not consist of a wax plug, rather it is made from a black metal washer, which is attached to the top of the brass center post by a screw. In this case, retain a large enough chunk of the top of the center pole to accomodate the washer and screw.
The donut shaped bottom electrode will attach to the other capacitor lead wire. The electrode has been cut and one end bent up and drilled to create a tab to attach this wire. |
|
|
|
|
|
|
Clean the brass mounting stub with brass polish or steel wool. This will enable you to make a good solder connection. Feed the lead wire from one end of the capacitor through the hole drilled in the top of the stub and wrap it around the stub a few times. Solder the connection. |
|
|
|
 |
|
|
|
|
|
|
|
|
|
 |
|
|
|
 |
|
|
|
|
|
Solder a short lead wire to the circular electrode. Cover the joint of this lead wire with shrink tubing and either shrink tube or paint the base of the capacitor stub with liquid electrical tape to prevent shorting of these two components when assembled. |
|
|
|
|
 |
|
|
|
|
|
|
Epoxy glue the circular metal electrode to the wooden base, making sure it is well centered with the hole drilled through the center of the wooden base. When dry, Insert the brass center post with the attached capacitor into the center hole of the wooden base. Make sure you have used shrink tubing or liquid electrical tape (or both) on the brass post to prevent it from shorting to the circular electrode. This is very important as the round metal electrode and center post come in very close proximity to each other. Glue the capacitor in place with more epoxy cement.
Solder the short lead in wire from the circular electrode to the lead on the top end of the capacitor.
To ensure you have created no electrical shorts between the two electrodes, connect an ohmmeter between the side tab and the threaded center hole on the underside of the wooden base. You should measure infinite resistance between these points. If so, continue with reassembly. |
|
|
|
|
 |
|
|
|
|
|
|
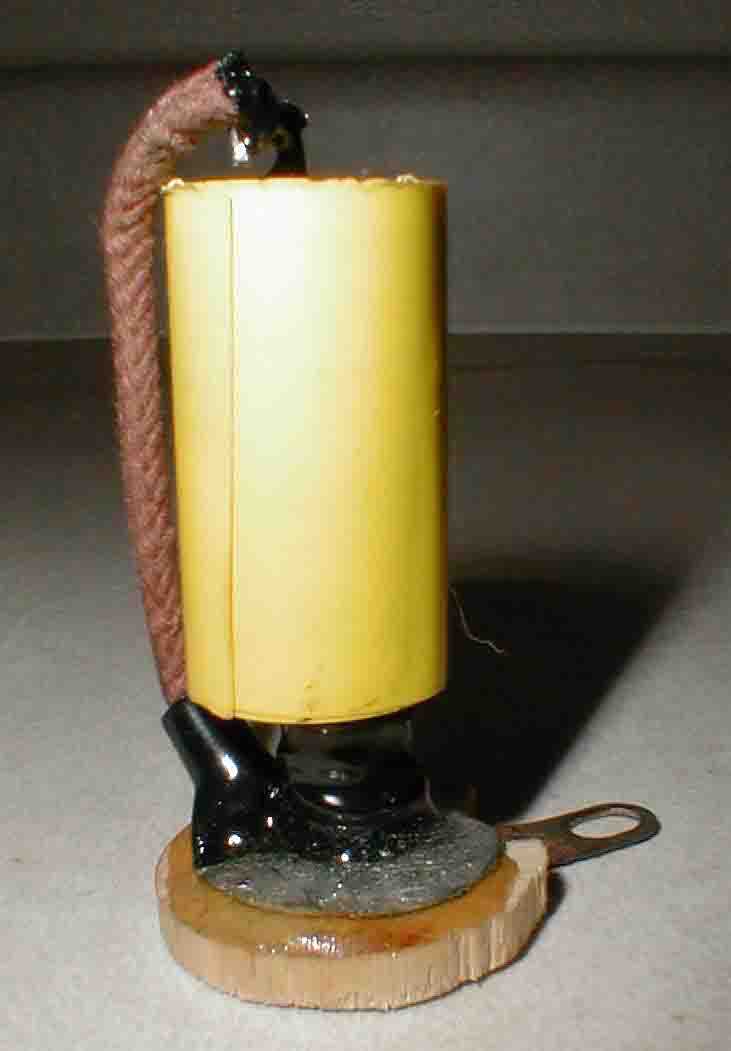
Cut a strip of brown paper 53mm wide and about 40 cm long. Angle the edges as shown. Cut a similar strip of black construction paper 53mm wide and about 20 cm long. The capacitor body you will create with this paper will be 53mm tall. This is slightly taller than the original capacitors (approx 50mm) used in the equasonne, but will allow you sufficient room to make all the internal connections. If you wish, you can manufacture the tubes to be slightly taller (up to about 60mm) to allow extra room. Do not make them any taller than 60mm. As the 485 tubes flare out towards the top, there is no room to accomodate a capacitor this wide which is taller than 60mm. |
|
|
|
|
|
 |
|
|
|
Wrap the brown paper strip around the wooden dowel. Use glue to form a tube. Be careful not to glue the paper to the dowel! |
|
|
|
|
|
When dry, slip the cardboard tube over the capacitor and around the wooden base. It should fit perfectly. The tube is glued to the base with white paper glue. The glue is applied to the inside perimeter of the tube before slipping it around the capacitor and base.
There should be a small amount of space at the top end of the tube. Slide a wooden disk cut from the dowel down the tube so that it rests on the top of the internal capacitor. This will make the unit a bit sturdier. Glue the disk in place with white paper glue. The original wax end cap can then be glued in place on top of this. If this wax disk broke during the disassembly of the old capacitor (more than likely), either glue it back together, or make a new one. Do not actually use wax, as the heat of the tubes will melt it during operation. A mixture of 5-minute epoxy and brown paint makes a durable and convincing replacement.
As mentioned above, some of these capacitors were not sealed on the top with wax, but with a metal washer. This washer is attached to the brass center post by a screw. If your capacitors use the metal washer, drill a hole in the top wooden dowel slice to accomodate the upper end of the brass center post that you previously sawed off and retained. Insert and glue this centerpost to the wood slice, leaving the threaded upper end flush with the wood surface. Place the metal washer on this and screw it into place with the original mounting screw. Insert and glue this unit inside the top of the cardboard capacitor tube. |
|
|
|
 |
|
|
|
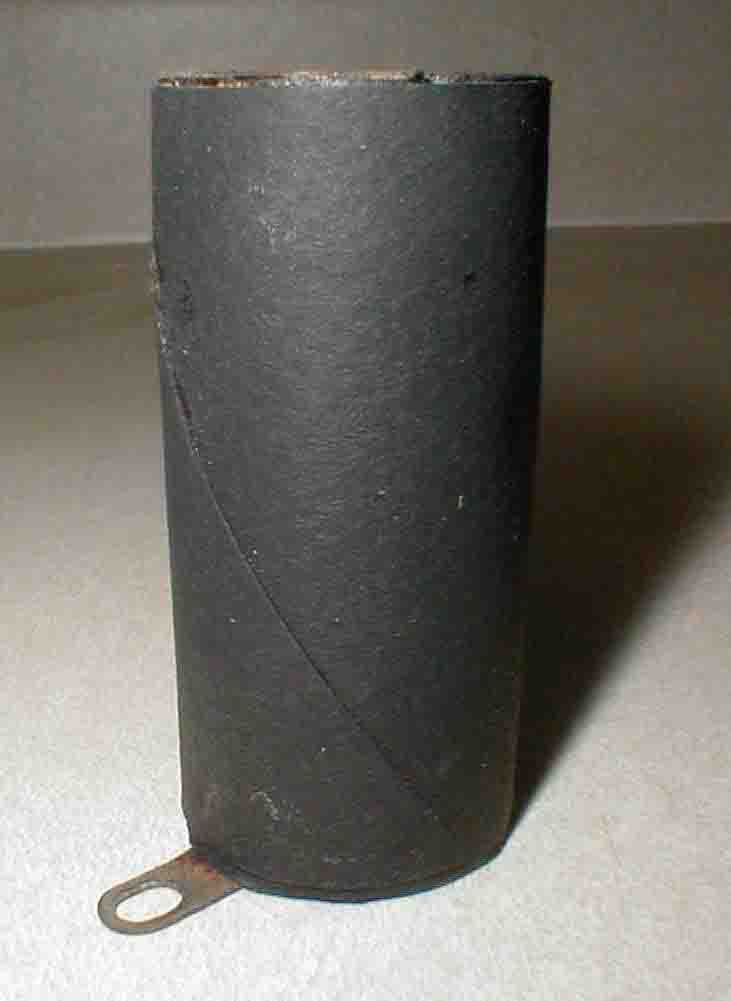
Wrap and glue the black paper strip around the capacitor and voila! You have a replacement capacitor ready to install that not only meets, but vastly exceeds the specifications of the original. |
|
|
|