|
|
|
|
|
Learn Visual Basic 6.0 |
|
|
|
|
|
Learn Visual Basic 6.0 |
|
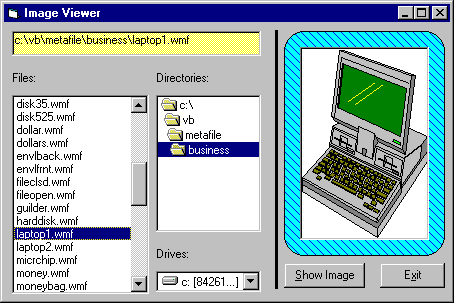
Develop an application where the user can search and find graphics files (*.ico, *.bmp, *.wmf) on his/her computer. Once a file is selected, print the corresponding file name on the form and display the graphic file in an image box using the LoadPicture() function. |
| Form1: | BorderStyle | 1-Fixed Single |
|---|---|---|
| Caption | Image Viewer | |
| Name | frmImage | |
| Drive1: | Name | drvImage |
| Dir1: | Name | dirImage |
| File1: | Name | filImage |
| Pattern | *.bmp;*.ico;*.wmf;*gif;*jpg [type this line with no spaces] |
|
| Label1: | Caption | [Blank] |
| BackColor | Yellow | |
| BorderStyle | 1-Fixed Single | |
| Name | lblImage | |
| Label2: | Caption | Files: |
| Label3: | Caption | Directories: |
| Label4: | Caption | Drives: |
| Command1: | Caption | &Show Image |
| Default | True | |
| Name | cmdShow | |
| Command2: | Cancel | True |
| Caption | E&xit | |
| Name | cmdExit | |
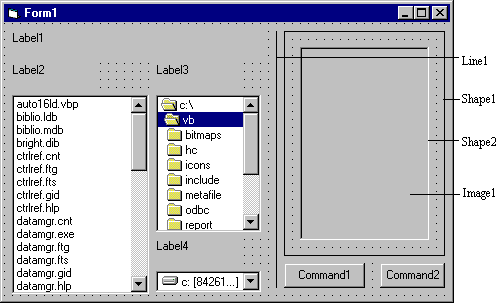
| Line1: | BorderWidth | 3 |
| Shape1: | BackColor | Cyan |
| BackStyle | 1-Opaque | |
| FillColor | Blue | |
| FillStyle | 4-Upward Diagonal | |
| Shape | 4-Rounded Rectangle | |
| Shape2: | BackColor | White |
| BackStyle | 1-Opaque | |
| Image1: | BorderStyle | 1-Fixed Single |
| Name | imgImage | |
| Stretch | True |