              |
Taking Photo's
Now for the hard part, actually taking
pictures.
Getting Started:
So now you've purchased and setup your underwater camera. What
now? Well, now you start taking photo's. Like all things in
life practice makes perfect, so get out there and take a lot of
photos. Any time you're looking at photo's, try to determine how
you can improve them. By regularly critiquing your own work you
can pick out area's which need improvement. And never fear asking
someone else for their opinion - they may pickup on something you've
missed.
Composition:
Taking nice pictures requires more then finding an
interesting subject and pointing you camera. Placement of your
subject is vital, and having a background makes things more
interesting.
Golden Rule: The golden rule of underwater
photography is to get close, get low, and shoot up.
- Get close: this will allow the subject to be as big
as possible in the final picture. Also, don't forget that water
will absorb the red light from your flash, so by getting close you will
get a more colourful picture. But don't get too close; there is
no point in getting closer then where your camera can focus, and many
animals may not let you get too close.
- Get low, shoot up: this is a composition thing. By
getting slightly below your subject and shooting up you will place the
"sky" above your subject. This will produce a brighter background for
your picture. In addition, it allows you to capture more
background scenery then if you are just pointing the camera straight
down.
Subject Placement: Most people think that
placing the subject is the simple part of taking a picture, you simply
place the object in the centre of the frame and click away. This
is wrong. Ideally your subject should be off to one corner of the
picture (see rule of thirds below). Secondly, it is best to have
your subject in an interesting setting. Think of it this way -
what is more interesting, your buddy floating in the middle of the
ocean, or your buddy poking his head up from behind a head of coral?
If possible you want a background behind your subject (more
below), it's even better if you have your subject interacting with
something. This isn't always a possibility, but you should try.
Rule of
Thirds: Most people instinctively place their subject in
the middle of the photo. Although this accentuates your subject,
it is often less then pleasing in appearance. Photographers have
long know about the "rule of thirds", which allows you to align your
subject to make things more interesting. The way this is done is
you imagine your field of view has two evenly spaced lines running
horizontally, and two evenly spaced lines running vertically.
These lines will intersect at right angles, dividing the image
into nine evenly sized segments. You want to centre your subject
where the lines intersect. This allows you to provide a
relatively intact background, while still keeping your subject in the
frame of the photo.

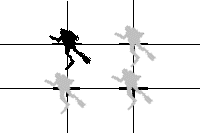
Rule of thirds: Mentally divide the picture into thirds, as shown
on the left. Optimal placement of your subject will be at the
points where the horizontal lines meet (right).
Lighting: As we mentioned above lighting
underwater is a central problem faced by photographers. The
tendency of water to filter out red light will give any photo taken
without a flash a blue-green hue. Besides hiding the wonderful
colours of the reefs this loss of colour also detracts from the overall
quality of the photo. But as we've mentioned, using a
camera-mounted flash will produce back scatter which also can ruin a
picture. So what is one to do? Here's some tips:
- If you want to take a flash free picture do so at very
shallow depths (3m/15' or less). Although some colour will be
lost there will still be sufficient light to take a decent picture.
- If using a flash take close-up pictures. This will
minimize the amount of water between you and your subject, thus
reducing the amount of material that can producer back scatter.
- Be artistic. In the backscatter section (below) is a
photo with the diver in the sun beam. Although you can't see tell
who the diver is (it's Greg) the picture is still very interesting and
gives the viewer a sense of what things may look like from a fishes
point of view. Could you imagine that same photo with a shark in
place of the diver? Or a dolphin? Or a school of fish?
Or a kelp bed? Beautiful! Although natural lighting
will produce blue-green pictures, using it to create silhouettes, or to
deliberately tint your pictures can be very appealing. One of the
most dramatic underwater photo's I've ever seen was of a reef shark
hovering over an old W.W.II ship wreak. The photo was done
without a flash, as the scene was too big to illuminate with a flash.
But the blue-green colour definitely added to the menace of the
shark, and emphasized the age of the wreak. Long and short -
don't be scared to experiment, as you never know what you'll get!
Backgrounds: One of the biggest mistakes
I've made is not placing my subjects in front of a background.
When you take a picture of water without anything in it, the
water looks black. So if you take a picture of a diver, in a
black wetsuit, in the open ocean you will see a face with a lot of
black and a lot of back scatter everywhere (see the photo in the
back scatter section for what I mean). These pictures look BAD.
So make sure you always have something behind your subject (a
wall, reef, shipwreck, school of fish, kelp, or whatever). This
will provide two advantages: first, the picture will be more
interesting as there will be something else there besides you friends
head. Secondly, a lot of the back scatter will be hidden by the
background, making this problem less obvious. To maximize the
effect of the background get your subject as close to it as possible.
Framers: Framers are present on many specialized
macro cameras. Framers usually consist of two 'L' shaped
rods which extend from the camera, resulting in two parallel rods
extending upwards at the focal point in front of the camera.
These rods are placed such that they mark the outside of the picture
the camera will take, and are located at the proper focal length to
ensure your subject is in focus. To take a picture you simply put
your subject between the framers, and click. The picture you get
will be exactly what you see between the two framers. The
advantage of this system is that you can easily determine what your
picture will look like before you shoot, thus easing composition.
Unfortunately, most animals do not like having anything that close to
them, making it hard to get photo's of fish and other jittery animals.
Potential Problems:
Back
scatter: Back scatter is the price we pay for buying a
cheap camera. Back scatter occurs when you use a flash that is
mounted on the body of the camera. The light from the flash
illuminates all of the small floating particles in the water, making
all of your pictures look like they were taken in the middle of a snow
storm. Professionals get around this by mounting the flash to the
side of the camera, often on an arm - this allows the back scatter to
go someplace other then the lens. I've yet to see a cheap camera
with an arm-mounted flash, so until that day we'll just have to work
around the problem. Below is an example of bad back scatter.
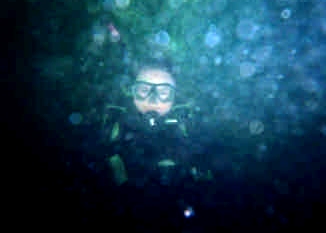
This photo shows two problems - first the flash has not illuminated the
entire scene. Secondly, a lot of back scatter is present in the
photo, making the diver almost invisible. the flash didn't get
the whole scene because it was partially covered by Tim's hand
(oops). Back scatter is a little harder to fix - here's some
way's to get around this:
- No flash. You need to be shallow for this to work -
but it can look damn neat if you get it right.
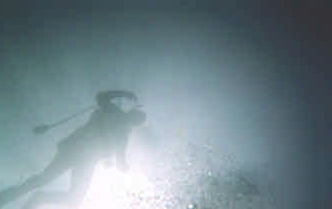
Here's a sample image taken
without a flash. The picture was taken at about 15' depth, with
the subject just a few feet below the surface, in the sun. Notice
how the silhouette of the diver and some bubbles are present in the
sunbeam. These pictures look neat. Horizontal pictures can
also be taken without a flash at very shallow depths if the water is
very clear (>30m/100' visibility).
- Put something colourful behind the subject. Back
scatter can be "hidden" in a complex and colourful background.
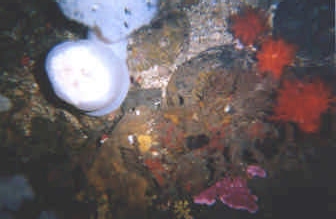
This image was taken about 1.5m
(8') away from this wall, and as such should be filled with back
scatter. However, the colours in this image "hide" the back
scatter; it's there but you have to look closely for it.
- Get close. The closer you are to your subject the
less scatter will be in your image.
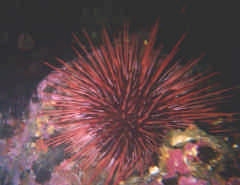
This image was taken about 0.5m
(1.5') away from the sea urchin. At this range there is almost
nothing in the water between you and your subject.
- Take pictures where there is a minimal amount of
"floaties". Generally speaking the clearer the water is the less
back scatter you will experience. Here's a few ideas on how to
avoid area's with lots of back scatter:
- Avoid periods when algae blooms occur. Generally
this is in the spring/summer, or after a storm.
- Avoid diving after storms or heavy waves. These
will stir up silt which can cause back scatter.
- Choose locations with clear water. A local
renowned for crystal clear waters will be a good place to take photo's.
- Take pictures at/around noon. When the sun is
high in the sky (noon plus/minus 1-2 hours) you will get better
lighting as less sun will be reflected by the oceans surface.
This will allow you to maximize ambient lighting.
Light
Absorption: Water absorbs light, and preferentially
absorbs red and orange light, while letting through blue and green
light. This means that as you go deeper pictures taken without a
flash will become green/blue tinted. Sometimes this effect is
desired, but if it isn't your only option is to use a flash. DO
NOT add red or orange enhancing filters to your camera - there is no
orange or red light to enhance below 10m/30'.
Subjects:
Getting Close & Stalking: Getting
close to your subject can be very difficult, especially in the case of
smaller fish and crustaceans, which tend to be wary of larger animals
(i.e. you). Like most animals, stealth is your key to getting
close to these flighty animals. The best camera's for these
animals are ones without framers (see above). Approach slowly -
in the ocean fast moving things are usually looking for a meal, so
rushing up to your subject will likely scare it away.
Unfortunately the release of bubbles from your regs can scare fish, but
never, ever, hold your breath - you could die. Observe your
subject - many animals tend to dart into their hiding places
frequently, even when nothing is around. Approach while it's
hiding, and snap your photo when it comes out. But for the
touchiest of subjects you may have to find them at night - many fish
which are unapproachable during the day sleep during the night.
Plus at night a whole new series of organisms will be out and about -
especially the colorful parts of corals, which are hidden from
predators during the day. With experience you should be able to
get close to most subjects.
Slow Moving Objects: Stationary (or slow moving
targets) make excellent photographic subjects. Corals, anemones,
smaller mollusks, worms, and starfish, are all easily
photographed. These are some of the better subjects to start with
as you can concentrate on getting the composition and range correct,
without worrying about trying to keep up with the subject. As
your skills progress you'll find it easier to take photo's of faster
moving organisms.
Landscapes: Unfortunately, wide-field (landscape)
photography not an option for most cheap cameras. This type of
photography requires special, wide-angle lenses, and powerful
flashes. About your only option if you want to take these types
of photo's is to do flash-free photography in shallow waters (less than
10'). If the waters are clear, and the sun bright, luck may lend
a hand and let you capture a decent picture. Unfortunately,
pictures of schooling fish, or 50' whale sharks, will have to wait your
investment in better equipment.
Once problem you will experience, regardless of the quality of camera
you have, is current. Currents can make picture taking very
difficult, if not impossible. Trying to fight a 0.5 knot current,
while trying to line up your camera with a subject, is difficult.
When currents get over 1 knot this becomes nearly impossible.
Here's some hints:
- Find an eddy. Downstream of any obstruction (a coral
head, rock outcropping, etc.) will be a pocket of slow moving water (an
eddy). By moving into one of these you can "hide" from the
current, making it easier to capture your image.
- Reef hooks. Some photographers use hooks to lock
themselves onto the reef. If you decide to use these make sure
you pick an anchor point with no living organisms to prevent injuring
the reef.
- Plan ahead. If you are drift diving look ahead.
When you see a subject of interest aim and prepare the shot before
hand, so you can capture it as the current carries you by.
Models: Some of the more interesting photo's
tend to involve other SCUBA divers. In many cases you do not
pre-plan a dive around getting photo's of your buddy. But
pre-agreeing on some basic hand signs can make getting a picture of
your buddy a lot easier should an opportunity arise. There are no
standard hand signs, but at a minimum you'll want signs for "lets take
a picture", and signs to direct your buddy to the proper
location.
Notes:
Overall this section can be summarized with a few quick
tips:
- Get close, shoot up. This minimized backscatter, and
makes for the best composition.
- Use a flash. You'll get more colourful pictures.
- Get subjects in front of a background. This can help
hide backscatter, and makes your pictures much more interesting.
- Film is important! Proper ISO rating and vibrant
colour film will improve the overall quality of your photo's.
- Take lots of pictures - practice makes perfect!
 |
 |
 |
| Basic
Setup |
Photography Home |
Environment |
|
