THE PEN TOOL
THE PEN TOOL
The tutorial that many have been waiting for is the marvelous Pen Tool. It's a little tricky at first but after you learn how it works it becomes more easier and useful. I hope these tips will improve your ability working with this tool.
 To
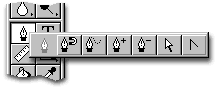
start, Click and hold the
mouse button down on the Pen Tool on the Tool bar. You will now see another bar
pop out with more Tools, these all belong to the Pen neighborhood. I'll go over
what each one does.
To
start, Click and hold the
mouse button down on the Pen Tool on the Tool bar. You will now see another bar
pop out with more Tools, these all belong to the Pen neighborhood. I'll go over
what each one does.
Animations were done with
Adobe ImageReady 2.0.
It comes with Photoshop 5.5
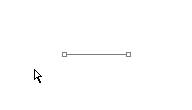
![]() The Pen Tool is used to make paths. A
path is any line or shape you draw using the pen, magnetic pen, or free form pen
tool. Unlike the bitmap shapes drawn by the pencil or other painting tools,
paths are vector objects that contain no pixels. Once you have saved a path, you
can store it in the Paths palette, convert it to a selection border, fill it
with color or stoke the path outline with any color.
The Pen Tool is used to make paths. A
path is any line or shape you draw using the pen, magnetic pen, or free form pen
tool. Unlike the bitmap shapes drawn by the pencil or other painting tools,
paths are vector objects that contain no pixels. Once you have saved a path, you
can store it in the Paths palette, convert it to a selection border, fill it
with color or stoke the path outline with any color.
![]() The Magnetic
Pen tool lets you draw a path that snaps to the edges of defined areas in your
image.
The Magnetic
Pen tool lets you draw a path that snaps to the edges of defined areas in your
image.
![]() The Freeform pen tool lets you draw paths
as if you were drawing with a pencil on paper.
The Freeform pen tool lets you draw paths
as if you were drawing with a pencil on paper.

![]() The Add-anchor-point tool lets you create
an anchor point along any path.
The Add-anchor-point tool lets you create
an anchor point along any path.
![]()
![]() The Delete-anchor-point tool lets you
delete an anchor path along any path.
The Delete-anchor-point tool lets you
delete an anchor path along any path.
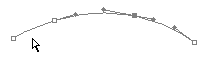
![]() The Direct-selection tool allows you to
modify the shape of the path. Use this to select a point along the path. You may
move the whole path by selecting it and clicking on a part of it and dragging. Tip:
When using the Pen tool, you can switch to the Direct-selection tool anytime by
pressing the Ctrl. key. (Mac: Command)
The Direct-selection tool allows you to
modify the shape of the path. Use this to select a point along the path. You may
move the whole path by selecting it and clicking on a part of it and dragging. Tip:
When using the Pen tool, you can switch to the Direct-selection tool anytime by
pressing the Ctrl. key. (Mac: Command)
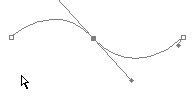
![]() The Convert-direction-point tool lets you
convert a smooth curve to a sharp curve or to a straight segment, and vice
versa.
The Convert-direction-point tool lets you
convert a smooth curve to a sharp curve or to a straight segment, and vice
versa.