
 IMAGE MAPS
IMAGE MAPS
An image map is an image in which you create clickable areas that link to different web pages. One of the most obvious uses of an image map is to create a map of the world, for instance, where each country’s outline is linked to a different page of information. Creating an image map is the only way to link a single image to more than one page.
We'll start off in Photoshop, go ahead and create or open the image you wish to create an image map out of. I will be using my websites top navigational menu.

Now once you are finished working on your
image lets transfer it into Image ready by pressing Shift + CTRL + M
or by clicking on the following button at the bottom of your Tools palette.![]()
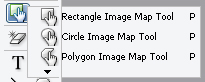
With the Image Map tools, you can create rectangular, circular, or polygon shapes. Make sure the Image Map palette is open in ImageReady. Select Window > Image Map if the palette is not open. Now select one of the Image Map tools, as shown below:
Click and drag to outline the area you wish to make a click able link. When you have finished outlining the image map shape, in the URL box, enter the path to the HTML page you want to link to. ImageReady automatically names the slice, which you can rename to something more descriptive, as shown below.

It’s a good idea to type in descriptive
text for the ALT tag, which will show up in the web browser
when the user moves the cursor over the image. If you need to move or change the
image map, use the image map selection tool. To access this tool, click and hold
on the image map tool. When you have finished creating various links, save the
file by selecting File > Save Optimized. Pre view the image
in a web browser by selecting the preview button in the ImageReady
toolbox.![]()