
 SITE MANAGEMENT
SITE MANAGEMENT
Dreamweaver works best with entire sites rather than independent web pages. For this reason, it's always a good idea to start a project in the Site Files window. Dreamweaver has many built-in tools to make a project easier and less time consuming, such as checking links, which can only be utilized if a Site is defined.
To begin managing your site, simply select 'Site Files' from the Window Menu (or hit F5).
This is where you add and modify files and directories on your site. You can also upload your files via FTP, generate a site map, and change links sitewide.
Before you begin, you must first define the site. You do this in the Pop-up window in the toolbar (in the screen shot it says 'tutorial'). Select define sites, which will bring up the following dialog box:
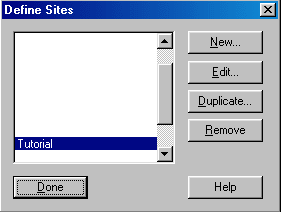
You may define as many sites as you like and they can be accessed via the popup menu. Since you most likely don't have any sites already, press the 'New' button. Now you'll see the following dialog box:
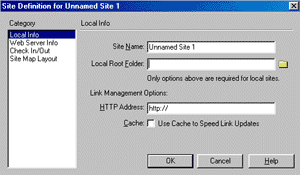
Here you give the site a name, define the local path, the remote path and choose whether you want to use Cache to speed link updates (recommended).
You can also specify your FTP server, Web Server, configure your site map, and specify whether you would like to Check Files In and Out. The latter is usually only relevant when other people (a team) are working within the same site.
So now that you have defined your site, you will notice that all the of the files and folders within the directory you chose are in the site window.
We recommend you add and modify files through this window. You'll understand why shortly.
A great way to create your site is by using Context menus. Context menus are activated either by right-clicking (PC) or CTRL-click (Mac). With Context Menus, one can add, rename or delete files and folders as well as check browsers and links. All of the context menu commands are also offered through the File Menu.
To add a file using the context menus, simply select 'New File'. Dreamweaver will not only create the file, but will also add the necessary HTML tags in order to be a valid HTML file.
When beginning a project, we recommend adding the necessary files and folders first. This can be done quickly using the context menus. First create the home page file ('index.html') in the root directory. Then create folders for subsequent pages and sections, and a folder for images and support files.
A typical business site might be organized like this (folders are in [ ] brackets):
[about]
[contact]
[images]
[links]
[services]
index.html
Once
the appropriate folders have been created, create a file inside each one of
them, including graphics. To do this, simply highlight the folder, access the
Context menu and select 'New File.' This will place the file inside the folder
selected. For now, there's no need to modify the files. You can leave them as
is. Make sure each folder has an 'index.html' file.
So what's the benefit of creating/moving files within the Site Files window?
There are several benefits. First of all, Dreamweaver will immediately add the
file/folder to it's site cache, which will make it easier to change and update
links.
If a file is moved outside of Dreamweaver, links will not be updated. Sometimes Dreamweaver will detect links as being absolute local rather than relative. When this happens, everything will work fine locally, but when placed online, the links will all be pointing to file:///(something).
Also, when a new file is created, Dreamweaver adds necessary tags for it to be a valid HTML document. Dreamweaver adds the following:
<html>
<head>
<title>Untitled Document</title>
<meta http-equiv="Content-Type" content="text/html; charset=iso-8859-1">
</head>
<body bgcolor="#FFFFFF">
</body>
</html>
If files are created in the Finder or Explorer, all the tags except for <html> must be added.
Files can be moved throughout the site in two different ways.
Files can also be copied by using the Copy and Paste feature. Select a file, hit CTRL (Command) C or go to the Edit Menu and select 'Copy'. Find the folder you would like to move the file and then hit CTRL (Command) V.
Files can also be copied within the same folder by Copying and Pasting. Dreamweaver will add 'Copy of' to the beginning of the file name. This can be useful when you wish to use the same look and feel as another file. Simply copy the file, rename it, then modify it.
Only one file can be pasted from the clipboard at a time. If you wish to copy and paste the same file multiple times, you must re-copy it for every paste.
When a file is moved, Dreamweaver will check its site cache for links to that file. If there are links to that file, you will be shown a list of pages linking to it. You can easily change the links by pressing the Update button. This is the largest advantage of moving files within Dreamweaver.
We also recommend that if files be deleted, you delete them within Dreamweaver. To delete a file or folder, simply select it and either use the Context Menu and select 'Delete' or hit the delete key on your keyboard. Dreamweaver will then check the site cache to see if there are any other files within the site pointing to the file you are planning to delete. If there are, you will be informed that links will be broken by continuing. You will be given the option to continue with the delete or cancel. If you do not get a warning dialog box, you may safely delete the file.
Dreamweaver can also generate a complete map of your site. This is done by
either going to the Window menu and selecting 'Site Map' or by clicking on the
sitemap icon in the toolbar.
![]()
The site map is an icon-driven representation of your site. It can be navigated by clicking on the plus (+) and minus (-) signs to open and close linked files. The map is drawn by how files are linked to each other rather than by directory structure. The home page is always on top, being the root page. Every page it links to is connected to it, and so on.
The site map is useful in many ways.
It's a different perspective of your site. By viewing your site map, you can see how a visitor would navigate throughout your site.
It's another way to manage files and links. Since the map is structured by the way files are linked, you can easily change the link from one file to another. Select the linked file, access the context menu, and select 'Change Link.' You will then be prompted for a new file to link to. You can also remove or hide links in this manner.
You can generate a graphic to either put online or for your own reference. To generate a graphic, simply go to the File Menu and select 'Save Site Map As'. You will then be prompted for a filename. Site maps can be saved as either a Bitmap (BMP) or a PNG file.
You have reached the end of Part 2. This Tutorial is not yet finished. We add a new part every 1-2 weeks.
Copyrights -Jehanzeb.Tk