
 IMAGE MAPS
IMAGE MAPS
Dreamweaver offers web designers the capability of creating image maps on the fly. All the tools required are built in. All that is required is to bring the image in and define the different clickable areas.
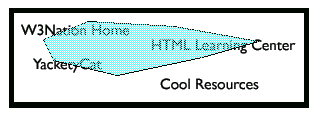
For this example we'll use the following image:

Once the image has been imported, you'll see a few Map options if you expand the Properties Toolbar:
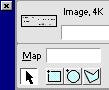
You can start your work by giving the map a name in the blank field to right of the word Map (a name is required). Then start defining your areas by selecting one of the hotspot tools (the blue shapes on the toolbar). Simply click and drag around the area you would like to make 'hot'. For this example, we'll use the Square Hotspot Tool:

Once the area has been drawn, the Properties Toolbar changes:

The 'Link' field is where you enter the url you wish to link to. For this example, we entered http://www.w3nation.com/. The 'Target' field is just like the standard target for any link. You can use the Presets included in Dreamweaver, or give the target your own name by typing in the field. The 'Alt' field is the Alternative text that will be displayed if graphics are turned off. Here is the information as we entered it for the sample:

and here is the result:
To complete the map, just do the same for all the other areas you wish to be clickable. Here is our finished imagemap:
If you have Invisible Elements turned on, you will see an icon that looks like this next to your image map:
![]()
Do NOT delete this! This contains the coordinates of your imagemap. If you delete this, the map will not work.
![]()
There are three different Image Map tools. There is the square tool, as demonstrated before, the oval tool and the polygon tool.
The
oval tool ![]() works in
the same fashion as the square tool. You simply use it do specify a circular
hotspot. This tool only draws a perfect circle.
works in
the same fashion as the square tool. You simply use it do specify a circular
hotspot. This tool only draws a perfect circle.

The
polygon tool ![]() is
more flexible with a nonlinear type of design. For example, if you had a picture
of a person that you would like to be clickable, this would be the tool to use.
With this tool you can click from one area to another. The tool follows your
mouse clicks with a path. It will continue following until the path is closed.
is
more flexible with a nonlinear type of design. For example, if you had a picture
of a person that you would like to be clickable, this would be the tool to use.
With this tool you can click from one area to another. The tool follows your
mouse clicks with a path. It will continue following until the path is closed.
The
Pointer Hotspot tool
![]() is used for
selecting the hotspots already defined. Once they are selected they can be moved
by dragging with the mouse or using the arrow keys on the keyboard. You can also
delete an existing hotspot by using the Delete key.
is used for
selecting the hotspots already defined. Once they are selected they can be moved
by dragging with the mouse or using the arrow keys on the keyboard. You can also
delete an existing hotspot by using the Delete key.
Once you have selected a hotspot the Properties Toolbar changes to the information defined for that hotspot. If you wish to modify your map later, all you have to do is select it and make the change necessary.
Copyrights -Jehanzeb.Tk