macro file the compressed mesh macro file the compressed mesh macro file the compressed mesh macro file the compressed mesh
file the compressed mesh macro file the compressed mesh macro file the compressed mesh macro file the compressed mesh macro
the compressed mesh macro file the compressed mesh macro file the compressed mesh macro file the compressed mesh macro file
|
introduction
Welcome to the Compressed Mesh macro file tutorial!
This tutorial will take you through the basic use of the Compressed Mesh Macro File, along with the Hair Growth Macro File.
To render the sample scenes in this tutorial you will need to download and install the macro files, and make sure you have a copy of the TORUS.PCM mesh file included in the macro file package.
The tutorial assumes you are familiar with the basics of the POV-Ray script language, including creating cameras, light sources, and objects. You will also need to know the usage of the #include and #declare statements, and how to call macros.
| the compressed mesh macro file the compressed mesh macro file the compressed mesh macro file the compressed mesh macro file |
1. using a compressed mesh
Normally using a POV-Ray mesh file means including the mesh filename directly into a scene (using #include "Mesh.inc", for example). To use a compressed mesh file we also use the #include statement, but instead of including the mesh file we first include the Compressed Mesh Macro File (PCM.MCR). Then, to create meshes in our scene we use the read_mesh macro with the mesh file name. To start, let's create a simple scene with a camera and light, and then read in a compressed mesh file:

#include "colors.inc"
#include "textures.inc"
camera {location <0.5, 1, -2> look_at <0, 0, 0>}
light_source {<-100, 200, -300> White}
background {LightBlue}

#include "PCM.MCR"
read_mesh ("TORUS.PCM")
Note that the read_mesh macro requires curved brackets (rather than curly brackets) around the filename. Now, when we render this scene we'll notice the torus mesh is completely black, and indeed POV-Ray will give us a message to say that "No pigment type given."
| the compressed mesh macro file the compressed mesh macro file the compressed mesh macro file the compressed mesh macro file |
2. texturing and transforming a compressed mesh
So how do we add a pigment or texture to our mesh? We know we need to place the texture inside the curly brackets of the object, but there aren't any curly brackets in our scene! The first option, then, is to add these brackets by wrapping our read_mesh macro in an object {} statement and adding the texture we want to use:
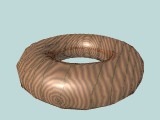
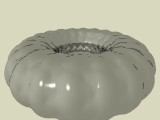
object {read_mesh ("TORUS.PCM") texture {DMFWood6}}
Sure enough, the torus will now be rendered with the texture we've specified. And now that we've got curly brackets around our mesh object, we can add other POV-Ray statements like any other object, or even declare the mesh to create multiple copies:
#declare MyTorus = object {read_mesh ("TORUS.PCM")}
object {MyTorus texture {Aluminum}}
object {MyTorus texture {Bright_Bronze} scale 2 rotate x*90}
object {MyTorus texture {Gold_Nugget} translate y}
The Compressed Mesh Macro File also offers a way to declare our mesh textures before reading the mesh (so we don't need the object {} statement at all), and allows you to package a texture inside the compressed mesh file itself.
| the compressed mesh macro file the compressed mesh macro file the compressed mesh macro file the compressed mesh macro file |
3. modifying the compressed mesh
OK, so we've created a mesh from a compressed mesh file, and added textures and transformations just like we would to an uncompressed mesh file. But apart from the saving in disk space for larger, more complex meshes, surely we would be better off just creating a torus in the usual way?
The answer is, of course, "yes" if all we want to do is texture and move the torus as in the previous examples. But with the power of POV-Ray macros we can do much more than this - to start, let's try a new scene that looks like this:
#include "colors.inc"
#include "textures.inc"
camera {location <-0.5, 1, -3> look_at <0, 0, 0>}
light_source {<-100, 200, -300> White}
background {LightBlue}
#include "PCM.MCR"
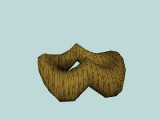
#declare mesh_texture = texture {Yellow_Pine}
#macro deform_mesh () ripple_mesh (x, 0.25, 3, 0.5) #end
read_mesh ("TORUS.PCM")
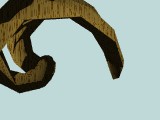
As we can see, after the basics of the scene we've included the PCM.MCR file, and then (at the end of the scene) we create our torus mesh as before. In between, though, we've added a couple of statements that modify the mesh. The first of these sets the mesh_texture option, and it's not too hard to see we are applying a nice wood texture to the torus. However, when we render the file we can see the torus doesn't look like too much of a torus any more! In fact, the torus has been "rippled", courtesy of the deform_mesh macro option we specified above.
Before worrying too much about the statements inside the deform_mesh option, let's look at how we specify these options. In the first case, we simply declared a value (in this case a texture). This type of declared option is used to alter many aspects of the behaviour of the read_mesh macro that comes after it. Because of this, the option will only work if we declare it before we use the read_mesh macro. Also, the name of the option (ie. mesh_texture) must appear exactly as shown. If we used Mesh_Texture, or meshtexture, or any other name the option would not be recognised.
| the compressed mesh macro file the compressed mesh macro file the compressed mesh macro file the compressed mesh macro file |
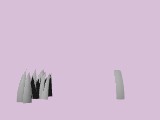
4. deforming the mesh surface
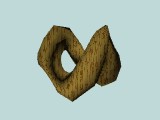
The second option above doesn't use the #declare statement - instead, we use the #macro statement to define the deform_mesh option. Again, the option name must appear as shown, including the empty pair of curved brackets after the name. The #end statement is also required as shown. Between these statements we have another macro, listed with a number of values. This macro, ripple_mesh, is defined in PCM.MCR, so all we have to do is call it with the necessary values.
In this case, the first value inside the ripple_mesh brackets is the axis we want the ripples to travel along. The next value specifies how much we want the ripples to deform the mesh, in this case one quarter of a POV-Ray unit. The next two values specify the frequency and phase of the ripples, and we can animate any of these values (using POV-Ray's clock) just as we would POV-Ray's ripples pattern in a texture. Don't worry if you're not too sure how these values work exactly - the main thing is just to know that we can deform the mesh in this way (which we certainly couldn't too with an ordinary torus!).
Apart from rippling the mesh, you can also deform the mesh with waves, random jittering, twisting, or bending of the surface, which you can see in the following examples (replace the previous #macro deform_mesh () line to render each deformation):

#macro deform_mesh () jitter_mesh (0.5, 123456) #end


#macro deform_mesh () twist_mesh (<135, 30, 0>, <0, 0, 0>) #end


#macro deform_mesh () bend_mesh (-x, x, -y, 360) #end
In fact, you can even define your own completely custom deformation macros that displace each vertex of the mesh surface using whatever calculations you like (see The Compressed Mesh Options Reference for more details on the macros above, and creating your own deform_mesh macros).
| the compressed mesh macro file the compressed mesh macro file the compressed mesh macro file the compressed mesh macro file |
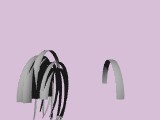
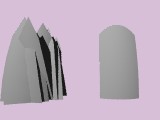
5. using object creation macros
As well as deforming the mesh surface, we can use macro options to create the mesh in different ways. For this we use the create_mesh macro, as in this scene:
#include "colors.inc"
#include "textures.inc"
camera {location <0.5, 1, -2> look_at <0, 0, 0>}
light_source {<-100, 200, -300> White}
background {Wheat}
#include "PCM.MCR"
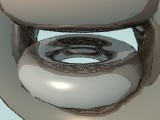
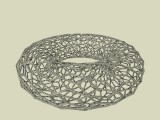
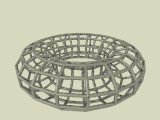
#macro create_mesh () wire_mesh (0.01) #end
object {read_mesh ("TORUS.PCM") texture {Polished_Chrome}}
As we can see the wire_mesh macro works by replacing the usual triangles with cylinders (the 0.01 value sets the radius of these cylinders). Again, there are a number of mesh creations to choose from, defined in PCM.MCR:
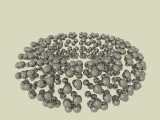
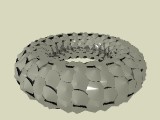
#macro create_mesh () object_mesh (sphere {0, 0.05}) #end
#macro create_mesh () blob_mesh (1, 0.5, false) #end
#macro create_mesh () cylinder_mesh (0.02, false, true, false) #end
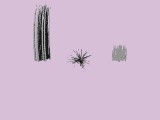
#macro create_mesh () spike_mesh (1, 1.5) #end
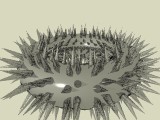
#macro create_mesh () spike_mesh (5, 0.5) #end
As with deform_mesh, you can create your own custom mesh creation macros that use the mesh surface data to create all sorts of objects.
| the compressed mesh macro file the compressed mesh macro file the compressed mesh macro file the compressed mesh macro file |
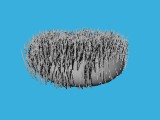
6. using hair growth
We saw in the previous section how the create_mesh macro option can be used to place objects onto the mesh surface. As an extension of this idea, you can use the Hair Growth Macro File to cover a mesh surface with hair of all lengths, and even to create things like dewdrops and scales. To use the file, we first include the Hair Growth Macro File, and then read the compressed mesh file as before:

#include "colors.inc"
#include "textures.inc"
camera {location <0, 1, -3> look_at <0, 0, 0>}
light_source {<-100, 200, -300> White}
background {SummerSky}

#include "PCMHAIR.MCR"
#declare mesh_texture = texture {pigment {White}}
read_mesh ("TORUS.PCM")
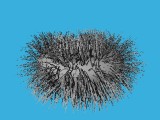
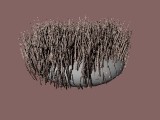
Rendering this we see the torus has indeed sprouted hair covering the surface. The hair is quite long and dense, so let's try using some options to shorten it (add this line before the read_mesh line):
#declare hair_length = 0.5;
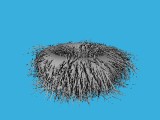
The hair is definitely shorter now, but there seems to be more hair on the top of the torus than the bottom. This is because at the moment all the hair is growing in one direction - up. On the underside of the torus the hair is actually growing towards the inside, before popping out of the top. To change this, we can make the hair follow the direction of the torus' surface:
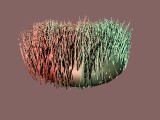
#declare hair_rotate_to_surface = true;
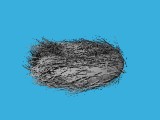
The hair is now more evenly spread across the surface, but each hair is growing right out of the surface. To change this we can rotate the base of each hair, flattening it so it grows more along the surface rather than out of it:
#declare hair_rotation = x*85;
The hair is flatter, but still seems to grow up in the y direction before drooping over. We can change this initial direction by changing the hair_sky option (which tells the macro file which direction to consider as up):
#declare hair_sky = x;
Now the hair grows out in the x direction, before curving back towards the opposite direction (ie. -x).
So, we have four options that we can use to change the length of the hair, two options to change the direction of the hairs, and an option to set whether we want all the hairs growing in the same direction of if we want the hairs to follow the direction of the mesh surface. Of course, any and all of these options can be animated using POV-Ray's clock to create hair that lengthens and shortens, and hair that changes direction (eg. bouncing, blowing in the wind, etc). Experiment with different values and combinations of these options, and then we'll move on to other options for controlling the appearance and shape of the hairs.
| the compressed mesh macro file the compressed mesh macro file the compressed mesh macro file the compressed mesh macro file |
7. using hair objects
The Hair Growth Macro File works by covering the mesh surface with individual hair objects. But each and every object in a POV-Ray scene requires extra computer resources to create and render, so it's not too hard to see how creating thousands (let alone millions) of virtual hairs could quickly overload an ordinary PC. Thankfully, though, POV-Ray does offer a solution in the form of triangle meshes. POV-Ray allows us to create a single mesh, and then to create many, many copies of it without requiring the full amount of memory for each copy.
Now, to create millions of hairs we can actually create a group of hairs as a single mesh, and then cover the hair growth surface with copies of these. By default, this is exactly what the Hair Growth Macro File does, using a mesh of smooth triangle hairs. The macro file also offers the ability to use flat triangle meshes (so each hair requires only one triangle, allowing you to create short, dense fur), or to use POV-Ray primitives rather than triangles (so each hair is perfectly smooth). In fact, we can define any POV-Ray object (or group of objects) we like to cover the surface, eg:
#declare hair_object = cone {<0, 0, 0>, 0.05, <0, 1, 0>, 0}
or:
#declare hair_objects = array[3] {
object {PineTree},
object {OakTree},
object {Stone}}
We can see that these options could be used to make the Hair Growth Macro File grow many things other than hair. For the moment, though, the important thing to understand is that a single hair_object can contain multiple hairs, and the options we shall soon discover may apply either to hair_objects or individual hairs within a single hair_object.
| the compressed mesh macro file the compressed mesh macro file the compressed mesh macro file the compressed mesh macro file |
8. controlling hair coverage
The macro file works by placing copies of the hair objects on the triangles of the mesh surface. By default, the macro simply places one hair object on each triangle in the mesh, and we can increase or decrease the density of the hair objects by changing this number:
#declare hair_objects_per_triangle = 3;
This would create three hair object copies randomly placed on each triangle in the mesh. We can also use numbers less than 1, eg. 1/5 would create one hair object for every five triangles.
Sometimes, though, we may want to control the total number of hair objects created, rather than guessing how many to place on each triangle. We can do this by specifying the hair_object_count option instead of the hair_objects_per_triangle:
#declare hair_object_count = 3500;
Now the macro file will calculate the number of hairs to place on each triangle so that we get exactly the number of hair objects we asked for (regardless of how many triangles make up the mesh surface).
But - what if we are growing hair on a mesh that contains some very small triangles, and some very large triangles? Obviously, placing a constant number of hair objects on each triangle would mean very dense hair on the small triangles, and sparse on the large triangles. If we want an even distribution across the surface no matter how large or small the triangles are, we can use the hair_objects_per_unit option:
#declare hair_objects_per_unit = 100;
As the name suggests, this creates 100 hair objects per square unit of mesh surface. It doesn't matter if there are 100 triangles per unit in a one area of the mesh and only 2 triangles per unit in another - the macro will evenly distribute the hair objects as determined by the value you specify.
| the compressed mesh macro file the compressed mesh macro file the compressed mesh macro file the compressed mesh macro file |
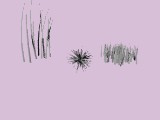
9. adjusting the hair shape
The Hair Growth Macro File offers four different types of predefined hair objects: the smooth_triangle_hairs_object (default), the clipped_sphere_hair_object, the triangle_patch_hairs_object, and the triangle_cluster_hairs_object. To use any of these after having included "PCM.MCR", we first declare the options that we want to modify the object, and then we use the macro name with empty brackets to define the hair object.
Each hair object macro supports different options, and to start we'll use options to change the curved shape of the first two hair types. Basically, each creates the hairs by growing them in an arc starting in the +y direction, and curving over the +z direction (which you can change with the hair_rotation option shown earlier).
To simplify things, we'll work on single hair objects using the following scene:
#include "colors.inc"
#include "textures.inc"
camera {location <0, 0.5, -1.5> look_at <0, 0.5, 0>}
light_source {<-100, 200, -300> White}
background {Thistle}
#include "PCMHAIR.MCR"
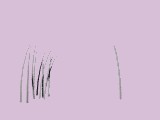
smooth_triangle_hairs_object ()
object {hair_object translate -x*0.5 pigment {White}}
clipped_sphere_hair_object ()
object {hair_object translate x*0.5 pigment {White}}
We can see how multiple hairs are created by the first macro (on the left), while only a single hair is created on the right. We know already how to adjust the length of the hairs, so let's try some options to change other aspects of the hair (add these after the include "PCM.MCR" statement):
#declare hair_thickness = 0.1;
#declare hair_radius = 0.5;
The first option is fairly obvious, and we can see the hair is indeed much thicker. The second option changes the radius of the arc that the curved hair follows, but we can see that halving it from the default of 1 has also shortened the hairs. This is because without a hair_length option the macro defaults to creating hairs that curve for one quarter of an arc (ie. 45 degrees). So rather than specifying a length in units, let's try adding this option:
#declare hair_arc = 1.5;
We can see on the left that the hairs do indeed curve for 1.5 arcs (270 degrees), but on the right the hair is clipped to only one arc. This is a limitation of the clipped sphere hair technique, and we can also see that the clipped sphere hair is cut flat at the end rather than tapered. Nevertheless, using the single clipped_sphere_hair_object has its advantages in certain situations, eg. try these option values instead:
#declare hair_radius = 3;
#declare hair_length = 1;
#declare hair_thickness = 0.5;
#declare hair_thickness_curvature = 0.3;
The triangular structure of the hair object on the left is quite obvious, whereas the object on the right is very suitable for creating things like scales, or (with a suitable semitransparent pigment map) feathers, leaves, etc. We've also introduced a new option, hair_thickness_curvature. Decreasing this from the default of 0.5 flattens the hair across its thickness, while higher values would give the hair a more three-dimensional thickness.
To move on to the second two hair object macros, let's try this scene:
#include "colors.inc"
#include "textures.inc"
camera {location <0, 0.5, -1.5> look_at <0, 0, 0>}
light_source {<-100, 200, -300> White}
background {Thistle}

#include "PCMHAIR.MCR"
smooth_triangle_hairs_object ()
object {hair_object translate -x*0.5 pigment {White}}

triangle_cluster_hairs_object ()
object {hair_object pigment {White}}

triangle_patch_hairs_object ()
object {hair_object translate x*0.5 pigment {White}}
Obviously, we can adjust the thickness and length of these hairs. Also, we can see how the cluster of hairs in the middle would be suitable for a highly curved surface (so that hairs don't appear to grow out of nowhere!), and useful when we want to cover both sides of a surface with hair. The result, though, will likely be more patchy and uneven than either of the two hair objects shown on the left.
Finally, let's try a couple of other options that adjust the hair objects (again, insert these lines after the #include "PCM.MCR" statement):
#declare hairs_per_patch = 50;
#declare hair_patch_size = 0.2;
#declare hair_patch_turb = 0;
The first option adjusts the number of individual hairs making up each hair object. The second option adjusts the spread of the hair patches (but has no effect on the hair cluster). This has been decreased from the default of 0.5 units, giving more compact patches. The last option reduces the randomness of the individual hairs (rotation and size) from the default of 0.1 - increasing the value would make the hair much messier.
Of course, different surfaces and desired effects will require different hair objects and options. For instance, creating grass on a large, flat surface might involve using the smooth_triangle_hairs_object with increased hairs_per_patch and a large hair_patch_size, so it wouldn't be necessary to use high hair coverage options. On the other hand, a close-up scene might involve using the single clipped_sphere_hair_object for smooth hair surfaces, with high coverage values.
| the compressed mesh macro file the compressed mesh macro file the compressed mesh macro file the compressed mesh macro file |
1. using hair textures and patterns
We saw earlier how declaring a mesh_texture option can be used to apply a texture to both the mesh surface and the hair objects. We also saw how you can declare hair objects that contain their own texture (obviously, every copy would contain the identical texture). For more control over how the hair is textured, you can use the hair_texture option:
#include "colors.inc"
#include "textures.inc"
camera {location <0, 1, -3> look_at <0, 0, 0>}
light_source {<-100, 200, -300> White}
background {DustyRose}

#include "PCMHAIR.MCR"
#declare mesh_texture = texture {pigment {White}}
#declare hair_texture = texture {pigment {DarkBrown} finish {Dull}}
read_mesh ("TORUS.PCM")
This has the advantage that the hair_texture is applied after the hair is positioned on the surface, so a patterned texture gives patterned hair. But in some cases you might not want each hair to change its texture over its length (for example, animal markings are generally the result of different coloured hairs grouped in various patterns). You can create this effect using the hair_texture option to set the desired hair normal and finish (if desired) and then declaring the hair_pattern_pigment option:
#declare hair_pattern_pigment = pigment {bozo
   color_map {[0 Aquamarine] [1 Red]}}
#declare apply_hair_materials_to_mesh = true;
Each hair object has now taken on the colour of the pattern pigment at the point the base of the hair object touches the surface. Also, using the apply_hair_materials_to_mesh overrides the previously declared mesh_texture (so the mesh texture will always match the hair texture). Finally, it is possible to use (instead of the two texture options shown above) the hair_material option to give the hairs objects interior properties combined with textures (including refraction and media). Obviously, this is only useful with hair objects that have an inside and outside.
TIP: You might find that the thin, dark shadows caused by the hair objects give your hairy surface a very grainy appearance, which can also make anti-aliasing relatively slow. But rather than making all the hairs semitransparent or using a large area light, one option to consider might be using a texture with a higher ambient finish and lower diffuse finish (eg. ambient 0.4 diffuse 0.7). This lowers the contrast between the lit hairs and the shadows falling on them, often giving a more realistic effect.
| the compressed mesh macro file the compressed mesh macro file the compressed mesh macro file the compressed mesh macro file |
11. other hair options
Although the options shown above should be enough for most scenes, there are a few other options you can change. Firstly, you can change the hair_seed value from the default of 0 to change the seed used for all random aspects of the hair growth.
Another is the hair_objects_only option. Setting this to true will cause the macro to only create the hair objects, and not the underlying mesh surface. This could be useful when you want to grow hair on a POV-Ray primitive such as a blob model - you can use a simplified mesh version of the blob surface to grow the hair on, and set hair_objects_only to true so this simplified mesh surface is not actually visible.
| the compressed mesh macro file the compressed mesh macro file the compressed mesh macro file the compressed mesh macro file |
now what?
Hopefully, this tutorial has been enough to familiarise you with how the Compressed Mesh Macro File and the Hair Growth Macro File work, and the sorts of things that you can create with them. For examples of how the different options can be used you can take a look at the sample images and animations included with the Compressed Mesh Macro File package. You can also use the Quick Reference files provided for each macro file, and for more advanced features (like creating your own mesh deformation and creation macros) you can use the Options References for each file.
| the compressed mesh macro file the compressed mesh macro file the compressed mesh macro file the compressed mesh macro file |
Website design, text, and graphics © 1999, Chris Colefax