
|
| |
Extracting (De-Multiplexing)
Sound From *.MPG Files
|
| |
| |
|
There are two possible ways
to extract audio from an MPEG file. The first is
by de-multiplexing, or breaking the video into
its component parts- a video stream and an audio
stream. This is the method of choice for videos
downloaded from the internet, which probably have
highly compressed sound to begin with--you don't
want to compress it further. The second method is
simply re-encoding the composite video to output
a solo audio stream. This method is good if your
audio stream is high quality and you want to
compress the audio to save hard drive space.
|
| |

|
| |
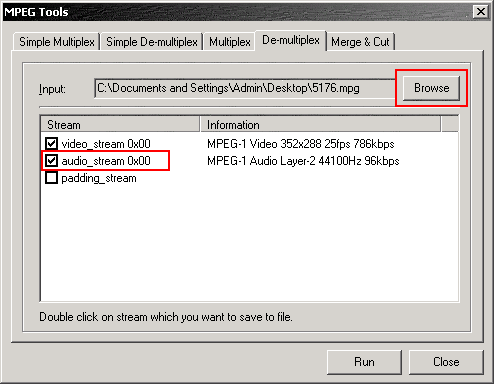
Here's how to de-multiplex
an *.MPG file:
1.
Open TMPGEnc, and a wizard box will pop up. Close
it. Click on [File / MPEG Tools] and you'll see a
window similar to that below:
|
| |
|
| |
2. Click on the De-multiplex
tab and you'll see a window like the one above.
This window will be blank when you first open it.
Click on Browse and find your
video file.
3.
You want to de-multiplex the audio portion, so
double click on the highlighted audio_stream
0x00 line and a dialog box will pop up
asking where you want to save the audio output.
In most *.MPG files, the audio is stored within
the video in a *.MP2 format, so naturally that's
what's going to get outputted--not an *.MP3. If
you absolutely need *.MP3 format for a portable
player or something then use Winamp to convert it.
Side note- if you feel so inclined, you can also
double click the video stream to save only the
video data without sound. This is useful for re-dubbing.
Anyway,
once you choose where you want to save the file,
you're done.
Now
I'm going to go over how to re-encode a solo
audio stream:
|
| |
|
| |
Since I'm too lazy to make
all new graphics with minor changes for the
purpose of this tutorial, I'm just going to use
the screenshots from the demuxing tutorial.
Ignore any red highlights because they won't
pertain to this exercise.
1.
We're looking at the bottom half of the screen.
Next to the Video source textbox is a Browse
button. Click it and find your video file. The Audio
source box will fill itself in using the
same path as the video source, naturally because
you want the audio stream from the video file you
specified.
2.
Below the Audio and Video source boxes, is one
that says Output file name. Click the Browse
button and point to where you want to save the
output, and the filename you want to save your
output as.
3.
See the frame to the right of the Audio, Video,
and Output textboxes that's labeled Stream
type? Make sure you select ES (Audio
only). It means you want an Elementary
Stream, Audio portion only. Given that, you
should be able to figure out what the rest of the
options do, and if you're dense then there are
ToolTips that explain them further.
4.
Now we need to find the maximum audio bitrate we
can save the audio as. If you skip this step, you
may end up saving a high-quality copy of a poor-quality
audio stream, which will do nothing but eat up
space on your hard drive. So we want to set our
desired audio quality (bitrate) relative to the
quality of the audio contained within the actual
video file. To check the bitrate within TMPGEnc,
go to [File / MPEG Tools]. A window like the one
below will pop up:
|
| |
|
| |
5. Click on the De-multiplex
tab. Here's where you ignore the
highlighting. Click on Browse to
find your file, then look down the Information
column to find the values that correspond with
the audio stream (labelled audio_stream 0x00).
The audio stream of the file I used is 44100Hz 96kbps
*.MP2. Write down whatever it says for yours,
then click Cancel.
6.
Go back to the main screen, and under where you
selected ES (Audio only) is a button
marked Settings. Click it and
you'll see something like below.
|
| |
|
| |
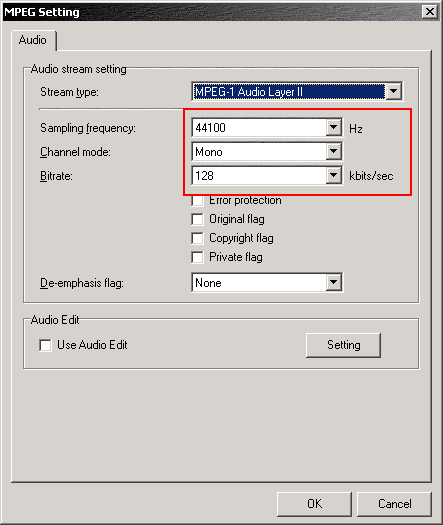
7. Now you can pay
attention to the highlighting. What I've drawn a
box around are the parameters that we just looked
up, that we now want to configure. If you've come
this far you probably want to set these values to
something LESS than what we looked up, otherwise
you would have been better off doing a simple de-multiplex.
Set
the sampling frequency to whatever the value we
looked up was (in this case 44100Hz). Set the
channel mode to Stereo or Mono depending on
whether the video is Stereo or Mono, or whether
or not you care. If you're concerned about
filesize select Mono. The bitrate, now, is the
part where we most affect the output file size.
As you can see, my screenshot shows I'm about to
save in 44100Hz 128kbps Mono when the video file
I'm working with is only 44100Hz 96kbps
Mono. So if I continued, I'd end up with a
bloated output file that still only sounds like a
44100Hz 96kbps Mono recording. You should change
your bitrate to be something lower than whatever
the source was (in my case I should save as
something less than 96kbps).
You
can also tool around with the audio editor, to
crop the sound or whatever. You can do it now, or
later with an external sound editor. Click OK
when you're done.
Now
you're back at the main screen. It's not in my
screenshot since a menu is covering it, but there's
a big button in the top left corner marked Start.
Click it and TMPGEnc will re-encode a solo audio
stream to the location you specified earlier. You're
done!
|
| |
Kopywrong
(k) 2005
All Rights Reversed. Reprint what you like.
|
|