
|
BIOS Modding Guide
In this chapter I would like to describe how to modify the BIOS ROM.
The most common changes are updates to complete sub modules of the BIOS,
like the microcode patches, the image displayed at POST time, the firmware
of onboard components. It is less common to go into the machine code and
perform changes on that level. All methods described here apply to the
Award BIOS, simply because all four motherboards I have at my disposal are
fitted with an Award BIOS... |
The BIOS ROM
Before going into medias res let me briefly explain what we find in the BIOS
ROM itself. Most importantly, the ROM image contains a boot block which is
executed when the CPU starts execution after switching on the power, or after a
hardware reset. All CPUs of i86 architecture will start executing code in real
mode at address FFFF:0000 which usually disables interrupts and performs a far
jump to the actual reset routine. In terms of linear 20bit address space the
starting point is FFFF0. That way it turns out quite handy that initially the
BIOS ROM occupies the address space in that area.
At some point in history this would have been the whole story since the ROM
would contain the actual BIOS routines, the setup and everything else. However,
as the memory requirements grew, the point was reached where not everything
could fit into the ROM itself. I guess, that is when the current mechanism was
born. In a current BIOS, only 24KB are reserved for the boot block and the
decompression routines. The remaining space of 232KB is essentially an LHA
archive. This archive contains a number of files. The selection of files depends
on the vendor and the model of the motherboard. What you can typically expect is
- the actual BIOS content. The file is often called ORIGINAL.TMP. It is
128KB long (after decompression) and it is loaded into the RAM at address
E0000 to FFFFF. Afterwards the chipset is programmed to divert all CPU read
memory cycles to the RAM. That means, the loaded BIOS content overlays the
BIOS ROM.
- a list of microcode patches for different cpuids and platforms. This is a
feature of intel's P6 architecture, allowing to patch CPU errata by uploading
patches into the CPU core. The file is often called CPUCODE.EXE or similar.
- extended ROM areas. Don't ask.
- the ACPI table.
- the EPA picture. That is a small bitmap that is presented briefly during
the POST. It typically shows the logo of the Energy Star Alliance to prove the
PC is a green PC...
- BIOS extensions for common cards and onboard devices. Typical examples are
the NCR53810 SCSI host adapter, and more recently the plethora of onboard
ATA-66/100 controllers.
- other vendor specific components.
The Tools
If you want to work with any of these BIOS components, you will need a number
of tools. The problem with some of the tools is that they are not freeware, nor
are they meant for general use. They are licensed by Award Inc. to motherboard
manufacturers to implement their BIOS template. However, you will be surprised
what a good search engine can find on the internet...
- Modbin.exe
- This is a DOS application. It serves to open the ORIGINAL.TMP file inside
the ROM file and modify almost all BIOS parameters, setup options etc. I have
found the versions 4.50.60, 4.50.75 and 4.50.77 for modifying Award BIOS
version 4.X. The corresponding program for Award BIOS version 6.0 is often
called modbin6.exe. I have found the version 1.00.12, 1.00.37 and
1.00.38 on the web. We are going to look at some applications of modbin
further down.
- Cbrom.exe
- Also a DOS application. This tool is used to view the contents of the LHA
archive in the ROM file. It can also extract, delete and insert files into the
archive. Having said that, I have not found a way to manipulate the
ORIGINAL.TMP file with cbrom. There is a number of versions on the web, eg.
1.30, 2.01 and 2.07. For Award BIOS version 6.0 there is a cbrom version 6.06.
CBROM V2.01A (C)Award Software 1999 All Rights Reserved.
Syntax:
     E:\...\CBROM.EXE InputFile [/other] [8000:0] [RomFile|Release|Extract]
     E:\...\CBROM.EXE InputFile [/D|logo|vga....] [RomFile|Release|Extract]
          InputFile   : System BIOS to be added with Option ROMs
          /D          : For display all combined ROMs informations in BIOS
          /epa|epa1-7 : Add EPA LOGO BitMap to System BIOS
          /logo|logo1-7: Add OEM LOGO BitMap to System BIOS
          /oem0-7     : Add special OEM ROM to System BIOS
          /err        : Return error code after executed
          /btvga      : Add VGA ROM to Boot Rom Block Area.
          /isa        : Add ISA BIOS ROM to System BIOS.(/isa Filename [xxxx:0])
          /vga, /logo, /pci, /awdflash, /cpucode, /epa, /acpitbl, /vsa, /hpm
          /hpc, /fnt0 - 5, /ros, /nnoprom, /mib

          RomFile   : File name of option ROM to add-in
          Release   : Release option ROM in current system BIOS
          Extract   : Extract option ROM to File in current system BIOS
                      <<< Examples >>>
            E:\...\CBROM.EXE 2a4ib000.bin /D
|
- Ctmc.exe
- Another DOS application. This tool can be downloaded from http://www.heise.de/ct. The archive ctmc10.zip contains
another couple of tools, namely splitawd.exe and lha255e.exe
which together can extract all files from a BIOS ROM into a temporary
directory.
Talking about ctmc itself. It can display the microcode patches contained
in a file or directory. It can also extract all entries from a file and store
them in a directory. Finally, it claims to be able to flash microcode updates
into the system BIOS, a function I have never tested and probably never will.
;-) I have not found a way to have it do the reverse, ie. assemble a
CPUCODE.EXE file from a list of singular microcode patches.
Microcode utility ctmc V1.0, c't/Andreas Stiller 02/2001
ctmc displays or loads Intel microcode update  for Pentium Pro, PII, PIII, P4
needs pure DOS for flashing, no memory manager, no Windows !!!
without parameter: displays CPUID, Update-ID, Platform-ID
                   and reloadable MC update blocks in BIOS
ctmc filename    : searches for valid MC update blocks in filename[s]
                 : (with wildcards *, ?)
                 : i.e. Intel BIOSses, PEP.PDB, FSC BIOS blocks ...
                 : Decompresses CPUcode in Award-BIOS-files with LHA.EXE
ctmc $           : $=shortcut for path set in Environment: set MCDATABASE=xxxx
ctmc $065*.*     : displays stored MC-info for all PII Klamath stepping
                 : (0650,0651,0652)
ctmc filename /store : stores MC Block into MCDATABASE
                 : name=cpuid, platformid,updateid .bin i.e. 0652010A.bin
ctmc filename /write: uses BIOS-API (INT 15-D042) for flashing MC-update
ctmc $  /write   : looking in MCDatabase for newest, valid MC and flash
|
- Pup<nnn>.exe
- This stands for processor update utility and is by intel. It comes with a
version number in the file name, eg. pup461.exe, pup501.exe,
pub514.exe etc. The archive usually contains checkup5.exe and a
microcode database pep.dat. Similar to ctmc.exe, checkup5.exe claims to
be able to flash microcode updates into the BIOS, it supports external
database files, and it can check microcode patches currently loaded in the CPU
as well as loading new ones.
- Bmp2epa.exe
- This is a fullscreen DOS application, although there is a Windows version
available. The Windows version is called bmptoepa and has been created
by a hobbyist (or should I say, BIOS hacker?) Anyway, the purpose of these
programs is to take a BMP file and transform it into an EPA picture. This
process has been documented in various places on the web since it allows to
customize the logo on the POST screen. Ideal for Intel vs. AMD guerilla.
- Bmp2bin.exe
- Similar to bmp2epa, this is used to convert a BMP file to a fullscreen
bitmap logo.
- Hex editor
- Obviously a hex editor of choice is an indispensable tool for viewing and
modifying binary files.
- Disassembler/Debugger
- In case you want to analyze the BIOS coding. However, BIOS coding is quite
different from normal applications, and tracing commands manipulating vital
CPU and chipset registers is not always healthy...
Adding Microcode Patches
The best way to understand is by looking at an example. What I have done
recently is to update the microcode patches for my Asus CUBX and the AOpen AX6BC
Pro as well as adding support for cD0 and Tualatin. Another project was to add
support for all known Celerons and 66MHz-P2s to my LX board (PC Partner
8831-02). That is what I am going to demonstrate in this chapter.
The board was given to me with a BIOS version (0610) that did not even boot
with cB0 Pentium III chip. Not that you would do it seriously, it would be a
waste of a CPU designed for 100+FSB, it was just to prove the point that the
BIOS coding would refuse to run CPUs it was not designed to run. The list
of supported CPUs can be told by looking at the available microcode patches.
Just looking at the ctmc screen:
Microcode utility ctmc V1.0, c't/Andreas Stiller 02/2001
Filename     Version  UpdateID Date       CPUID    Checksum  LoadVers Platform
LX0610.MC0   00000001 00000020 03.09.1996 00000632 EBC16165  00000001 00000000
LX0610.MC0   00000001 00000032 12.12.1996 00000633 0D73D3BC  00000001 00000000
LX0610.MC0   00000001 00000033 16.06.1997 00000634 F3AC5144  00000001 00000000
LX0610.MC0   00000001 00000029 23.01.1998 00000651 8EC49C2F  00000001 00000001
LX0610.MC0   00000001 00000007 08.04.1998 00000652 01E31F0F  00000001 00000001
LX0610.MC0   00000001 00000027 23.01.1998 00000650 66D67DD7  00000001 00000001
|
There is only support for cpuid 632, 633, 634 (which stands for the early
66MHz-P2s) and cpuid 650, 651, 652 (which stands for first generation Celerons
without L2 cache and the later 66MHz-P2s). The update IDs indicate that the
patches are pretty ancient as well. Btw, detailed information on cpuids,
steppings etc. can be found on developer.intel.com.
Next I updated the BIOS to version 1223. This allowed my cB0 Pentium III to
boot, although no microcode update was available. I took that as an indicator
that Coppermine Celerons might run as well. Only the missing microcode patches
should be included.
Before doing the modification, a few preparations need to be made. First and
foremost we need to establish the input sources. We need to choose the BIOS
version that we are going to use as a coding base for our modification. In this
case I chose the latest available BIOS (version 1223) and made a copy of the
file under the name lx1223m.bin. We also need to download other BIOS files and
resources from the internet. At the time of writing, I found the BIOS version
1007 for the Asus CUV4X the most up to date one. It is a good source for
microcode patches. Only the microcode patch for cpuid 6B1 (Tualatin) is missing.
It can be found in the BIOS version 1007 for the Asus CUSL-C.
As a practical word of advice, it makes sense to create a dedicated work
directory and copy everything needed into it. It is also extremely helpful to
obey strict naming conventions. This might involve renaming the BIOS files
downloaded from the internet. Since the tools are a bit picky at times, the
filenames should strictly follow the 8+3 convention, with a full 3 letter
extension. I use the extension *.bin for BIOS files and *.mc0 for microcode
files.
Step 1
Let us assume we start with the following files in our work directory.
 Volume in drive E is IBM27_2
 Volume Serial Number is 3155-1F08

 Directory of E:\WORK

22.07.01  09:56         <DIR>          .
22.07.01  09:56         <DIR>          ..
07.10.99  19:49                 32,658 cbrom.exe
23.02.01  15:31                 57,568 ctmc.exe
13.06.01  09:36                262,144 cv4x1007.bin
04.01.99  22:40                131,072 lx1223.bin
20.07.01  21:59                131,072 lx1223m.bin
               7 File(s)        614,514 bytes
                            625,999,872 bytes free
|
First thing to do is to view the content of the BIOS files and to extract the
microcode patches. We can view the content of, say, lx1223.bin by typing
cbrom lx1223.bin /D. We can extract the microcode with the command
line cbrom lx1223.bin /cpucode extract. When prompted, we provide the
filename lx1223.mc0.
CBROM V2.01A (C)Award Software 1999 All Rights Reserved.

              ********   lx1223.bin BIOS component ********

 No. Item-Name         Original-Size   Compressed-Size Original-File-Name
================================================================================
  0. System BIOS       20000h(128.00K) 136EFh(77.73K)  original.tmp
  1. XGROUP CODE       03F08h(15.76K)  02C03h(11.00K)  awardext.rom
  2. CPU micro code    06000h(24.00K)  03227h(12.54K)  CPUCODE.BIN
  3. EPA pattern       00046h(0.07K)   0006Dh(0.11K)   AWARDEPA.BIN

  Total compress code space  = 1A000h(104.00K)
  Total compressed code size = 19586h(101.38K)
  Remain compress code space = 00A7Ah(2.62K)

                      ** Micro Code Information **
Update ID  CPUID  |  Update ID  CPUID  |  Update ID  CPUID  |  Update ID  CPUID
------------------+---------------------+--------------------+-------------------
PPGA   01   0665  |  SLOT1  20   0632  |  SLOT1  34   0633  |  SLOT1  35   0634
SLOT1  32   0650  |  SLOT1  30   0651  |  SLOT1  01   0653  |  SLOT1  14   0652
SLOT1  04   0660  |  SLOT1  06   0670  |  SLOT1  03   0671  |  SLOT1  04   0672

E:\WORK>cbrom lx1223.bin /cpucode extract
CBROM V2.01A (C)Award Software 1999 All Rights Reserved.
Enter an extract file Name :(CPUCODE.BIN) _
|
The same thing we do with the BIOS file cv4x1007.bin. Afterwards our working
directory should look like this:
 Volume in drive E is IBM27_2
 Volume Serial Number is 3155-1F08

 Directory of E:\WORK

22.07.01  09:56         <DIR>          .
22.07.01  09:56         <DIR>          ..
07.10.99  19:49                 32,658 cbrom.exe
23.02.01  15:31                 57,568 ctmc.exe
22.07.01  10:10                262,144 cv4x1007.bin
22.07.01  10:07                131,072 lx1223.bin
20.07.01  21:59                131,072 lx1223m.bin
22.07.01  10:07                 24,576 LX1223.MC0
22.07.01  10:10                 51,302 CV4X1007.MC0
               9 File(s)        690,392 bytes
                            625,901,568 bytes free
|
Step 2
The next thing to do is to analyze the microcode patches. First we obtain a
list of the patches contained in lx1223.mc0 by typing ctmc
lx1223.mc0. The result:
Microcode utility ctmc V1.0, c't/Andreas Stiller 02/2001
Filename     Version  UpdateID Date       CPUID    Checksum  LoadVers Platform
LX1223.MC0   00000001 00000001 27.08.1998 00000665 6D487DC1  00000001 00000010
LX1223.MC0   00000001 00000020 03.09.1996 00000632 EBC16165  00000001 00000000
LX1223.MC0   00000001 00000034 08.05.1998 00000633 278BE7DC  00000001 00000001
LX1223.MC0   00000001 00000035 08.05.1998 00000634 3AC2FB53  00000001 00000001
LX1223.MC0   00000001 00000032 10.06.1998 00000650 A0027121  00000001 00000001
LX1223.MC0   00000001 00000030 10.06.1998 00000651 DE71ECC9  00000001 00000001
LX1223.MC0   00000001 00000001 14.10.1998 00000653 76FDF028  00000001 00000001
LX1223.MC0   00000001 00000014 10.06.1998 00000652 0E4A7195  00000001 00000001
LX1223.MC0   00000001 00000004 05.06.1998 00000660 0C7B5205  00000001 00000001
LX1223.MC0   00000001 00000006 28.05.1998 00000670 0CE041AD  00000001 00000001
LX1223.MC0   00000001 00000003 11.08.1998 00000671 F6CF7B0B  00000001 00000001
LX1223.MC0   00000001 00000004 29.10.1998 00000672 15916A64  00000001 00000001
|
This looks a lot better than the original BIOS version 0610. It contains
almost all cpuids of Celeron, P2 and P3 CPUs prior to Coppermine. Doing the same
with cv4x1007.mc0, we obtain
Microcode utility ctmc V1.0, c't/Andreas Stiller 02/2001
Filename     Version  UpdateID Date       CPUID    Checksum  LoadVers Platform
CV4X1007.MC0 00000001 00000020 03.09.1996 00000632 EBC16165  00000001 00000000
CV4X1007.MC0 00000001 00000034 08.05.1998 00000633 278BE7DC  00000001 00000001
CV4X1007.MC0 00000001 00000035 08.05.1998 00000634 3AC2FB53  00000001 00000001
CV4X1007.MC0 00000001 00000040 25.05.1999 00000650 B6A8B9B9  00000001 00000001
CV4X1007.MC0 00000001 0000000A 05.05.1999 00000660 05B795F4  00000001 00000001
CV4X1007.MC0 00000001 00000006 28.05.1998 00000670 0CE041AD  00000001 00000001
CV4X1007.MC0 00000001 00000003 05.05.1999 00000665 2B9733F1  00000001 00000010
CV4X1007.MC0 00000001 00000010 28.06.1999 00000653 4B6DFC5E  00000001 00000001
CV4X1007.MC0 00000001 00000010 22.09.1999 00000672 0FC53099  00000001 00000001
CV4X1007.MC0 00000001 00000003 11.08.1998 00000671 F6CF7B0B  00000001 00000001
CV4X1007.MC0 00000001 00000002 10.06.1998 00001632 6AAE5598  00000001 00000000
CV4X1007.MC0 00000001 00000040 25.05.1999 00000651 F400B4AC  00000001 00000001
CV4X1007.MC0 00000001 0000002A 12.05.1999 00000652 C8B34CC7  00000001 00000001
CV4X1007.MC0 00000001 0000000E 10.09.1999 00000673 F64116D1  00000001 00000001
CV4X1007.MC0 00000001 00000014 10.06.1999 00000680 2B6C7F13  00000001 00000001
CV4X1007.MC0 00000001 0000000D 21.09.1999 00000681 31708166  00000001 00000001
CV4X1007.MC0 00000001 00000011 21.09.1999 00000681 FC16538D  00000001 00000010
CV4X1007.MC0 00000001 00000013 06.02.2001 00000683 2F0DA1B0  00000001 00000001
CV4X1007.MC0 00000001 00000014 06.02.2001 00000683 0976FD98  00000001 00000010
CV4X1007.MC0 00000001 00000007 05.05.2000 00000686 87AA303F  00000001 00000001
CV4X1007.MC0 00000001 00000008 05.05.2000 00000686 EA2B7B61  00000001 00000010
CV4X1007.MC0 00000001 00000001 02.11.2000 0000068A 80FC9E3B  00000001 00000010
CV4X1007.MC0 00000001 00000004 15.11.2000 000006B0 65611EB6  00000001 00000010
|
In reality we would have to try a few more BIOS files, but this is the best
one I have found. It contains every CPU of the P6 family so far, excluding the
Pentium Pro and the 6B1 Tualatin. Also, if you compare the Update IDs, the
patches are more up to date than those in lx1223.mc0. In fact, they are the most
up to date of any BIOS I checked.
We cannot simply copy the cv4x1007 microcodes into the lx1223m BIOS for two
reasons. First of all, the microcode files have a different format. Secondly, if
you look at the screenshot of cbrom above, in lx1223.bin there are only 2.62KB
space left. The cv4x1007 microcode file is far too big. Therefore we are going
to construct a totally new microcode file for lx1223m.bin.
Step 3
We can use ctmc to extract singular microcode patches from cv4x1007.mc0 into
a newly created directory \MCDB. To that end we first define an environment
variable by typing set MCDATABASE=\MCDB. Then we issue the command
ctmc cv4x1007.mc0 /store. This should extract 23 files into directory
\MCDB, each of them precisely 2048 bytes long.
 Volume in drive E is IBM27_2
 Volume Serial Number is 3155-1F08

 Directory of E:\MCDB

22.07.01  11:36         <DIR>          .
22.07.01  11:36         <DIR>          ..
03.09.96  00:00                  2,048 06320020.BIN
08.05.98  00:00                  2,048 06330134.BIN
08.05.98  00:00                  2,048 06340135.BIN
25.05.99  00:00                  2,048 06500140.BIN
05.05.99  00:00                  2,048 0660010A.BIN
28.05.98  00:00                  2,048 06700106.BIN
05.05.99  00:00                  2,048 06651003.BIN
28.06.99  00:00                  2,048 06530110.BIN
22.09.99  00:00                  2,048 06720110.BIN
11.08.98  00:00                  2,048 06710103.BIN
10.06.98  00:00                  2,048 16320002.BIN
25.05.99  00:00                  2,048 06510140.BIN
12.05.99  00:00                  2,048 0652012A.BIN
10.09.99  00:00                  2,048 0673010E.BIN
10.06.99  00:00                  2,048 06800114.BIN
21.09.99  00:00                  2,048 0681010D.BIN
21.09.99  00:00                  2,048 06811011.BIN
06.02.01  00:00                  2,048 06830113.BIN
06.02.01  00:00                  2,048 06831014.BIN
05.05.00  00:00                  2,048 06860107.BIN
05.05.00  00:00                  2,048 06861008.BIN
02.11.00  00:00                  2,048 068A1001.BIN
15.11.00  00:00                  2,048 06B01004.BIN
              25 File(s)         47,104 bytes
                            625,115,136 bytes free
|
The files contain the microcode patch for each single CPU type. The filename
is a concatenation of cpuid (4 characters), platform ID (2 characters) and
update ID (2 characters). If required, we can do the same for other BIOS files
and create our own data base of microcode patches.
What we are going to do now is to define what patches are actually needed for
the LX board and to build a new microcode collection. Looking at the information
on developer.intel.com, in
order to support every CPU with 66MHZ FSB we require at least
| CPUID
| Platform ID
| Platform
| CPU type
| CPU core
| Stepping |
| 0633
| 01
| Slot 1
| Pentium II
| Klamath
| C0 |
| 0634
| 01
| Slot 1
| Pentium II
| Klamath
| C1 |
| 0650
| 01
| Slot 1
| Celeron, P2
| Deschutes
| dA0 |
| 0651
| 01
| Slot 1
| Celeron, P2
| Deschutes
| dA1 |
| 0652
| 01
| Slot 1
| Pentium II
| Deschutes
| dB0 |
| 0660
| 01
| Slot 1
| Celeron I
| Mendocino
| mA0 |
| 0665
| 10
| Socket 370
| Celeron I
| Mendocino
| mB0 |
| 0683
| 01
| Slot 1
| Celeron II
| Coppermine
| cB0 |
| 0683
| 10
| Socket 370
| Celeron II
| Coppermine
| cB0 |
| 0686
| 01
| Slot 1
| Celeron II
| Coppermine
| cC0 |
| 0686
| 10
| Socket 370
| Celeron II
| Coppermine
| cC0 |
| 068A
| 10
| Socket 370
| Celeron II
| Coppermine
| cD0 |
In fact, I would have liked to stick in a few more just to be on the safe
side, but the BIOS file has no space for additional patches. I am not even sure
whether the board would support Coppermines without slot riser, at least the
voltage regulator on the board can supply the required core voltage.
In order to continue we delete all files from MCDB that are not on the list.
The task now is to combine the remaining files to something we can add to a BIOS
ROM.
As far as I can see, ctmc.exe offers no option to re-assemble a patch
collection. Therefore we need to analyze the file structure with the help of a
hex editor. It turns out that cv4x1007.mc0 has a structure different from
lx1223.mc0. Luckily, the latter is quite simple. It is simply the concatenation
of all singular 2048 byte microcode patches. The Asus file structure is also not
too difficult. It has the structure of a header and a body. The body is the
concatenation of 4096 zero bytes and all singular 2048 byte microcode patches.
The 4096 zero bytes count as two additional microcode patches. The header
consists of a 4 byte entry for every microcode patch (including the two zero
entries), followed by 0xFFFF. The first two bytes of each 4 byte entry represent
the file offset of the corresponding microcode patch in intel byte order (low
byte first).
For the purpose of this chapter it is sufficient to concatenate the relevant
files in MCDB. This is achieved by typing copy /b *.bin LX1233M.MC0
at the command prompt. Afterwards, the MCDB directory should look like this:
 Volume in drive E is IBM27_2
 Volume Serial Number is 3155-1F08

 Directory of E:\MCDB

22.07.01  11:36         <DIR>          .
22.07.01  11:36         <DIR>          ..
08.05.98  00:00                  2,048 06330134.BIN
08.05.98  00:00                  2,048 06340135.BIN
25.05.99  00:00                  2,048 06500140.BIN
05.05.99  00:00                  2,048 0660010A.BIN
05.05.99  00:00                  2,048 06651003.BIN
25.05.99  00:00                  2,048 06510140.BIN
12.05.99  00:00                  2,048 0652012A.BIN
06.02.01  00:00                  2,048 06830113.BIN
06.02.01  00:00                  2,048 06831014.BIN
05.05.00  00:00                  2,048 06860107.BIN
05.05.00  00:00                  2,048 06861008.BIN
02.11.00  00:00                  2,048 068A1001.BIN
22.07.01  12:39                 24,576 LX1223M.MC0
              15 File(s)         49,152 bytes
                            625,442,816 bytes free
|
The resulting file LX1223M.MC0 is copied into our work directory. Back in our
working directory, we copy or rename the file LX1223M.MC0 to whatever the
filename is in the lx1223.bin archive. In this case we say copy /b
LX1223M.MC0 CPUCODE.BIN.
 Volume in drive E is IBM27_2
 Volume Serial Number is 3155-1F08

 Directory of E:\WORK

22.07.01  09:56         <DIR>          .
22.07.01  09:56         <DIR>          ..
07.10.99  19:49                 32,658 cbrom.exe
23.02.01  15:31                 57,568 ctmc.exe
22.07.01  10:10                262,144 cv4x1007.bin
22.07.01  10:07                131,072 lx1223.bin
20.07.01  21:59                131,072 lx1223m.bin
22.07.01  10:07                 24,576 LX1223.MC0
22.07.01  10:10                 51,302 CV4X1007.MC0
22.07.01  12:39                 24,576 LX1223M.MC0
22.07.01  12:39                 24,576 CPUCODE.BIN
              12 File(s)        754,524 bytes
                            623,083,520 bytes free
|
Step 4
Before inserting the file into the BIOS image, we remove the old file by
typing cbrom lx1223m.bin /cpucode release.
Step 5
Next we add the file to the BIOS image using the command line cbrom
lx1223m.bin /cpucode CPUCODE.BIN.
Step 6
Finally we make sure everything went allright by checking the BIOS file
content. Reason being, that cbrom sometimes fails to tell us if there is a
problem in step 5. Again, the display command is cbrom lx1223m.bin
/D.
CBROM V2.01A (C)Award Software 1999 All Rights Reserved.

              ********  lx1223m.bin BIOS component ********

 No. Item-Name         Original-Size   Compressed-Size Original-File-Name
================================================================================
  0. System BIOS       20000h(128.00K) 136EFh(77.73K)  original.tmp
  1. XGROUP CODE       03F08h(15.76K)  02C03h(11.00K)  awardext.rom
  2. EPA pattern       00046h(0.07K)   0006Dh(0.11K)   AWARDEPA.BIN
  3. CPU micro code    06000h(24.00K)  03A84h(14.63K)  CPUCODE.BIN

  Total compress code space  = 1A000h(104.00K)
  Total compressed code size = 19DE3h(103.47K)
  Remain compress code space = 0021Dh(0.53K)

                      ** Micro Code Information **
Update ID  CPUID  |  Update ID  CPUID  |  Update ID  CPUID  |  Update ID  CPUID
------------------+---------------------+--------------------+-------------------
SLOT1  34   0633|  SLOT1  35   0634|  SLOT1  40   0650|  SLOT1  0A   0660
PPGA   03   0665|  SLOT1  40   0651|  SLOT1  2A   0652|  SLOT1  13   0683
PPGA   14   0683|  SLOT1  07   0686|  PPGA   08   0686|  PPGA   01   068A
|
If there is no entry for the CPU micro code, there is probably insufficient
space in the archive and we need to go back to step 3.
All auxiliary files that cbrom has left behind (BIOS.ROM and FILE_BUF.BIN are
typical candidates) can be safely deleted.
Addendum: Step 7
This step is optional, but it is the icing on the cake. We are going to
change the boot message. It is, of course, possible to print any cool message,
but from an engineering point of view we want to do two things: we want to
highlight the modified nature of the BIOS, and we want to introduce a version
control. Instead of a version number I usually use the modification date. The
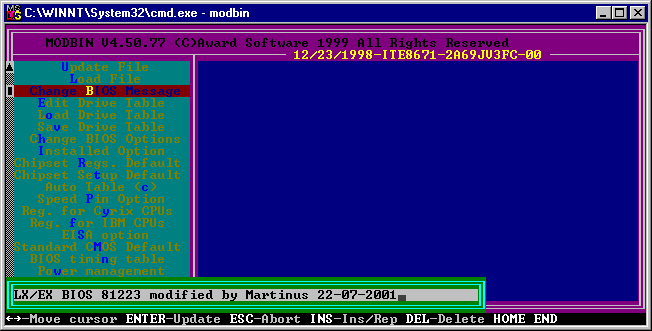
process itself is easy: we start modbin, select the appropriate BIOS file,
change the boot message and save the file.
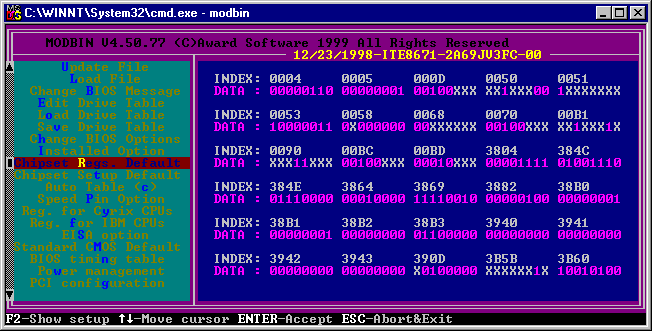
Modbin offers a lot more options, for example the default values for the PCI
configuration registers of the chipset. I have been playing with the DRAM Timing
Register of the LX chipset at offset 0x58, but since the parameters are
available from the BIOS setup anyway it doesn't really make sense. It is a much
brighter idea to use the most conservative settings during bootup, and leave it
to the BIOS settings to select faster settings if the RAM can take it.
Finally some caveats regarding modbin. Whilst I have been using this piece of
software a number of times successfully, it can be a bit picky. For starters, it
seems to have difficulties saving a file from within a DOS box under Windows NT.
Use Windows 98 or DOS instead. Modbin6 will not open BIOS files for the Asus
CUBX for some reason, although the BIOS says it is version 6. However, I could
open and save them successfully in modbin 4.5, only that most options are not
available. Lastly, someone has reported that modbin 4.5 has difficulties storing
the right check sum prior to version 4.50.77. Therefore you should always use
version 4.50.77 or later.
Other BIOS Modifications
In the very same way you can extract and add other modules from and to BIOS
files. For instance, there are reports of some Asus CUBX users who chose to
downgrade the controller BIOS for the onboard CMD ATA-66 controller for
some reason. The only thing you need to figure out is the cbrom option.
Another mod that has reached great popularity is the modification of the EPA
picture or even full screen boot images. There is a number of web sites out
there with detailed explanations of the process.
For the EPA picture you start with a BMP file of 136*126 pixels and 1 bit
colour depth. You then load it into one of the tools, colour it, convert it to
EPA format and use cbrom with option /epa to store it in a BIOS file. There are
certain limitation regarding colour and size.
For a fullscreen bitmap logo you start with a BMP file of 640x464 pixels and
4 bit colour depth. Again this is converted by a tool and stored in a BIOS file
using cbrom with option /logo.
My own personal favourite EPA modification is the removal of the EPA picture
altogether. Especially on my Asus CUBX. In fact, I am not sure whether this is a
feature that Asus built into the CUBX BIOS or whether this is standard for Award
BIOS version 6.0, but I noticed, without the EPA picture the video display will
remain in text mode during POST. Normally the POST screen switches to graphics
mode in order to display the EPA image and the Award logo. Since my monitor
blanks out for a second when a mode switch occurs, I sometimes missed the POST
screen or failed to press DEL in time to get into the BIOS setup. That is now a
thing of the past.
Coding Changes
This is the area were real mastery is displayed. Unfortunately my track
record is less than spotless. In fact, my very first BIOS mod was of this
nature. I will tell you about it in a second. But first let us consider the
difficulties. The basic procedure is similar to the other modifications. First
we need to extract the compressed system BIOS image, usually called ORIGINAL.TMP
or similar. Then we need to modify it, update the check sum, and store it back
into the archive. Sounds easy. The problem is, the standard tools are not very
helpful. For instance, there seems not to be a switch that makes cbrom extract
the BIOS image. Even worse, for the same reason you cannot add a BIOS image to
the archive. Also, there is no way to update the checksum of the BIOS image.
Well, if the solution doesn't come on a silver plate we need to be inventive.
And here is what I did for my first BIOS mod. At the time I was playing with the
idea of upgrading my ancient Pentium Pro based machine to a Celeron - using one
of the commercially available CPU adapters. However, it is a well known problem
that the Award BIOS shipped during those days would refuse to boot with an
unexpected CPU. So I extracted the BIOS image (ORIGINAL.TMP) by loading the BIOS
into modbin. Modbin was running in a DOS box under Windows. You can then go into
a parallel session and copy the file modbin has extracted temporarily.
So far so good. I then had all the time in the world to disassemble the file,
search for cpuid commands and devise a course of action. In fact I chose to flip
exactly one byte (maybe just one bit) in the whole 128KB file, essentially
changing a jump condition or the displacement, something like that. The idea was
that it wouldn't have any effect when the code was executed by the Pentium Pro.
Btw, I had to learn i86 assembler, segment registers, low endianism and all the
rest of it. With my strong background of M68K assembler, it was quite a culture
shock - and sometimes an insult to human intelligence.
Anyway, knowing what change to make at what offset, the task now was to get
it into the BIOS file. So I fired up modbin again. In a parallel session I
flipped the byte in the temporary ORIGINAL.TMP file created by modbin. I saved
the BIOS ROM from modbin. I flashed the ROM file without any errors. When I
switched the computer on again I was greeted by - a black screen and silence.
The computer was dead. I have never worked out what went wrong, whether I should
have updated the checksum myself (I assumed modbin would do that for me),
whether there was a totally unrelated problem.
Thinking of it now, I was certainly a bit inexperienced an naive, and I am
sure I will try again at some point. But I will approach things more
scientifically next time.
When things do go wrong
Obviously, modifying and flashing untested BIOS files carries a certain
amount of risk. You should only do it if you have means of recovery in the case
of an error. I wouldn't rely on the boot block method, and I would certainly not
do the so-called hot swap method. What I can recommend is an independent flash
tool. That needn't be an industrial strength professional device. All you need
is another PC with an ISA slot and the c't
jumpstarter. Amusingly the part is known as c't flasher in Germany... ;-)
So much for now on BIOS modding. If you have any comments, or if you can give
me hints and advice, feel free to drop me a line. Thanks,
Martin