Stage 1: Mixing a Flesh Tone
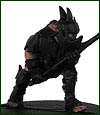
The Goblins have no set skin tone and, if you look at the models and film stills of the Goblins featured throughout the manual, you will notice a wide variation of colours. For this particular model put a small amount of Scorched Brown onto a palette then take a roughly equal amount of Dwarf Flesh and mix the two together with an old brush. Paint this mix onto all of the flesh areas such as the legs, arms, toes, ears and face
Stage 2
Next paint the spear staff with Scorched Brown.
Stage 3
Now paint over the cloth areas with an undercoat of Skull White. These will be painted a different colour in the next stage, but some colours appear dull in tone if painted straight onto a black undercoat. You should take some care at this stage to avoid overlapping the white undercoat onto the skin sections you have already painted. Try to leave a very thin outline of the Chaos Black undercoat as a divider between the two colours. This will help prevent overlapping, and will also make the different colours stand out against each other.

Stage 4
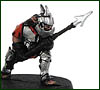
Once the undercoat has dried, all of the cloth sections of the model can now painted with Blood Red.
Stage 5
Now paint the metal parts of the model, such as the armour and the spear tip, with Chainmail. You could drybrush the armour or you could try a technique known as an armour wash. To do this, paint the model’s armour with Chainmail as you would do any other section of the figure. Once this has dried, clean your brush and dip it into Black Ink. You do not want an excessive amount of ink on your brush. If a drop appears at the tip of your brush, then you have too much and should wipe off the excess.
Now paint over the metal sections that you want to give an armour wash to. The ink will run into any recesses creating a shaded effect and make the armour appear worn and tarnished. Take care not to overlap the wash onto any sections you have already painted.
You are now ready to base your model.