![]()
Silvertone 1483
I bought this amp off of e-bay for use as a bass amp. It was a wreck, and looked like it spent some time in a flood! All the tubes were covered in dirt, the chassis was completely bent out of shape, and the front plate was rusted pretty bad. The cabinet was totally destroyed too!
The first thing that I did was to remove all the tubes and clean them. To my amazement, the tubes all tested OK! These were all original Silvertone tubes. The chassis was then stripped of all sockets. I had to drill out the brass rivets that Sears used to hold the sockets to the chassis, and then strip the sockets of all the components. I removed the transformers, and cleaned the rust off of them with a wire buffing wheel. The front plate was cleaned with steel wool, and was straightened between two pieces of plywood in a vise. The transformers were then spray painted with polyurethane, as was the front plate, and allowed to dry. I straightened the chassis between two pieces of plywood, and then the remaining dents were hammered out by placing a piece of plywood over the dent, and the dent on a piece of ply in the vise, and then hammering on the top piece of ply. The control pots were all dirty too, so I sprayed them good with contact cleaner, and worked them back and forth until they turned smoothly.
Once the chassis was straight, and the transformers were dry, I put it all together again! The sockets and terminal strips were re-riveted to the chassis with aluminum pop-rivets, and then the front plate was re-attached to the control panel when the switches and jacks were put back in. The knobs were cleaned in soapy water with a tooth brush, and were dried and put back on the amp. I then started the grueling task of re-wiring this sucker!
This thing is all point to point wired, nothing new to me, since all of the amps I've built are point to point, but it's still a little time consuming. For point to point wiring, you need a good set of long nosed pliers to hold the components in place when you're soldering, or you'll get burnt fingers! I accidentally stuck the soldering iron in my finger over the course of re-wiring this one! Ouch! I did get it re-wired, after a few days of sweating in the garage in the July heat. I got it in the house, plugged it in to my speaker cabinet, and it made a terrible noise, and the controls for one set of jacks controlled the other jacks! The OT leads were switched, two coupling caps were switched, and a wire was replaced with a shielded wire, and now it works, correctly!
UPDATE!
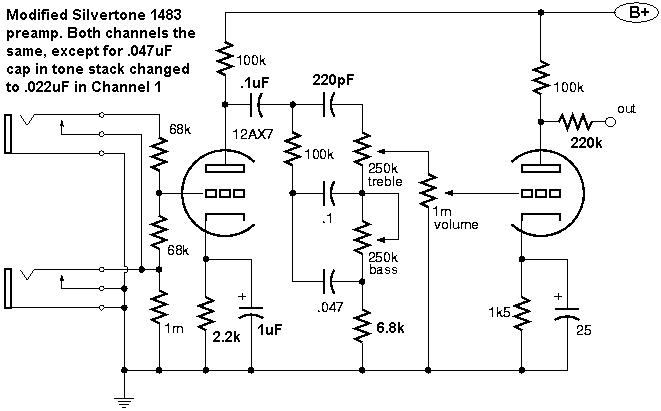
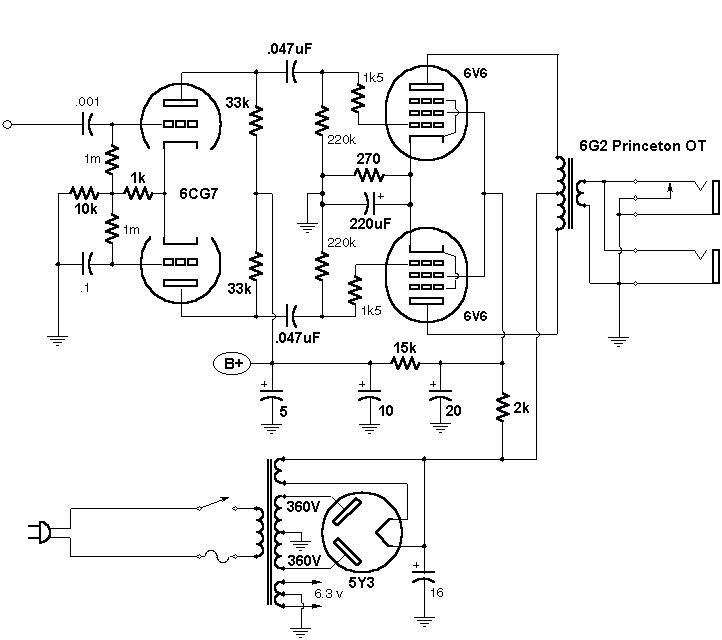
I've rewired the amp, and replaced the OT with a Princeton OT from New Sensor. The original was making a weird noise, so out it went. The only OT I had that would fit in the original holes was the one for a Princeton. I can and have used both 6V6's and 6L6's in this amp at full tilt with no ill effects. The 6V6's are pushing around 12 watts or so, and the 6L6's get closer to 30 watts. I also re-designed the phase-inverter. It had a split-load PI with a 6CG7 after it to boost the signal a little. I changed the 6CG7 to a long-tailed pair PI, and eliminated the split-load PI. The tone controls were changed from the original Silvertone layout to Fender style tone stacks. Channel one has the blackface Super Reverb tone stack, channel two has the blackface Bassman stack. I like it!
Here's a schematic of the modified Silvertone 1483 preamp, and another schematic of the power amp.
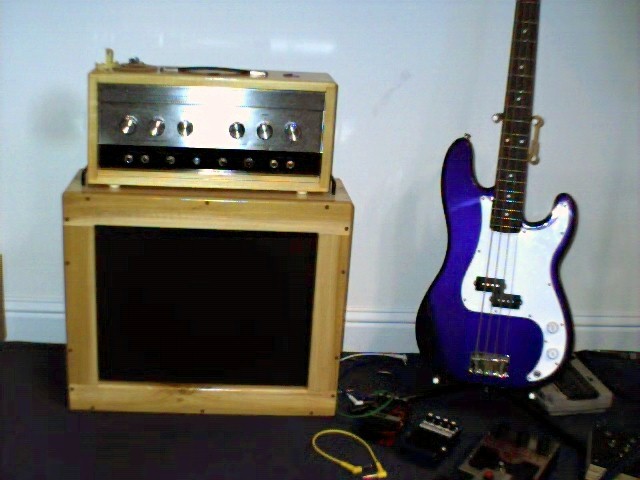
I just bought a great piece of poplar to make a new cabinet out of. The new cabinet will measure 18.5" wide, 8.5" tall, and 6" deep. Not very big for a two channel head! It should be light weight too.
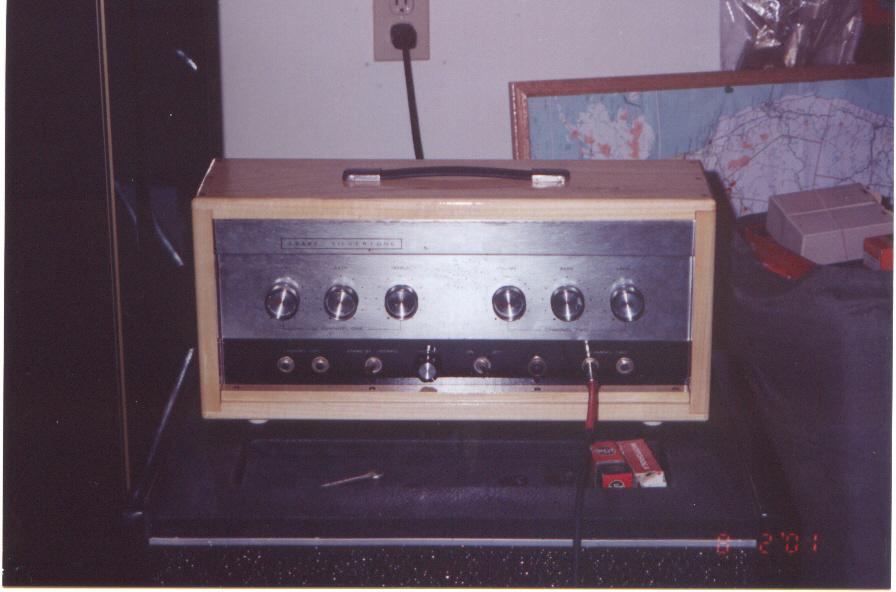
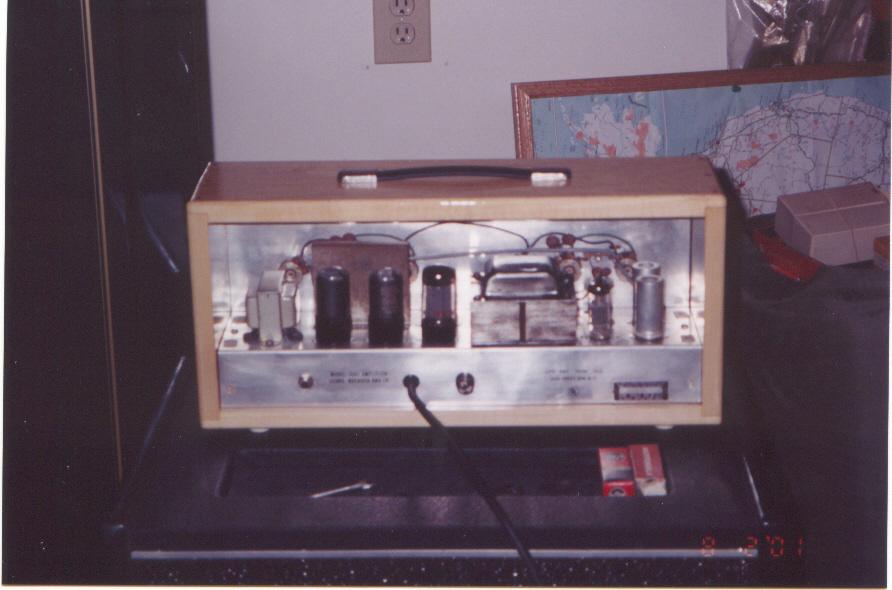
Here's a picture of the 1483 before being re-built. Here's the back:

and here's the front:

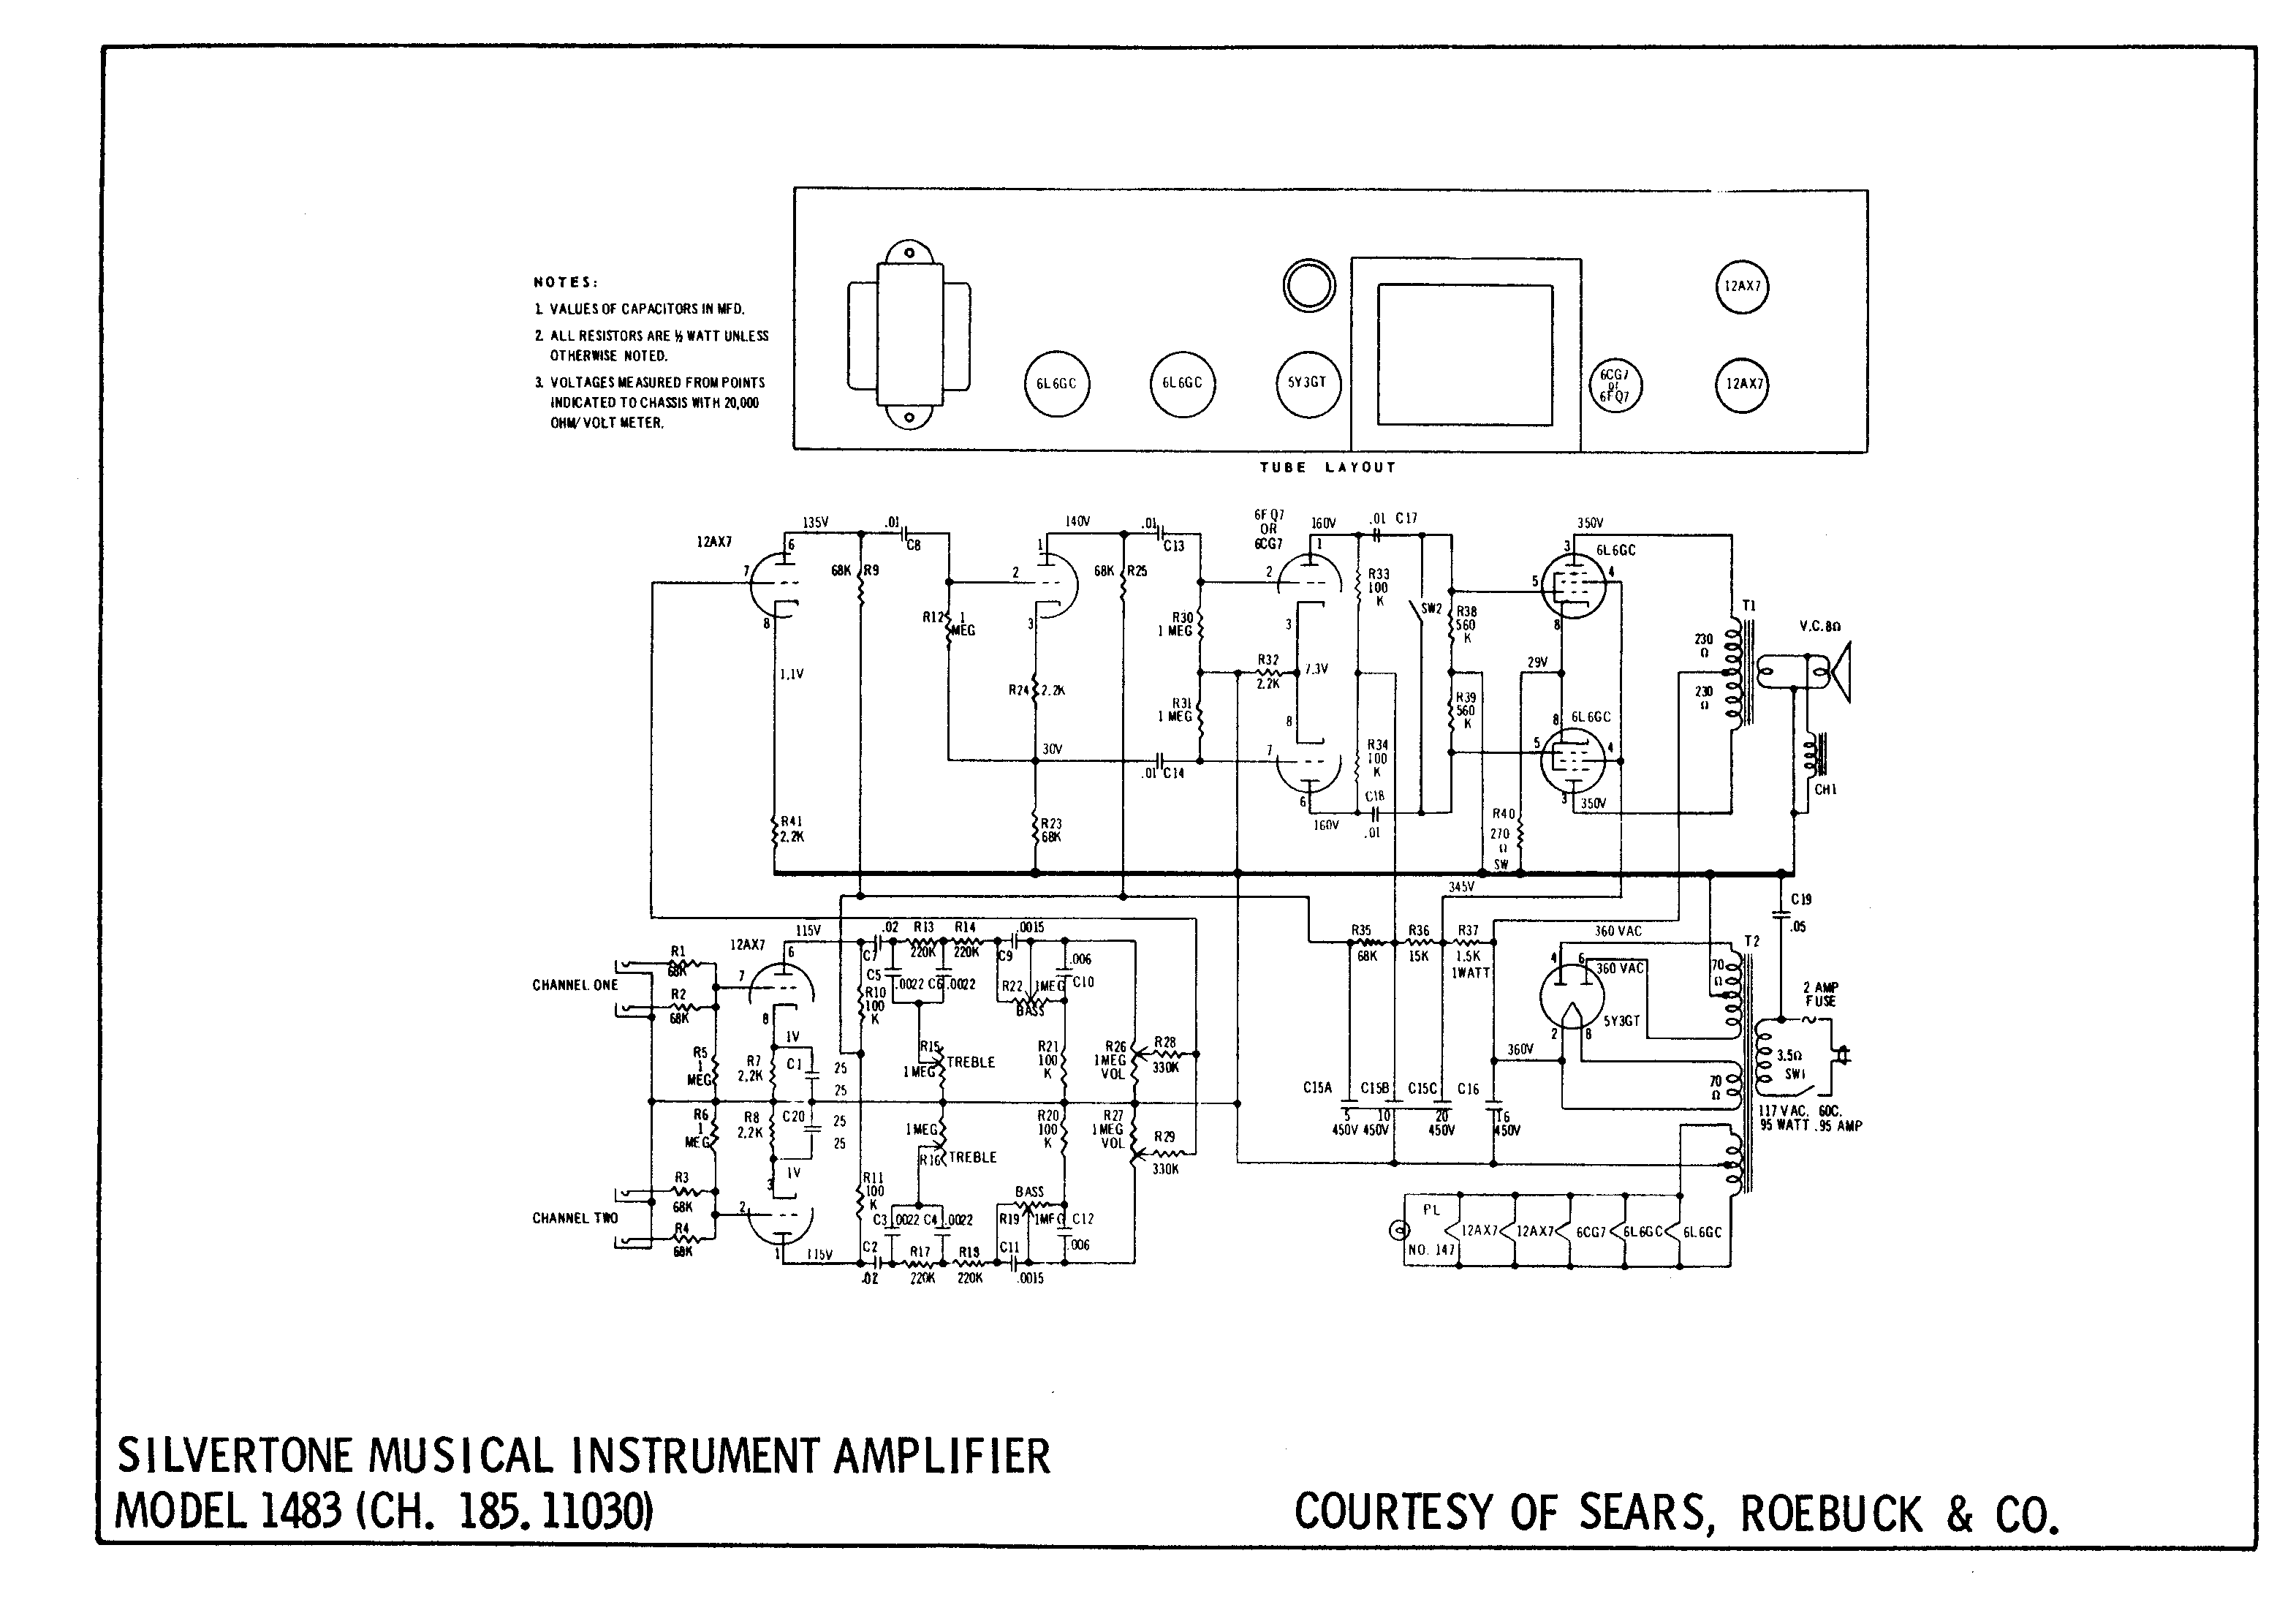
Here's a schematic of the stock Silvertone 1483.
UPDATE!
My dad and I are finished with that poplar cabinet! We didn't stain it, we just put about three thick coats of polyurethane on it, and that's it! It really looks great! The cabinet is nice and light, and the wood grain of that poplar is very nice. We put a strip of poplar on the front edge of the cabinet to cover that spot on the face plate where the paint came off, and there's a strip of wood behind the top edge of the face plate to keep the top from being pushed in. Here's a couple of pictures of the finished product!
Here's the front view:
And here's the back:
I've built a matching cabinet for it, housing a Weber C15CA "California" speaker. The 1483 head on it's new 15" cabinet:
UPDATE!
Here are a few sound samples I recorded. They were both recorded with the amp at 1/2 volume with 6V6 power tubes on channel 2 with a Shure 588SB mic about 4 inches from the grill at the top of a Leslie cab. I'm playing my Epiphone Del Rey guitar, bridge pickup (humbucker).
UPDATE!
I've sold this amp and cabinet, but I've kept the Weber VST "California" speaker and I'm using it in a new cabinet for my latest hi-gain project. I'm keeping this page up for your viewing pleasure for now, at least until I run out of web-space, in which case I'm afraid that this page will be terminated.