CCTV & DVR Port Forwarding Configurations
Basic
requirements & rules:
- Connect the DVR and ADSL router with RJ-45 (network cable).
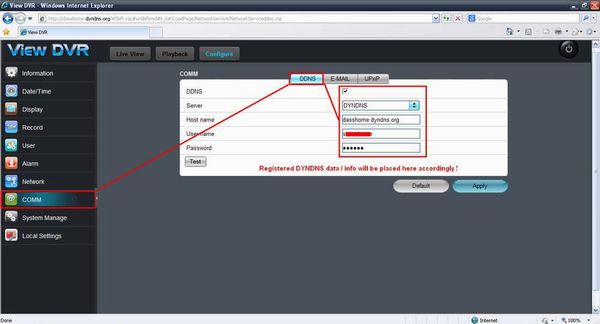
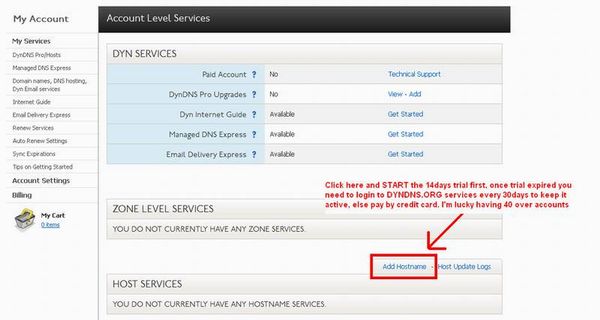
- DYNDNS registered URL (if not goto www.dyndns.org and register ones for
FREE).
- The Dyndns.org URL is needed to be keyed in your DVR and router as well
fo authentication (refer DVR manual).
- The standard DNS for DVR is 202.188.0.133 (TMNet Streamyx Primary DNS
Trigger).
- Else
Google DNS 8.8.8.8 or 8.8.4.4 can be used
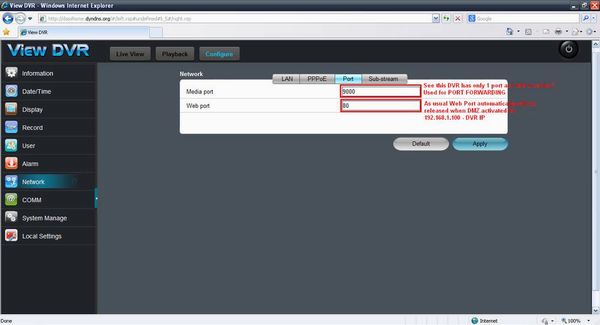
- PORT 80
is standard "Open & Available" port in the router, therefore DVR's using
PORT 80 is easy to setup.
- By default, the ADSL router's UPNP is unchanged, leave it as it is, do
not change!.
- Enable DMZ (Dematerialized Zone) mode in the modem and key in DVR IP.
- Do not change the DVR PORTS unnecessarily unless have conflicts with
device!
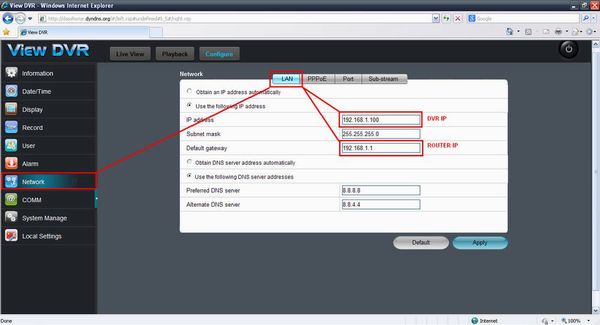
- Make
sure the DVR has same IP format with router (change using DVR Remote control
supplied), example;
a.
if Router 192.168.1.1 then DVR should be 192.168.1.100
b.
if Router 10.0.0.1 then DVR should be 10.0.0.100
c.
if Router 192.168.0.1 the DVR should be 192.168.0.100
SCROLL BELOW FOR COMMON ROUTER SETUP GUIDES
& FOR DVR GUIDES SCROLL TOBOTTOM !
Linksys
ADSL Routers
Step 1
- Open Internet Explorer and at address bar type 192.168.1.1
- Fill in Username & Password (default: Username: admin Password:
password)
- Click "OK" to login
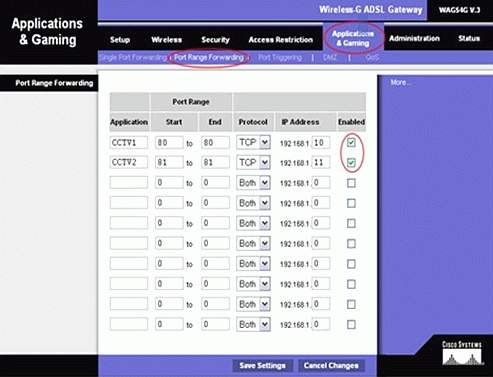
Step 2
- Select "Applications & Gaming" tab
- Click "Port Range Forwarding"
- Fill in application name. (eg: CCTV)
- Key in your port number into the Start and End columns : Protocol keep
setting as TCP.
- IP Address (Your CCTV Server or IP camera's IP Address) : Tick "Enable".
- Click "Save Settings".
Step 3
- Save the settings and Reboot router
(Please see in the DVR menu for the available PORT stated as
default, key in the PORT menu as in the DVR itself, eg. PORT 80, 5050 or
9090 (Depends on the DVR model)
Aztech
ADSL Routers
Step 1
- Open Internet Explorer and at address bar type 192.168.1.1
- Fill in Username & Password (default: Username: admin Password: admin)
- Click "OK" to login
Step 2
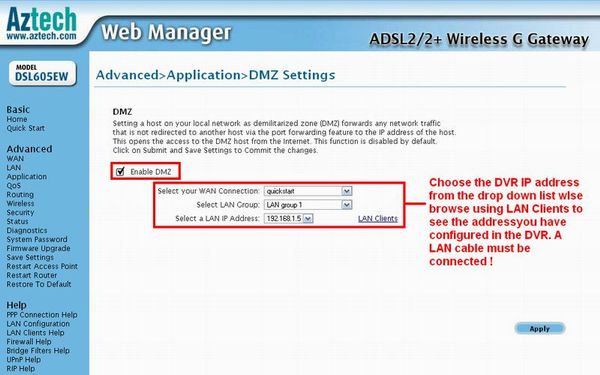
- Click the "Advanced" tab
- Select "LAN Clients" tab
Step 3
- New IP Address -> Your CCTV Server or IP Camera's IP Address : Hostname
-> CCTV
- After key in both, click "Apply" below
- After click Apply, you will see your rules on the list below : Select
"Port Forwarding" on the left panel
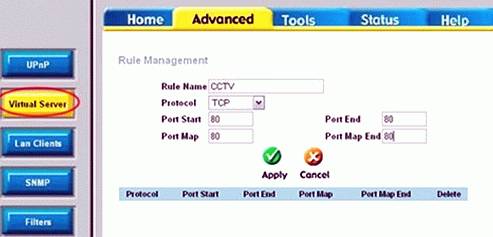
Step 4
- Rule Name -> CCTV
- Protocol -> Keep setting as TCP
- Key in your port into Port Start, Port End and Port Map. : Click "Apply"
to confirm the port entry
- If done entry the port, please go back by select "Port Forwarding"
Step 5
- Ensure that the LAN IP is the CCTV Server or IP Camera's IP Address you
added before.
- Select "User", highlight "CCTV" ,then click "Add". You'll see the "CCTV"
go to "Applied Rules".
- Click "Apply" to confirm the rules.
Step 6
- Save the settings and Reboot router
DLink
ADSL Routers
Step
1
- Open Internet Explorer and at address bar type 192.168.0.1
- Fill in Username & Password (default: Username: admin Password: blank)
- Click "OK" to login
Step 2
- Click "Advanced" on the upper tab
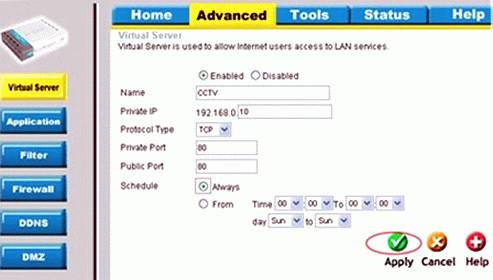
- Select "Virtual Server" on the left panel
Step 3
- Check "Enabled" check box
- Name -> CCTV
- Private IP -> Your CCTV Server or IP Camera's IP Address : Keep Protocol
Type setting as TCP
- Private Port -> 80 (Your CCTV server or IP Camera's port) : Public Port
-> (same as Private Port)
- Schedule -> chekced "Always"
- Click "Apply"
Step 4
- Rule Name -> CCTV
- Protocol -> Keep setting as TCP
- Key in your port into Port Start, Port End and Port Map. : Click "Apply"
to confirm the port entry
- If done entry the port, please go back by select "Port Forwarding"
Step 5 (Other DLink similar models, use this steps, if not SKIP)
- Go to Virtual Server by click "Virtual Server" on left panel : Select
"User", then select "Add"
- Rule Name -> CCTV
- Keep Protocol setting as TCP
- Port Start -> 80 (Your CCTV server or IP Camera's port)
- Port End, Port Map, and Port Map End are the same as POrt Start : Click
"Apply" to confirm the rules
- Click "Virtual Server" to go back
Step 6 (Other DLink similar models, use this steps, if not SKIP)
- Ensure that "LAN IP" is your CCTV server or IP Camera's IP Address. :
Select "User"
- Highlight "CCTV", and then click "Add"
- The CCTV rule will go to "Applied Rules"
- Click "Apply" to confirm the setting
Step 7
- Click "Tools" on the upper tab
- Select "System" on the left panel
- Click "Save and Reboot" button
- After settings router, need to be click "Save and Reboot" button to save
the settings
Step 8
- Save the settings and Reboot router
Belkin
ADSL Routers
Step 1
- Open Internet Explorer and at address bar type 192.168.1.1
- Fill in Username & Password (default: Username: admin Password: admin)
- Click "OK" to login
Step 2
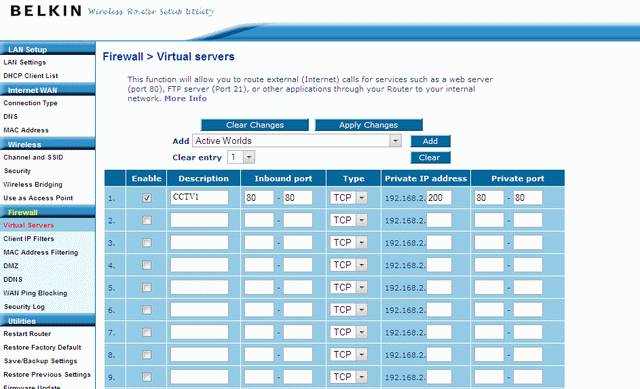
- Click "Virtual Servers" tab (Its at the FIREWALL category)
- Fill the "Description" -> CCTV
- Fill the "Inbound Port" -> The DVR's assigned PORT address accordingly
- Fill the "Type" -> TCP/UDP (if TCP/UDP not available, just select TCP)
- Fill the "Private IP Address" -> The DVR's assigned IP address
accordingly
- Fill the "Private Port" -> The DVR's assigned PORT address accordingly
(Same as Inbound Port)
- Click "Apply Changes" to save the category settings
Step 3
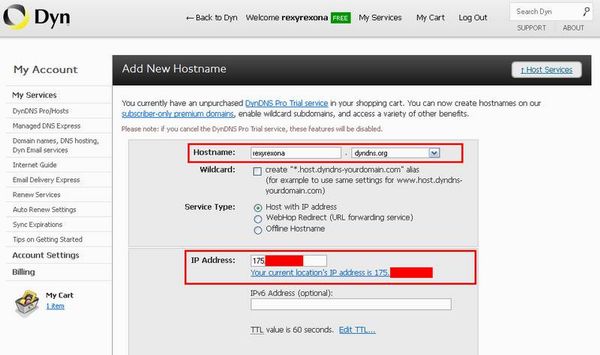
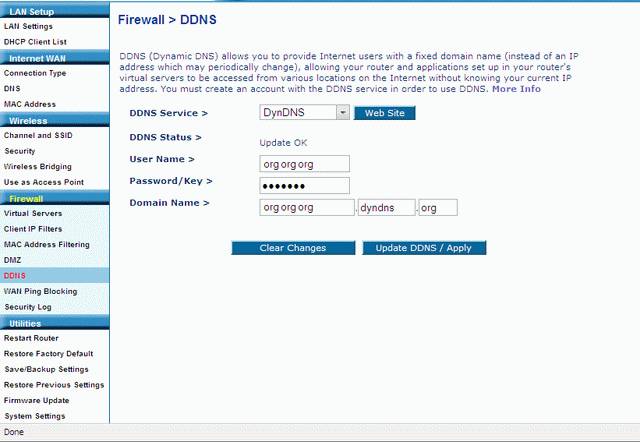
- Click "DDNS" tab (Its at the FIREWALL category)
- Fill in the DYNDNS information as registered in the www.dyndns.org (eg.
username, URL and password)
- Click "Update DDNS/Apply" to save the settings
Step 4
- Click "Save/Backup Settings" (Under Utilities category) and save the
router settings
- Click "Restart Router" (Under Utilities category) to restart and take
changes effect
ZyXEL ADSL
Routers
Step 1
- Open Internet Explorer and at address bar type 192.168.0.1
- Fill in Username & Password (default: Username: admin Password: 1234)
- Click "OK" to login
Step 2
- Click "Advanced" on the upper tab
- Select "NAT" tab on the left panel
Step 3
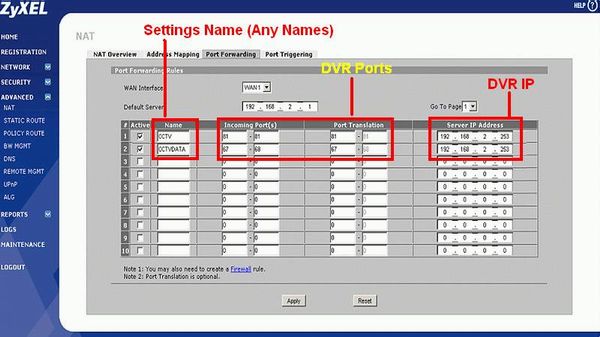
- Click the "Port Forwarding" tab on the screen.
- Name -> CCTV
- Incoming Port(s) -> Your CCTV Port number(s)
- Tanslation Port(s) -> Your CCTV Port number(s) -> This should be same as
above
- "Server IP Address" will be the DVR's assigned IP address
- Click "Apply" to save the settings
Step 4
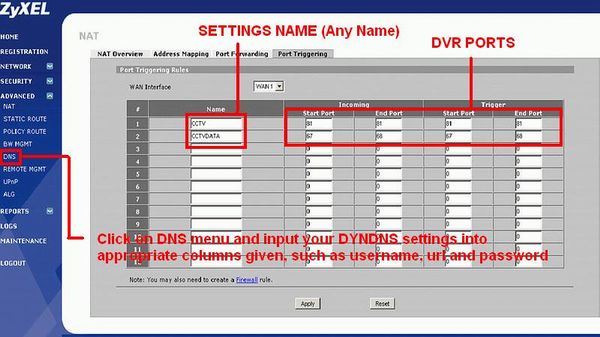
- Click the "Port Triggering" tab on the screen.
- Name -> CCTV
- Incoming -> Your CCTV Port number(s) Same PORT for Start and End field
- Trigger -> Your CCTV Port number(s) Same PORT for Start and End field
- Click "Apply" to save the settings
Step 5
- Go to "DNS" tab on the left and click it
- Fill in the DYNDNS information as registered in the www.dyndns.org (eg.
username, URL and password)
- Click "Apply" to save the settings
Step 6
- Save the settings and Reboot router
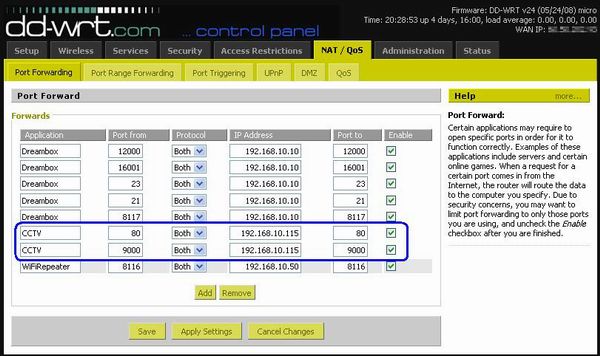
DD-WRT
Screenshots
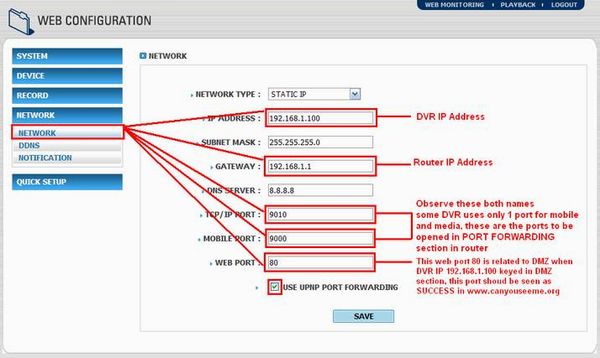
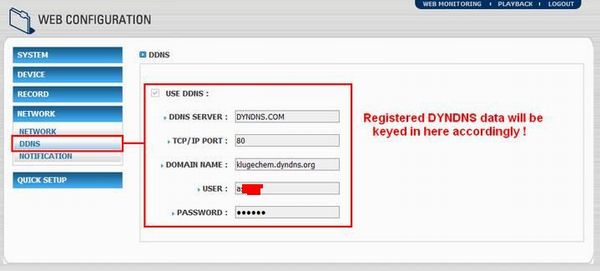
Korean STL Series DVR systems
Additional
important note to be kept in mind
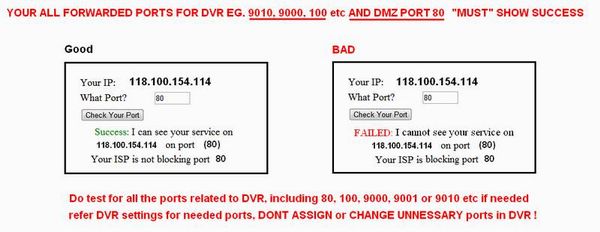
The DVR system must be up and running active in order to be seen in
www.canuseeme.org
DYNDNS registered URLs will only work on the computer systems which is on
the other network / internet, and not on the same network / internet
|