Converting Audio Cassettes into Audio CDs
Checklist:
Before we proceed make sure that you have these things.
1.
Audio Cassette Player with Audio Out jack.
2.
A Stereo Cable with 1/8’’ Male Stereo Pins at both the
ends.
3.
A Computer equipped with a Sound Card with Line-in jack
and also a CD-Writer Drive.
4.
Audio Editing Software.
5.
Wav to MP3 Converting Software.
6.
CD Writing Software.
Step 1: Connecting the Cassette Player to the Computer.
To connect your Audio Cassette
Player to your computer sound card, you will need one of the cables shown in
the photo below. The cable can be purchased at an electronics store (e.g.,
Radio Shack) or a merchant that supplies home entertainment products.
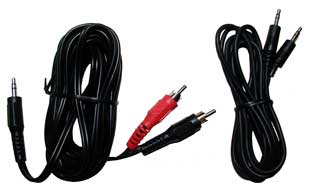
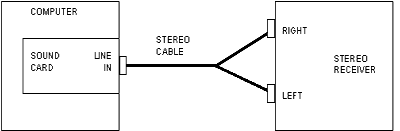
For a Player with Stereo Output, you
will need a 3.5 mm stereo plug to 2 RCA plugs cable shown on the left of the
above photo. The RCA plugs connect to the audio output jacks of the Player and
the mini plug end connects to the Line In jack of the computer sound card, as
shown in the figure below.
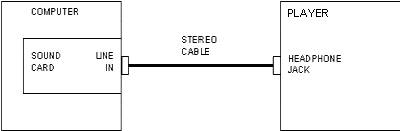
For an ordinary Player with a
headphone jack, you will need a 3.5 mm stereo plug to 3.5 mm stereo plug shown
on the right of the above photo. Place the Player at low volume and connect one
end to the radio headphone jack and the other end to the Line In jack of the
computer sound card, as shown in the figure below.
Step 2: Setting the Recording Settings in Windows.
![]()
Double-click on the Speaker Icon on the Taskbar.
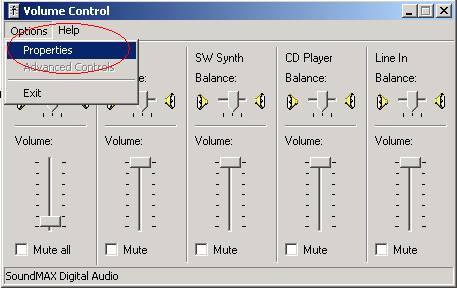
Click on Options à Properties.
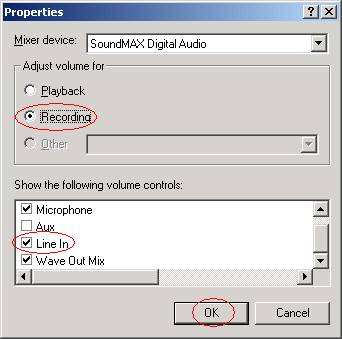
Select Recording. Check mark Line In and click on Ok.
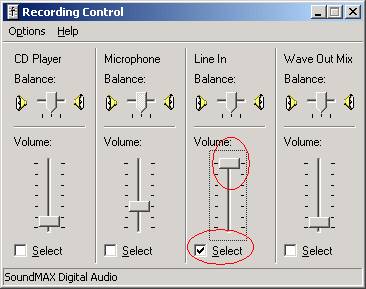
Select Line-In as the source of Recording, make the volume level high.

Click on Options à Exit to close the Volume Control.
Step 3: Recording the Songs from the Cassettes.
Software used: Audacity 1.0.0
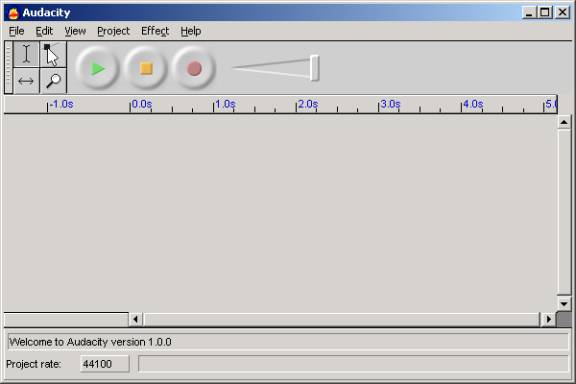
Software is Free of Cost and available for download at http://audacity.sourceforge.net/
Initial Settings in Audacity
- Click
on File à
Preferences.
- Place
a checkmark for Record in Stereo.
- Click
on Sample Rates tab.
- Select
44100.
- Click
on File Formats tab.
- Select
WAV.
- Click
on Ok.
Adjusting Recording Volume
Before we start the actual
recording, it is better to first adjust the recording volume for better
results.
For this we have to follow a Trial
and Error Method.
Play the Cassette so that it plays
at the middle of the cassette; press the Recording button on Audacity.
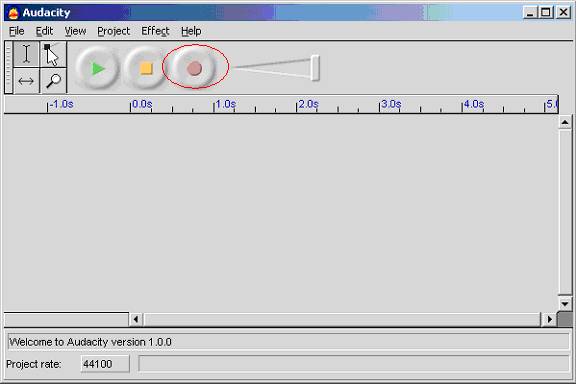
The Recording will start, continue
Recording for some time. Stop the Recording using the Recording button.
Click the Play Button and check if
the Recording Volume is Ok, if not change the Recording volume by changing the
volume on the Cassette Player.
Try the Recording again and repeat
this trial and error method, till you set the correct Recording Volume.
Recording the Audio Cassette into the computer
After setting the Recording Volume,
we can start the original recording.
Rewind the Cassette.
Click on the Record button in Audacity;
press the play button on the Cassette Player.
Allow the initial Silence to be
recorded. This will be useful for performing Noise Reduction for the Recorded
Audio.
Record the whole side of the Audio
Cassette. Save the Wav file with appropriate name to any location on the Hard
Disk.
Perform the same for the other
cassette.
Noise Reduction
This is the most complicated stage
in our conversion process. Audacity makes Noise Reduction very easy.
Open the Wav file for which the
Noise Reduction is to be done.
We can follow these steps to
perform Noise Reduction on Audacity.
Step 1: Selecting the Noise Region.
The place where we can find the
Noise is the portion where the initial Silence is recorded.
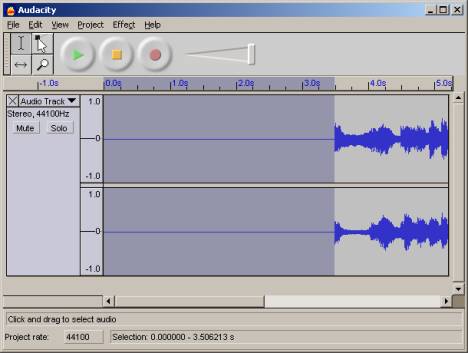
Select the Initial Silence Region.
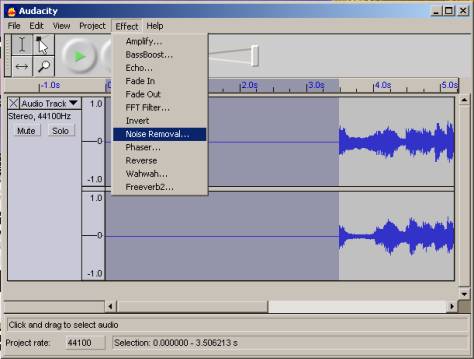
Click on Effect à Noise Removal.

Click on Get Noise Profile and click on Close.
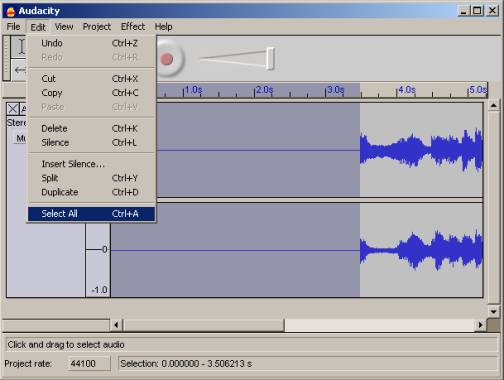
Click on Edit à Select All.
Again click on Effects à Noise Removal.
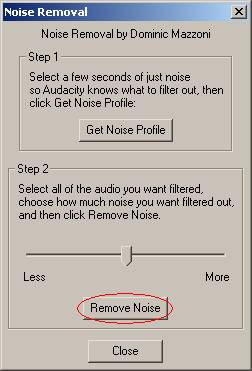
Click on Remove Noise button. The Noise Reduction process will start and end. Save the file.
Splitting the Recorded Audio into Individual Songs.
The next process is to split the
Recorded Audio into separate Songs. This is much easier.
Open the Recorded Audio in
Audacity. Select the Region of a Song. Click Edit à Copy.
Click on File à Export Selection as Wav and
Save the file into the desired location.
Perform the same for other songs.
Step 4: Converting Wav into MP3
You can make Audio CDs from Wav Files,
however if you would like make MP3 Discs and want to save space on the Hard
disk, you can convert the Wav files into MP3 Discs.
A Normal Wav Audio for 5 Minutes
duration occupies approx. 60-70 MB of Hard disk Space.
A Standard MP3 Audio for 5 Minutes
duration occupies approx. 4-5 MB of Hard disk Space.
We can use Music Match Jukebox for
this purpose.
Open Music Match Jukebox and click
on File à Convert Files.
Follow the onscreen instructions.
Step 5: Burning Audio CDs
Please follow the steps on the following link to burn a Audio CD from the Recorded Wav or MP3 files.
http://h20015.www2.hp.com/en/document.jhtml?lc=en&docName=bph07160
After burning your old Cassettes to
new CDs. Enjoy your old Music in your new computer or new your CD Player.
Enjoyyyyyyyyyyy !!!!!!!!!!!!!!!!!!!!!!!!!!!!!!!!