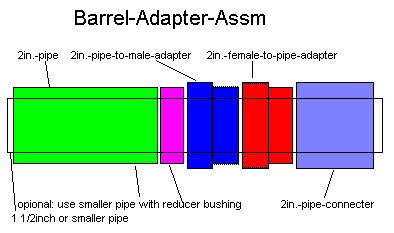
This is the Barrel Adapter assembly.
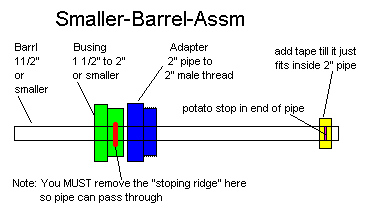
I made my gun with a 2" barrel with the intention of having the option to add other barrel sizes. I have a 2" coupler on the end of the barrel with a female adapter that I can attach other barrels to. The smaller barrel go down inside the 2" barrel to about 2" for the stopper. I also put a stop in the smaller barrels by drilling a small hole into the pipe and across and out the other side. I the treaded it for 1/4-20 all thread. Then I installed the all thread through and out the other side. i added glue to the threads and screwed the rod in till the glue was in the threads on the pipe. I let the glue dry and then cut the rod off flush with the outside of the pipe on both sides. At this point I wrapped electrical tape around the pipe covering the all thread. I kept wrapping the tape till it would just fit inside the 2" the barrel to help keep the smaller barrel centered in the larger pipe and to help direct the compressed air into the smaller barrel insted of some of it going into the space between the two barrels.
When making a smaller barrel the "downsizing" bushing must have the stop ring removed from the inside of the bushing so the pipe will pass all the way through the bushing.
Larger barrels obviously will not go into the 2" barrel so they just attach with a male adapter and a bell adapter onto the end of the guns 2" barrel.
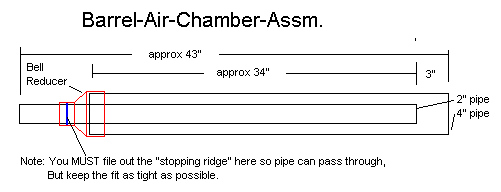
Here is the Barrel Are Chamber assembly.
Notice that the 2" barrel stops 3" short of the 4" compression chamber not the end of the clean out(not shown here) this diminutions came from the design of the first piston assm that I had to change. It works well with the new design piston. I recommend that the piston be able to move back from the barrel the same distance that the barrel is round.(ex. with a 2" barrel the piston should move back 2" to allow max. airflow into the barrel.) Take into account that the piston will move into the clean out till it hits the "bumper" inside when figuring piston movement.
You must remove the stopping ridge in the bell reducer to slide the pipe through.
I do not recommend putting a potato stop in the 2" barrel . An air leak here would be very hard to fix and there is a small possibility that it could cause the gun to fire unexpectedly.
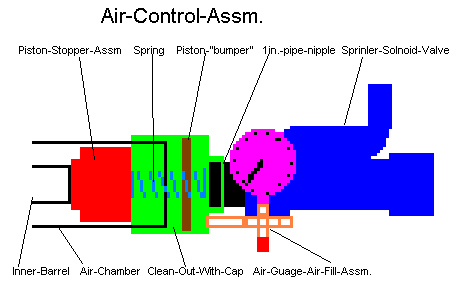
Here is a picture of the business end of my Air Cannon.
The purpose of the Piston-bumper is to keep the piston assembly from
slamming into the clean out cap and breaking the cap or maybe even blowing
it clean off! I made mine out of a piece of 1/4" ID. vacuum hose with a
smaller piece of vacuum hose stuck in both ends to keep it together. You
could cut a disk of the correct size out of some soft material of some
kind, I used the hose because it was handy. DO NOT glue this in place in
case you have to remove the piston for some reason. (ex. cleaning, fix
air leak,something stuck in barrel)
See the Piston-Stopper-Assm picture for details about construction of the piston.
The spring was a leftover from the solenoid off a chevy starter I once replace and kept the spring.( I thought it might come in handy some day!) I had to stretch it to give it the right length I needed.
Note that a strong spring is not needed here because the piston assembly moves very freely.
The Sprinkler solenoid Valve is attached to the clean out cap with the shortest 1" pipe nipple I could find (about 1 1/2" long). I drilled a hole in the center of the cap the correct size to tap a 1" NPT hole. (actually I did not have the correct drill needed so I used the largest I had and the used a large reamer on the plastic to get it close to the correct size, then I easily used the tap to make the threads.)
I then did a trial fit of the pipe nipple and valve to find where I needed to put the Air Gauge/Air Fill Assembly. I removed the valve and pipe, then drilled and taped the 1/8" NPT hole. (see the Clean out Cap Drilling Picture)
The actual assembly was a bit of a trick to figure out just how to screw all the parts into the cap. I don't remember just how I did it but I think I placed the 1/8npt hole over to the side just enough so that when the small brass tubing parts where installed I could still screw on the valve. Just be sure to "think ahead" before drilling the small hole in this part of making the gun.
On my gun the end of the barrel sits 3" inside the end of the large pipe used as the air chamber.
NOTE that this is 3" from the end of the pipe NOT the attached clean out. I came up with the 3" from the design of my first piston assembly (which started to bind shortly after construction do to the large pipe slowly becoming "out of round") Also it is good to know that the piston assm. can be installed AFTER the clean out is attached. (this is good, do to the fact that I had to redesign the piston assembly.)
Safety Note:
Not shown on the valve is a manual pressure relief lever.
I used this to test my gun before I had made the handles or added the
electronics (wiring and switches) to check for air leaks.
Once I had the bugs worked out I use electrical tape to keep this in
place and from firing the gun unexpectedly (very dangerous!)
Never Forget:
SAFETY FIRST !!
The Air psi. gauge was removed from a portable air tank that I installed on a truck and changed to a liquid-filled gauge. This one is a 0 to 160 psi non-liquid-filled type.(read not expensive)
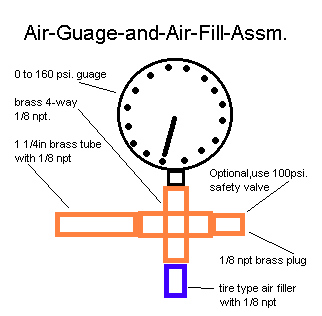
This is what I call the Air Gauge and Air Fill Assembly.
It is all pretty self-explanatory.
The only thing I might add it that you can save a few buck by using
a "T" insted of the 4-way like I did.
 Note that I no longer recommend using this type of cap in a hi-press. air
cannon.
Note that I no longer recommend using this type of cap in a hi-press. air
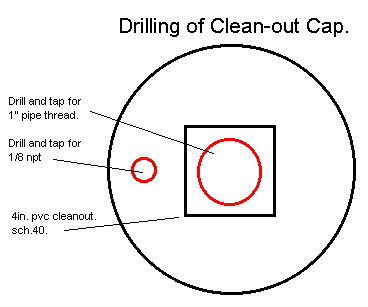
cannon.This is the clean out cap,viewed from the top.
The large hole in the center is tapped for a 1" pipe nipple. This is where I attached the Solenoid Valve. The small hole is tapped for a 1/8" npt. This is where I attached the Air Gauge Air Fill assembly.
Sorry, but there is no exact placement of the 1/8 npt hole. Just place it where it will work best with what you have to work with. I think mine just did scrape the inside wall of the threads.
You can get a clean out cap made of pvc. or brass. I used pvc, so far with no problems.

Important update 8-3-'98
Because of a weakness found in using the threaded caps to hold the solenoid valves. I have redesigned this part of the gun.
I think have found a fix for
the problem of the 4" clean out cap's cracking or exploding using off the
shelf parts. What I did was to get a 4" threaded male adapter to screw
into the clean out or female threaded adapter , into this I glued a 4"
X 2" adapter bushing. into the adapter bushing I glued a 2" <slip fit>
X 1" threaded bushing. Now I can screw a 1" steel nipple into this and
attach my valve as usual. This adds a little more air volume to the area
behind the piston , but it was easy to make and get the parts. and should
work well and not blow out. Patrick
Parsons.
Another update. 7-15-'98
Last night or was it early this
morning?..... I drilled the end cap to accept a 1" threaded nipple to attach
my solenoid valve. This
time I tried something diff. I used a slightly longer nipple and drilled
it in the center to accept two 1/8 NPT. fittings.... the air fill valve
and the gauge. .the other cap cracked.... I am surprised it did not blow
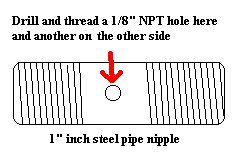
off! Below is a crud drawing of how I drilled the 1" steel
nipple to accept the Shrader Valve and Air Gauge. The nipple is used to
attach the solenoid valve to the air cannon. NOTE that you can drill
a 1/4" NPT hole for the air gauge if the gauge you use has a larger thread.
Use the shortest nipple that will work with the parts you have. I think
the one I used was 2" long, it was a tight fit, but it all when together
nicely.
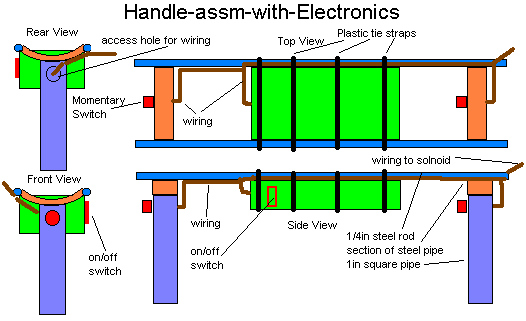
Here is a picture of the Handle assembly with the Electronics installed.
You will notice that the battery box is held in place by 4 plastic tie straps. This was done because I have not yet fabricated a bracket or mount for it ,yet. The 4 straps do seam to be holding it quite well at this time. Take notice that I drilled through both sides of the handels to mount the "trigger" switches. I just mounted the switches and let the wires pass through the other side.
I wrapped all exposed wires with elec. tape. The wires that run along the rod between the handles were wrapped to the rod with more tape. Note: the wires MUST NOT be place in such a way that they will get cut by the large hose clamp that will be used to hold the whole thing on to the gun.(think ahead). The small piece of wire that sticks off the end of the assembly go's to the solenoid on the valve.
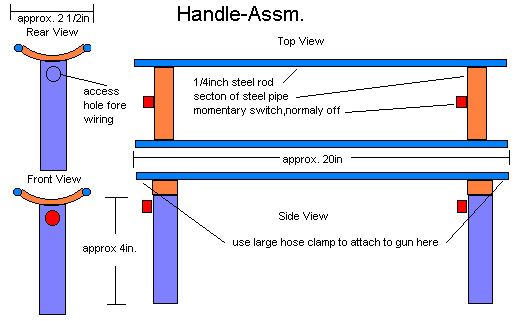
This is the Handle Assembly.
Once again this is self explanatory for the most part.The piece marked "section of steel pipe" was easily bent to fit. I wanted to make it out of a pipe that had an ID. that was the same as the OD. of the 4" pvc I used as the air chamber.I did not have any pipe the right size, but I did have some that was about 1" bigger, so I cut a "ring" 1" wide off the end of it. I put it in a vise and squeezed it till it was slightly egg shaped. From this I now had about a 2 1/2" section at each end of the ring that was almost a perfect match to the OD of my air chamber.
The handles were made from a scrap of 1" square tubing about 8" long with 1/16 inch wall, I cut this in half. Placing the handles 20" apart seemed to "feel" right to me.
The rods were cut from some old scrap parts off some forgotten project that was still laying around the shop gathering dust in a corner.
All parts were made of steel and welded together. I know not everyone has access to a welder and other shop equipment, but this may give you a good starting point for an idea of your own.
This is pretty self-explanatory for the most part.
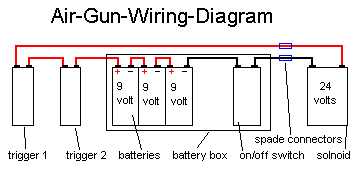
Note that the on/off rocker switch is mounted in the side of the battery box.The battery box is a small plastic box I found at Radio Shack. I took three 9-volt batteries rapped a few layers of tape around them(they will all be replaced at the same time)and used some velcro cloth(about 2" x 3/4") with sticky tape on the back side of both pieces. I stuck this to the batteries and the batteries to the inside of the box.
The battery box hides the batteries and gives the gun a cleaner look.Wrap all exposed wires with electrical tape and or cover with automotive wire loom (wire loom looks good and gives that HI-TECH look, oh yea it also helps protect the wires from damage)
Also at Radio Shack I found a 5 pack of the clips that go on the top of the batteries with about 5" of red and black wire on each for under 2 bucks.(very handy)