Binding Mounting
Proper consideration when mounting bindings on your snowboard can play a huge role in how both you and your board perform on the slopes. Always choose a binding based on it's attributes and how well they will work for you. Be sure to have one of your boots handy when purchasing bindings so that you can see just how compatible the two are together. Your boot should fit well in the binding both width and length wise, and the straps should easily be long enough to go over the boot. Of course if you are buying a compatible step-in binding, the system should naturally fit fine, leaving you only to decide on the binding model. Before mounting your bindings, there are several factors that you must first consider, but be aware that a rider's stance is very much a personal preference and may very well require some fine tuning over a period of time until the most comfortable position is acquired..
1) You must first decide if you ride regular(left foot forward) or goofy(right foot forward).If uncertain, there are a few ways to help you. If you've ever skateboarded before it is likely that the same stance will work for you when snowboarding. If you haven't, think about a few other things. When you go up a flight of stairs, which foot do you lead off with? If you were pushed from behind, which foot goes forward first? If you were playing baseball and had to slide into home plate, which foot would be out in front?
2) Placement of the bindings on the snowboard will depend much on the type of riding that you do. For example, a person that primarily freerides will want to have their stance set back on the board about 1.5" to provide ease of turn initiation. A pure freestyler that rides fakie or backwards a lot will prefer to be more centered on the board in order to freely board in both directions and for when landing jumps in the opposite direction. Those who board in powder will like their stance further back on the board for greater flotation. Keep in mind that, assuming you purchased a snowboard for your specific riding, generally the hole patterns will already be set up for your style.
3) You also need to decide how wide of a stance you want. The easiest way to do this is with the help of another, which tends to take away the element of over focusing. Stand beside the snowboard with your back to it and your heels near the side edge. Making sure not to look behind you, find the most comfortable stance position and have the other person place the bindings behind you on the board, close to the backs of your heels. You have now found a good stance width without over analizing the situation. Place only two screws diagonal from each other in each binding and turn them to the point where they just start to catch the insert threads. Only use two becuase you will most likely have to be moving them when evaluating boot overhang and thus will only have to remove two screws this way as opposed to four.
4) The next thing to do is figure out what binding angles you would like to use. This is decided by the type of riding you will be doing. Most freerdiers will like both binding angles positive to take advantage of better edge quickness. Generally, the rear angle would be between +6 to +18 degrees and the front angle between +21 to +33 degrees. Freestylers tend to prefer more neutral binding angles. A rear angle of between -6 to 0 degrees and a front of between 0 to 6 degrees is not uncommon. If an individual is more of an all-mountain type boarder, something along the lines of a -3 to +6 rear angle and 0 to +15 front will work fine. If you are unsure of the angles you would like to use, start off with a 0 degree rear angle and a +15 front and experiment on the slopes until you find what works best for you. Since you have barely started the binding screws, you can now change the angles by jiggling each binding up and down to achieve the desired angle of each. When located, moderately tighten the two screws of each binding.
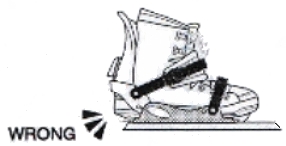
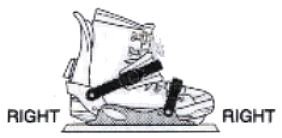
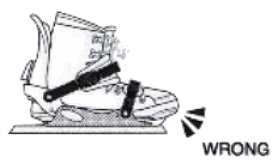
5) Now you must evaluate the toe and heel overhang of your boots in conjuction with the width of the snowboard. Place the boots in the bindings and tighten down the straps if applicable to pull the boots back in the heel cups of the bindings. Next, evaluate the overhang of both the toes and heels of the boots. Optimally, the toes should overhang equally with the heels. The preferable amount of overhang is 1/4" to 1/2" for both the toes and heels. If you have a little more than this do not worry. The amount of drag in the snow you may experience will depend greatly on the type of snow you are riding on and just how far you are actually getting on edge. Many people have slightly more than 1/2", but 1" is to be considered the maximum allowed.
6) Once you have determined the final placement of the bindings, it is time to place the remaining screws in the bindings and fully tighten all. Work diagonally and alternate in tightening the screws as if putting lug nuts back on a car wheel. It is very important not to overtighten the screws in order to avoid damaging the inserts or other board components. A good rule of thumb is to tighten the screws one half turn less than you could fully when using both hands. Signs of overtightening binding screws are bumps on the board base directly under the inserts, or dimples in the same areas. These signs would be due to either pushing the inserts through the board or pulling them from the board. If you ever have problems with the screws coming lose too often, simply apply some clear fingernail polish on the threads to retain a better bond.
7) Step into the bindings, evaluate your stance, and make any changes as necessary.