Tradescantia Propagation

This manual is for those employees assigned to propagate Tradescantia.
Roy Reynolds
Introduction
Tradescantia are a very important spring crop here, at
Reynolds Foliage and More. That is why
it is of utmost important that it is propagated in the most efficient way
possible to maximize the number of sellable plants produced and there quality. In this manual you will learn how to propagate
Tradescantia
through single node stem cuttings.
Definition of Process
Propagation is the process through which new plants are formed witch may be by sexual, through seeds or spores, or through asexual means, all other forms of propagation such as cuttings or divisions.
Single node stem cuttings are pieces of stem that contain a leaf node and sometimes a leaf along with a portion of the stem above and below the node.
Skills and Knowledge Needed
One most have a basic understanding of how Tradescantia grow in order to propagate them successfully. First, they are creeping plants that grow very fast. Next, the plant will branch readily when pinched and that these branches arise from the buds in front of where the leaves join the stem. Lastly, adventurous roots form quite readily on the stem directly below a leaf.
When propagating plants from cuttings it is important to remember three things:
· That the equipment and material being used are clean.
· That the plants are turgid and firm, not wilted.
· That the plants are insect and disease free.
One must recognize the fact that the pruners are sharp and one can easily be injured by them. Know where your fingers are at all times in relationship with the blade so you don’t cut your fingers.
Equipment and Materials Needed
Equipment
- sharp pruners
- black permanent marker
- hose connected to a water source
- watering wand connected to the hose
- wire brush
Materials
- 1206 cell pack
- 2 labels per species
- Pro-mix
- Greenshield solution
- Flat
- Stock plant
List of Steps
1. Sterilizing the Pruners
2. Pot Preparation and label making
3. Pre-treatment before taking cuttings
4. Taking the cuttings and sticking them
5. After sticking care and disposal of plant material not used
Analysis of Steps
1. Sterilize the Pruners
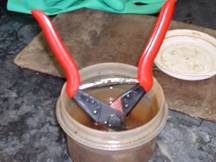
a) Sterilize the blade of the pruners by soaking them in a solution of Greenshield diluted to the instructions on the bottle. (Figure 1)
Caution: Greenshield
can irritate your skin. Wash it with soap and water if you come in contact with
it.
Figure 1
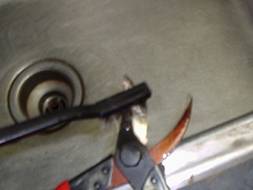
b) Take the pruners out of the solution and brush both sides from and back of blade to remove debris that may be on the blade. (Figure 2)
Warning: The blades of the pruners are sharp and you can be injured by them.
Figure 2
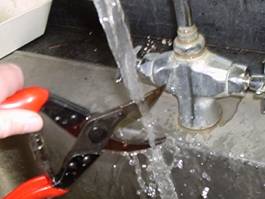
c) Run the blade of the pruner under hot water from the sink to remove the Greenshield. (Figure 3)
Figure 3
2. Pot Preparation and label making
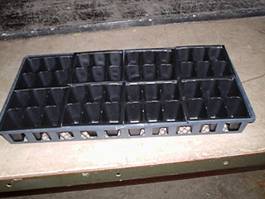
a) Put 1206 cell pack inside of a flat. (Figure 4)
Figure 4
b) Fill the cell pack with soil. (Figure 5)
Figure 5
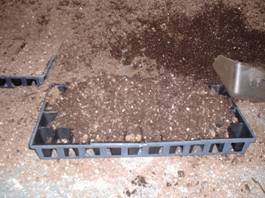
c) Brush off extra soil from the top of the pack. (Figures 6 & 7)
Figure 6
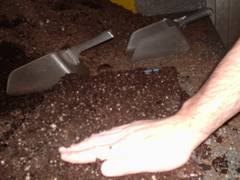
Figure 7
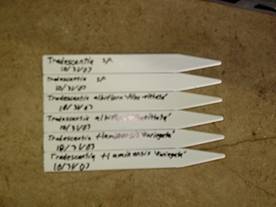
d) Write the botanic name given on the label in the stock plant container and the date on two labels per variety you are taking cuttings of. (Figure 8)
Figure 8
3. Pre-treatment before taking cuttings
a) Choose a Tradescantia from the stock plant house that appears healthy and has no distorted leaves or discoloration. (Figure 9)
Figure 9

b) Water it till water drains from the bottom then stop. Wait 5 minutes, then water again as previously. (Figure 10)
Figure 10

c) After 30 minutes, bring the stock plant to the propagation house for cuttings to be made.
4. Taking the cuttings and sticking them
a) Follow the stems back to the soil line and cut the stem from the plant 2 nodes above the soil line. (Figure 11)
Warning: The pruners
are sharp so keep track of where your fingers are to avoid cutting them.
Figure 11

b) Take single node cuttings by cutting the stem a quarter inch above where the leaf quits encircling the stem and a quarter inch below the swollen node where the leaf surrounds the stem. (Figures 12, 13, & 14)
Figure 12
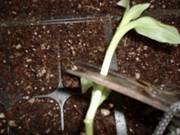
Figure 13

Figure 14

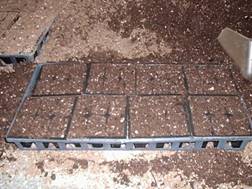
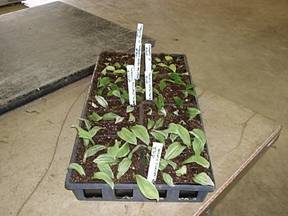
c) Insert two cuttings into each cell making sure that the right side is up and that the leaf does not get buried in the soil. (Figure 15)
Figure 15

5.
After
sticking care and disposal of plant material not used
a) Put one label in the cell pack at the beginning and one at the end of each variety. (Figure 16)
Figure 16
b) Put the cuttings on the propagation bench that has mist and bottom heat. (Figure 17)
Figure 17

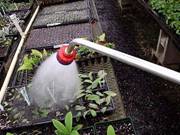
c) Carefully water the cell pack with the hose that has a water breaker on it to avoid splashing the soil and washing the cuttings out. Repeat after two minutes. (Figure 18)
Figure 18
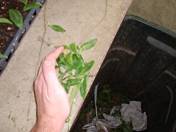
d) Dispose of the plant material cut of the plant in the compost bin. (Figure 19)
Figure 19
e) Put the stock plant back in the stock plant house where you found it.
Conclusion
You have now successfully taken and stuck cuttings of Tradescantia and have started them on there way of being a fantastic crop. In a week, they will be rooted and removed from the mist and grown for another week. After this time, three of the cell plants will be planted in a hanging basket for sell this spring.
Work Cited
Hartmen,
Practices.