General:
NOTE: This strat, like a couple of other really good and detailed strats, was written by Patch. I rewrote the WR part thingy, although he explains the essence of it in the good score strat anyway. Well then:
After B8 and A9, you just know that Expert is going to give you an even more
tortuous variation of the splitting squares floor. It's an ingenious floor
that requires good balancing and a steady thumb.
I want to finish consistently!
The floor itself is symmetrical so going left or right from the start makes no
difference if you want a consistent finish (ignoring bananas). This strat
deals with going right from the start. Reverse the directions if you're more
comfortable with the left. Let's call the direction you face at the start
north.
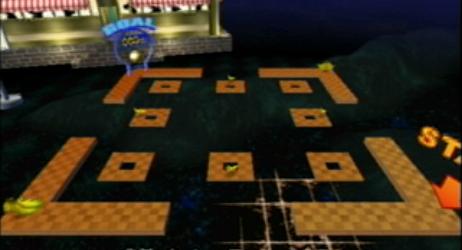
At the start there is a big doughnut shape in the middle of the level. Let's
call this Stage 1. This splits into 8 small doughnuts (call this Stage 2) each
of which then split into 8 small squares (Stage 3). There are also four
separate L-shape platforms at the boundaries of the moving squares, which form
a square shape. This means that to go from one L-shape to another, you must
travel on the moving squares. After Stage 3, the squares form back into
doughnuts (Stage 2) which then form back into the big doughnut (Stage 1) and so
on...
The squares all connect together briefly at the middle of the level (Stage 1)
only a few times during the 60 seconds. This is your best chance to get on a
doughnut destined for a different L-shape, and since the longer you spend on
the squares/doughnuts the more chance you have of falling off, you need to make
sure that you get on the correct doughnut the very first time.
Stage 3 is your only chance to leave an L-shape and whichever one you're on,
you'll have 7 small squares to choose from, 5 will be from the doughnut closest
to you and one each from the two adjacent doughnuts.
At the start, head north-east to the end of the L-shape's arm. Wait here until
Stage 3. Two small squares will arrive, one from the south doughnut and the
other from the south-east doughnut. You want to get on the one from the south
east doughnut i.e. the square furthest from you. The two squares join together
and to the L-shape briefly, so just calmly roll across the first square to the
second.
You are on the south square of the south-east doughnut. When the doughnut
reforms and before Stage 1 occurs, you must roll to the north square of this
doughnut. Go anticlockwise around the doughnut for this, picking up a banana.
When steering, you must also take into account that the doughnut will move
towards the middle of the level.
You are on the north square of the south-east doughnut. Now all the doughnuts
will join together into one big doughnut. This is your chance to roll onto a
doughnut destined for the goal platform. Remember that each L-platform is
'served' by three doughnuts. So for the goal platform, you can get on the
north-west, north or north-east doughnut. However you don't have enough time
to make it to the north-west doughnut (and it only has one square that docks
with the goal platform anyway). The north doughnut is risky to get to but has
5 squares that dock with the goal platform. The north-east doughnut is the
closest and therefore easiest to get on, but has only one square that docks
with the goal platform.
I find that the north-east doughnut is the easiest option. You may find the
north doughnut a better choice, so experiment with that.
Your aim is to get on the south square of the north-east doughnut. You'll find
that at Stage 1, this square is right next to you. In fact, it's just one
square diagonally north. Use the west square of the east doughnut to roll onto
it.
You are on the south square of the north-east doughnut. As the big doughnut
splits and before Stage 2, you need to get on the north square of the doughnut
you're on. I go clockwise around the doughnut for this, but either way will
do. Again, remember that the doughnut will move out from under you unless you
steer accordingly.
You are on the north square of the north-east doughnut. The doughnut will
split into squares and the square you're on will move north towards the goal
platform. Like at the beginning, yours and another square will join together
and with the L-shape. The other square is the east square of the north
doughnut. Use this to roll onto the L-shape.
Now remember to breathe again and simply roll into the goal, but don't relax
too much - the goal's placing sometimes causes you to bounce off a post and
fall off if you're not concentrating!
I want a good score!
First of all, you should be going to the right, not the left. There are banana
bunches either way, but the one on the right has a banana 'hidden' underneath
it, so you'll get an extra 100 points.
Wait at the start for a second or two. Call this direction north. Then *just*
as the doughnuts are about to separate into small squares, boost right then
bear left towards the north corner of the arm. Hopefully you'll hit the edge
of the furthest of the two small squares that are about to arrive there, pick
up the banana on the next small square and bounce towards the next L-shaped
platform.
Try to circle anticlockwise, picking up the banana bunch and single banana on
the extreme right of your curve. Here's the killer bit - keep going at full
speed and try to do a similar bounce to get to the goal platform, picking up
the banana on one of the small squares on the way. The small squares are
moving away from the L-shapes now, so you'll encounter all sorts of different
possible bounces.
Obviously you want as low a bounce as possible, breaking the ribbon at full
speed.
I want the record!
First of all, your score on this level should be at least 11700. Now how is the WR strat different from the "good score" strat? I don't wait at the start, instead I roll back into the corner of where you start. The camera will screw you up majorly, but there are ways of preventing that, I just forgot how it works:). I'm sure you'll be fine. Anyway, face north-east, i.e. look at the banana bunch that is straight ahead.
Charge straight along the right side of the platform, then hold up-left and try to go directly over the north-west (probably the north corner in the sense Patch defined) corner here to crash into the side of one of the platforms at hight speed. The idea is to hit the side of the platform very shortly after it has begun to split, i.e. reach stage 3. Often you'll hit the side and fall down. If you're lucky, you'll get over to the bunch and then you need to get some fancy bounces to the goal. I think I again try to roll along the right side of the platform and then hit the side of a platform hard. In any case, 11900 is not overly hard IMO, and the current WR is not as good as sdkess' 11890 on the left side anyway.
Current Record: 11960
Finish: 53.30
Bananas: 13
Difficulty rating for 11850:
4/5
Back
<--