|
Flashing DCT3 and tools
WARNING: Before upgrading always create FUBU (Full Backup) of your phone. Not just partial flash.
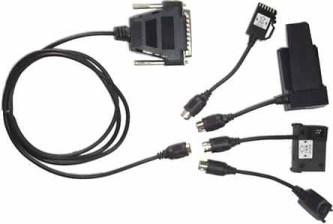
|
Image above
of Standard DCT3 Flash Cable Set
with connectors for 3210, 8210,
33XX, 51XX
Extra Connectors are widely available.
You
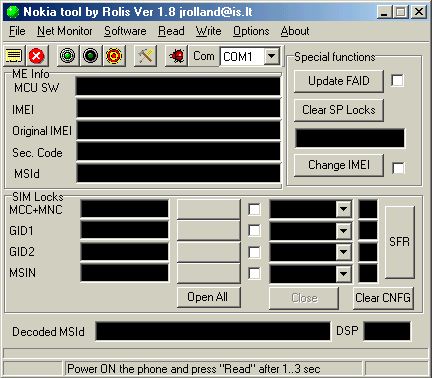
Will also need an mbus compatible datacable for setting the FAID
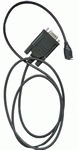
after flashing. If you have the set above then the Data Base Cable
is what you need (pictured below)
In order to upgrade (or downgrade) your phone's software, you will need:
a flasher cable,
flashing software,
an MBUS cable and
FAID (Flash Authority Identification
Data) calculation software.
You will need the latest version of firmware for
your model of handset,which come in the form of
MCU+PPM,
available for download here: http://www.handy-flashpage.tk/. It is
best to combine the two flashes into a single flash file using nasNFcon,which
should be slightly smaller than the full size of the flash,
so as not to erase
EEPROM data.
MCU
(Master Control Unit) - contains main operating software
PPM
(Post Programmable Memory) - contains languages,
dictionaries, menus, ringtones, etc.
EEPROM
(Electronically Erasable and Programmable Read Only Memory)
- contains phone specific information
Recommended software - The following
instructions are provided for upgrading using Rolis Flasher and
NokTool1.8.
Instructions:
Ensure the phone's battery is well charged.
Plug the flasher cable into LPT (printer, 25 pin)
port
Ensure the phone is switched OFF.
Remove the SIM from the phone, replacing the battery
if removal was necessary.
Plug the cable into the phone, ensuring the phone is
switched off.
Run Rolis Flasher.

Select the model of the phone from the drop-down
menu.
Select "Read" from the "Flash" menu,
press CTRL+R or click on the green button (
,7th
from left) on the toolbar.
Press the power button of the phone briefly when
prompted (plugging the charger in will also have
the same result). The backup process will start and
will take several minutes to complete.
Select the location and filename to save the
backup.
Ensure the phone's battery is well charged.
Plug the flasher cable into LPT (printer, 25 pin)
port.
Ensure the phone is switched OFF.
Remove the SIM from the phone, replacing the battery
if removal was necessary.
Connect the flasher cable to the phone, ensuring the
phone is switched off.
Run Rolis Flasher.

Select the model of the phone from
the drop-down menu.
Select "Write" from the "Flash" menu,
press CTRL+W or click on the red button (
, 9th from left) on the
toolbar.
Select the correct flash file using the
file selection dialog box.
After entering the correct start start
address determined from the table, select "OK" in the dialog
box that appears.

| Model | Version | MCU | PPM | EEPROM/PMM |
| 3210 | All | 0x200000 | 0x2F0000 | External |
| 3310 | <=v04.02 other >=v05.47 |
0x200000 0x200000 0x200000 |
0x320000 0x330000 0x340000 |
0x3D0000 0x3D0000 0x3D0000 |
| 3315 | All | 0x200000 | 0x340000 | 0x3D0000 |
| 3330 | All | 0x200000 | 0x490000 | 0x550000 |
| 3410 | All | 0x200000 | 0x570000 | |
| 5110 | All | 0x200000 | 0x2B0000 | External |
| 5130 | All | 0x200000 | 0x2C0000 | External |
| 5210 | All | 0x200000 | 0x490000 | 0x580000 |
| 5510 | All | 0x200000 | 0x490000 | 0x550000 |
| 6110 | All | 0x200000 | 0x2C0000 | External |
| 6130 | All | 0x200000 | 0x2C0000 | External |
| 6150 | All | 0x200000 | 0x360000 | External |
| 6210 | All | 0x200000 | 0x520000 | 0x5A0000 |
| 6250 | All | 0x200000 | 0x530000 | 0x5A0000 |
| 7110 | All | 0x200000 | 0x510000 | 0x590000 |
| 8210 | All | 0x200000 | 0x340000 | 0x3D0000 |
| 8250 | All | 0x200000 | 0x340000 | 0x3D0000 |
| 8850 | All | 0x200000 | 0x340000 | 0x3D0000 |
For combined flashes, use the start address listed for the first part of the file.
Press the power button of the phone briefly when
prompted (plugging the charger in will also have the same
result).
The flash erase process will start and flash writing
will commence immediately afterwards.
This will take several minutes to complete.
Repeat steps 8 to 11 for the PPM if not combined into
a single flash.
Disconnect the flasher cable from the phone.
Insert the SIM card.
Plug the MBUS cable into an available COM (serial,
9pin) port.
Power on the phone.
Connect the MBUS cable to the phone.
Run NokTool1.8.

Select the correct MBUS COM port from the
drop menu at the top of the user interface.
Click the Read button
.
Click the "Update FAID" Button.
Click the "SFR" button.
Restart the phone. (you are
done)
|
|
Internet Explorer 6 or above recommended and macromedia flash 6 plugin for best result © 2001 - 2004 SmaRkieS Interactive For comments and suggestions email to [email protected] |
|