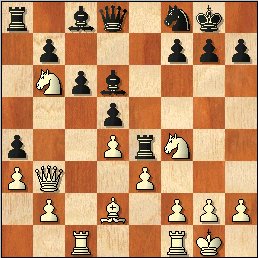
1.d4 d5 2.c4 e6 3.Nc3 Bb4 4.e3 Nf6 5.Nge2 0-0 6.a3 Be7 7.Nf4 a5 The first "different" move, changing the character of the game somewhat. Now that white will be unable to get in the thematic b4, with a pleasant space advantage to counter blacks dynamism, he must go about attacking the structural weaknesses in the black position that this move brings about. It nearly comes about, but black seems able to cope - in fact, it is hard to pinpoint exactly what goes wrong for white in this game. 8.Bd2 c6 9.Rc1 Nbd7 10.cxd5 exd5 11.Bd3 Re8 12.0-0 Nf8 13.Na4 Maybe this is the start of a faulty plan, although it seems quite natural to hit the b6-square after it has been weakened. It just doesn't seem fast enough, and the de-centralising of white's pieces brings about repurcussions in the centre when his queenside play is about to reach it's peak. 13...Bd6 14.Qb3 Although this is the sort of pressure white would hope to exert following a move like ...a5, black appears to have enough time to achieve a good position by giving up the a-pawn, as the tactics all appear to work for him. 14...Ne4 I'm not particularly sure where I think white should improve, but maybe this move points the way - hitting the bishop on d2 gives blacks central operations more weight. Maybe ommiting the moves Bd2 and Rc1 in favour of a quicker attack on the queenside is an idea. 15.Bxe4 Unless white wants to stunt his play with 15.Qc2, this is pretty much forced. 15...Rxe4 Another way of playing it was 15...dxe4 16.Nb6 a4 17.Nxa4 Bxf4 18.exf4 Ne6, when I prefer black. 16.Nb6 a4 Diagram