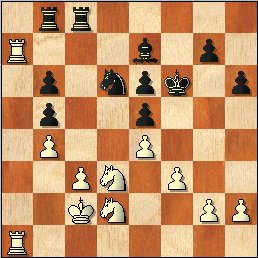
1.d4 d6 2.e4 e5?! No matter how desperate you might be to exchange queens against a stronger player, ruining your position to do so is not worth it. 3.dxe5 dxe5 4.Qxd8+ Kxd8 5.Bc4 Be6 5...f6 was playable but similarly uninspiring. 6.Bxe6 fxe6 7.Be3 Nf6 8.f3 Bd6 9.Nd2 Nc6 10.c3 Ke7 11.Nh3 h6 12.Nf2 Greet calmly positions his pieces on their optimum squares, all the while blunting the effectiveness of the doubled pawns with moves like c3 and f3. 12...Nd7 13.Nd3 Kf7 14.Ke2 a6 15.a4 b5?! Admittedly white is probably going to open the a-file eventually, but there is no need to give him the oppurtunity to let him do so whenever it most suits him. 16.b4 Now white can improve his position still further, and open the file for his rooks when every piece is as well placed as possible. 16...Rhb8 17.Ra2 Rc8 18.Rha1 Rab8 Oliver is having to resort to shuffling his rooks around. This is where his problem lies - it is not so much that is position is particularly bad, but more that he has absolutely no counterplay to distract white. 19.Nb3 Nd8 20.axb5 Now Greet has got everything where he wants it, the breakthrough finally comes. 20...axb5 21.Ra7 Nb6 22.Bc5 Kf6 23.Bxb6 cxb6 Another set of double pawns is created as an attempt at counterplay down the c-file, and to prevent the intrusion of a white knight to c5, but once these factors have been addressed white will once again be able to home in on these glaring weaknesses. 24.Kd2 Nb7 (=) A rather optimistic draw offer. 25.Kc2 Be7 26.Nd2 Nd6? Diagram